JeepParts
My Garage
My Account
Cart
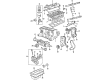
OEM 2000 Chrysler Cirrus Crankshaft Seal
- Select Vehicle by Model
- Select Vehicle by VIN
Select Vehicle by Model
orMake
Model
Year
Select Vehicle by VIN
For the most accurate results, select vehicle by your VIN (Vehicle Identification Number).
5 Crankshaft Seals found


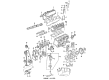
2000 Chrysler Cirrus Rear Main Seal Part Number: 4621939AB
$27.24 MSRP: $40.20You Save: $12.96 (33%)Ships in 1-2 Business DaysProduct Specifications- Other Name: Seal - Rear Main Crankshaft; Engine Crankshaft Seal, Rear; Rear Seal; Seal Rear Main Crankshaft Serviced With Retainer [04663625]; Crankshaft Seal
- Position: Rear
- Item Weight: 0.50 Pounds
- Item Dimensions: 0.7 x 4.6 x 4.8 inches
- Condition: New
- Fitment Type: Direct Replacement
- SKU: 4621939AB
- Warranty: This genuine part is guaranteed by Mopar's factory warranty.

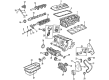
2000 Chrysler Cirrus Timing Cover Gasket Part Number: 4667341AB
$6.94 MSRP: $28.05You Save: $21.11 (76%)Ships in 1-2 Business DaysProduct Specifications- Other Name: Seal - Timing Belt Cover; Timing Cover Seal; Front Cover Gasket; Seal
- Item Weight: 0.40 Pounds
- Item Dimensions: 5.5 x 5.2 x 0.7 inches
- Condition: New
- Fitment Type: Direct Replacement
- SKU: 4667341AB
- Warranty: This genuine part is guaranteed by Mopar's factory warranty.


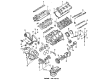
2000 Chrysler Cirrus Rear Main Seal Part Number: MD372251
Product Specifications- Other Name: Seal - Crankshaft Oil; Seal Crankshaft Oil Rear
- Item Weight: 0.50 Pounds
- Item Dimensions: 4.5 x 4.4 x 0.3 inches
- Condition: New
- Fitment Type: Direct Replacement
- SKU: MD372251
- Warranty: This genuine part is guaranteed by Mopar's factory warranty.


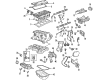
2000 Chrysler Cirrus Front Crank Seal Part Number: 4667198
$16.24 MSRP: $23.35You Save: $7.11 (31%)Product Specifications- Other Name: Seal - Front Main Crankshaft; Engine Crankshaft Seal, Front; Timing Cover Gasket; Timing Cover Seal; Front Seal; Crankshaft Front Oil Seal; Engine Crankshaft Seal.
- Position: Front
- Item Weight: 0.40 Pounds
- Item Dimensions: 0.6 x 2.0 x 2.0 inches
- Condition: New
- Fitment Type: Direct Replacement
- SKU: 4667198
- Warranty: This genuine part is guaranteed by Mopar's factory warranty.

2000 Chrysler Cirrus Timing Cover Gasket Part Number: 4667340AB
Product Specifications- Other Name: Seal - Timing Belt Cover; Engine Timing Cover Gasket; Timing Cover Seal; Front Cover Gasket; Inner Gasket; Seal
- Replaces: 4667340
- Item Weight: 0.40 Pounds
- Item Dimensions: 3.2 x 2.4 x 0.7 inches
- Condition: New
- Fitment Type: Direct Replacement
- SKU: 4667340AB
- Warranty: This genuine part is guaranteed by Mopar's factory warranty.
2000 Chrysler Cirrus Crankshaft Seal Parts and Q&A
- Q: How to Service and Repair a Crankshaft Seal on 2000 Chrysler Cirrus?A: Prior to working on the crankshaft main bearing seal, take off the transaxle and the flex plate. Connect the dust lip with the crankshaft using a 3/16 flat bladed screwdriver to pry out the crankshaft seal, keeping the blade away from its face, though it should contact the chamfer where the two pieces meet. If the crankshaft has any rough spots, use 400 grit sandpaper to tidy them up so the new seal won't be damaged when fitted. Hold Special Tool 6926-1 Seal Guide to the crankshaft and set the seal over the guide, with the lip of the seal closest to the crankcase. Be careful not to force the seal independently into the housing past flush, as oil could start to seep out. Insert Special Tool 6926-2 into the seal center and use C-4171 until you feel the tool fully engage with the block. When that is done, reinstall the flex plate, securing the bolts with Mopar Lock & Seal Adhesive and tightening each to 95 Nm (70 ft. lbs.). After that, place the transaxle back on the car.
Related 2000 Chrysler Cirrus Parts
 2000 Chrysler Cirrus Crankshaft
 2000 Chrysler Cirrus Crankshaft Pulley
 2000 Chrysler Cirrus Crankshaft Thrust Washer Set
 2000 Chrysler Cirrus Crankshaft Timing Gear
 2000 Chrysler Cirrus Cylinder Head Gasket
 2000 Chrysler Cirrus Dipstick Tube
 2000 Chrysler Cirrus Intake Valve
 2000 Chrysler Cirrus Oil Pan
 2000 Chrysler Cirrus Oil Pan Gasket
 2000 Chrysler Cirrus Timing Belt Tensioner
 2000 Chrysler Cirrus Timing Cover Gasket
 2000 Chrysler Cirrus Transmission Mount