JeepParts
My Garage
My Account
Cart
OEM 2000 Dodge Caravan Window Motor
Window Lift Motor- Select Vehicle by Model
- Select Vehicle by VIN
Select Vehicle by Model
orMake
Model
Year
Select Vehicle by VIN
For the most accurate results, select vehicle by your VIN (Vehicle Identification Number).
4 Window Motors found

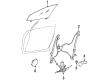
2000 Dodge Caravan Window Regulator, Front Part Number: 68037296AA
$195.08 MSRP: $342.00You Save: $146.92 (43%)Product Specifications- Other Name: Regulator Assembly - Front Door Window; Power Window Motor; Window Motor; Motor; Regulator
- Position: Front
- Replaces: 4675586AB, 4675586AC, 4796318AB
- Item Weight: 6.00 Pounds
- Item Dimensions: 26.6 x 14.4 x 3.5 inches
- Condition: New
- Fitment Type: Direct Replacement
- SKU: 68037296AA
- Warranty: This genuine part is guaranteed by Mopar's factory warranty.
2000 Dodge Caravan Window Regulator, Front Part Number: 68037297AA
$233.27 MSRP: $480.00You Save: $246.73 (52%)Ships in 1-2 Business DaysProduct Specifications- Other Name: Regulator Assembly - Front Door Window; Power Window Motor; Window Motor; Motor; Regulator
- Position: Front
- Replaces: 4675587AC, 4675587AB, 4796319AB
- Item Weight: 5.80 Pounds
- Item Dimensions: 26.1 x 14.3 x 4.0 inches
- Condition: New
- Fitment Type: Direct Replacement
- SKU: 68037297AA
- Warranty: This genuine part is guaranteed by Mopar's factory warranty.


2000 Dodge Caravan Window Motor Part Number: 4874115
Product Specifications- Other Name: Motor - Window Regulator; Motor, Rear Quarter Window, Right; Motor Window Regulator
- Item Weight: 1.00 Pounds
- Item Dimensions: 6.8 x 3.8 x 3.2 inches
- Condition: New
- Fitment Type: Direct Replacement
- SKU: 4874115
- Warranty: This genuine part is guaranteed by Mopar's factory warranty.


2000 Dodge Caravan Window Motor Part Number: 4874114
Product Specifications- Other Name: Motor - Window Regulator; Motor, Rear Quarter Window, Right; Motor Window Regulator
- Item Weight: 1.30 Pounds
- Item Dimensions: 7.4 x 4.2 x 3.0 inches
- Condition: New
- Fitment Type: Direct Replacement
- SKU: 4874114
- Warranty: This genuine part is guaranteed by Mopar's factory warranty.
2000 Dodge Caravan Window Motor Parts and Q&A
- Q: How to Service a Window Motor on 2000 Dodge Caravan?A: To begin working on the quarter window motor, first cut the negative cable from the battery and then open the panel above the door. After that, unplug the wire connector from the power vent motor and take out the nut connecting the crank to the vent glass. Once removed, get rid of the bolts holding the power vent motor on the D-pillar and remove the motor, pulling the crank off it next. Before installing, make sure the motor is placed in its open position and attach the crank hinge so that it points back to the motor in its extended position. Undo the removal actions and everything will be complete.
Related 2000 Dodge Caravan Parts
 2000 Dodge Caravan Ignition Switch
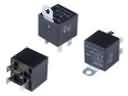 2000 Dodge Caravan Fuel Pump Relay
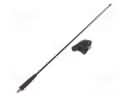 2000 Dodge Caravan Antenna
 2000 Dodge Caravan Clock Spring
 2000 Dodge Caravan Headlight Switch
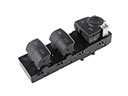 2000 Dodge Caravan Power Window Switch
 2000 Dodge Caravan Relay
 2000 Dodge Caravan Air Bag
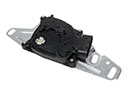 2000 Dodge Caravan Automatic Transmission Shift Position Sensor Switch
 2000 Dodge Caravan Back Up Light Switch
 2000 Dodge Caravan Mirror Switch
 2000 Dodge Caravan Transmitter