JeepParts
My Garage
My Account
Cart
OEM 2004 Chrysler Pacifica Weather Strip
Door Weatherstripping- Select Vehicle by Model
- Select Vehicle by VIN
Select Vehicle by Model
orMake
Model
Year
Select Vehicle by VIN
For the most accurate results, select vehicle by your VIN (Vehicle Identification Number).
18 Weather Strips found


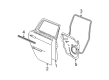
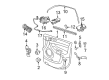
2004 Chrysler Pacifica Door Weatherstrip, Rear Driver Side Part Number: 5054119AG
$79.32 MSRP: $87.60You Save: $8.28 (10%)Ships in 1-2 Business DaysProduct Specifications- Other Name: Weather Strip - Rear Door Belt; Door Seal, Rear Left; Weatherstrip; Belt Weatherstrip; Weatherstrip Rear Door Belt Outer; Weatherstrip Rear Door Belt; Door Seal
- Position: Rear Driver Side
- Replaces: 5054119AE, 5054119AB, 5054119AD, 5054119AC, 5054119AF
- Item Weight: 1.30 Pounds
- Condition: New
- Fitment Type: Direct Replacement
- SKU: 5054119AG
- Warranty: This genuine part is guaranteed by Mopar's factory warranty.


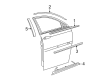
2004 Chrysler Pacifica Belt Weatherstrip, Front Passenger Side Part Number: 5054116AH
$78.85 MSRP: $87.10You Save: $8.25 (10%)Ships in 1-2 Business DaysProduct Specifications- Other Name: Weather Strip - Front Door Belt; Door Window Belt Weatherstrip, Front Right; Weatherstrip Front Door Belt Outer; Weatherstrip, Front Door Belt
- Position: Front Passenger Side
- Replaces: 5054116AF, 5054116AB, 5054116AG, 5054116AD, 5054116AC, 5054116AE
- Item Weight: 4.70 Pounds
- Item Dimensions: 49.4 x 8.2 x 8.3 inches
- Condition: New
- Fitment Type: Direct Replacement
- SKU: 5054116AH
- Warranty: This genuine part is guaranteed by Mopar's factory warranty.


2004 Chrysler Pacifica Body Weatherstrip, Front Part Number: WT93XXXAC
$61.75 MSRP: $76.35You Save: $14.60 (20%)Ships in 1-2 Business DaysProduct Specifications- Other Name: Weather Strip - Front Door Body Mounted; Door Seal, Front; Weatherstrip Front Door Body Mounted; Door Seal
- Position: Front
- Replaces: WT93XXXAB
- Item Weight: 2.90 Pounds
- Item Dimensions: 20.4 x 17.2 x 2.1 inches
- Condition: New
- Fitment Type: Direct Replacement
- SKU: WT93XXXAC
- Warranty: This genuine part is guaranteed by Mopar's factory warranty.

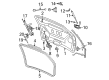
2004 Chrysler Pacifica Upper Seal, Rear Part Number: 5054704AC
$40.98 MSRP: $58.75You Save: $17.77 (31%)Ships in 1-2 Business DaysProduct Specifications- Other Name: Weather Strip - Liftgate Opening; Hatch Seal, Rear Upper; Liftgate Seal, Upper; Weatherstrip; Upper Weatherstrip; Weatherstrip Liftgate Opening
- Position: Rear Upper
- Item Weight: 0.50 Pounds
- Condition: New
- Fitment Type: Direct Replacement
- SKU: 5054704AC
- Warranty: This genuine part is guaranteed by Mopar's factory warranty.

2004 Chrysler Pacifica Belt Weatherstrip, Front Driver Side Part Number: 4894475AE
$35.56 MSRP: $51.00You Save: $15.44 (31%)Ships in 1-2 Business DaysProduct Specifications- Other Name: Weather Strip - Front Door Belt; Door Window Belt Weatherstrip, Front Left; Door Seal; Weatherstrip Front Door Belt Inner; Weatherstrip
- Position: Front Driver Side
- Replaces: 4894475AB, 4894475AD, 5054433AA
- Item Weight: 1.00 Pounds
- Condition: New
- Fitment Type: Direct Replacement
- SKU: 4894475AE
- Warranty: This genuine part is guaranteed by Mopar's factory warranty.

2004 Chrysler Pacifica Weatherstrip, Rear Part Number: 4894304AC
$48.27 MSRP: $92.30You Save: $44.03 (48%)Ships in 1-2 Business DaysProduct Specifications- Other Name: Weather Strip - Rear Door Mounted; Door Seal; Weatherstrip Rear Door Mounted
- Position: Rear
- Replaces: 4894304AB
- Item Weight: 1.50 Pounds
- Item Dimensions: 56.2 x 31.9 x 2.3 inches
- Condition: New
- Fitment Type: Direct Replacement
- SKU: 4894304AC
- Warranty: This genuine part is guaranteed by Mopar's factory warranty.

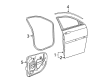
2004 Chrysler Pacifica Door Weatherstrip, Front Passenger Side Part Number: 4894298AC
$45.60 MSRP: $87.20You Save: $41.60 (48%)Ships in 1-2 Business DaysProduct Specifications- Other Name: Weather Strip - Front Door Mounted; Door Seal, Front Right; Weatherstrip; Weatherstrip Front Door Mounted; Door Seal
- Position: Front Passenger Side
- Item Weight: 1.20 Pounds
- Condition: New
- Fitment Type: Direct Replacement
- SKU: 4894298AC
- Warranty: This genuine part is guaranteed by Mopar's factory warranty.

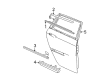
2004 Chrysler Pacifica Door Weatherstrip, Rear Passenger Side Part Number: 5054118AH
$78.11 MSRP: $99.00You Save: $20.89 (22%)Ships in 1-2 Business DaysProduct Specifications- Other Name: Weather Strip - Rear Door Belt; Door Seal, Rear Right; Weatherstrip; Door Seal; Belt Weatherstrip
- Position: Rear Passenger Side
- Replaces: 5054118AE, 5054118AC, 5054118AF, 5054118AD, 5054118AG, 5054118AB
- Item Weight: 4.70 Pounds
- Item Dimensions: 50.9 x 8.3 x 8.2 inches
- Condition: New
- Fitment Type: Direct Replacement
- SKU: 5054118AH
- Warranty: This genuine part is guaranteed by Mopar's factory warranty.

2004 Chrysler Pacifica Body Weatherstrip, Rear Part Number: WT91XXXAC
$78.01Ships in 1-2 Business DaysProduct Specifications- Other Name: Weather Strip - Rear Door Body Mounted; Door Seal, Rear; Weatherstrip; Weatherstrip Rear Door Body Mounted; Door Seal
- Position: Rear
- Replaces: WT91XXXAB
- Item Weight: 3.10 Pounds
- Item Dimensions: 149.1 x 2.1 x 1.1 inches
- Condition: New
- Fitment Type: Direct Replacement
- SKU: WT91XXXAC
- Warranty: This genuine part is guaranteed by Mopar's factory warranty.
 Product Specifications
- Other Name: Weather Strip - Front Door Mounted; Door Seal, Front Left; Weatherstrip; Weatherstrip Front Door Mounted; Door Seal
- Position: Front Driver Side
- Item Weight: 1.70 Pounds
- Item Dimensions: 51.5 x 37.1 x 1.5 inches
- Condition: New
- Fitment Type: Direct Replacement
- SKU: 4894299AC
- Warranty: This genuine part is guaranteed by Mopar's factory warranty.
2004 Chrysler Pacifica Weatherstrip, Rear Part Number: 4894305AC
Product Specifications- Other Name: Weather Strip - Rear Door Mounted; Door Seal; Weatherstrip Rear Door Mounted
- Position: Rear
- Replaces: 4894305AB
- Item Weight: 1.20 Pounds
- Item Dimensions: 12.4 x 12.2 x 2.2 inches
- Condition: New
- Fitment Type: Direct Replacement
- SKU: 4894305AC
- Warranty: This genuine part is guaranteed by Mopar's factory warranty.
 Product Specifications
- Other Name: Weather Strip - Liftgate Opening; Hatch Seal, Rear; Weatherstrip; Weatherstrip Liftgate Opening
- Position: Rear
- Replaces: 5054703AD, 5054703AB
- Item Weight: 4.70 Pounds
- Item Dimensions: 20.5 x 19.6 x 2.4 inches
- Condition: New
- Fitment Type: Direct Replacement
- SKU: 5054703AC
- Warranty: This genuine part is guaranteed by Mopar's factory warranty.
- Product Specifications
- Other Name: Weather Strip - Front Door Belt; Door Window Belt Weatherstrip, Front Left; Weatherstrip Front Door Belt Outer; Weatherstrip, Front Door Belt
- Position: Front Driver Side
- Replaces: 5054117AC, 5054117AE, 5054117AG, 5054117AB, 5054117AF, 5054117AD
- Item Weight: 1.20 Pounds
- Condition: New
- Fitment Type: Direct Replacement
- SKU: 5054117AH
- Warranty: This genuine part is guaranteed by Mopar's factory warranty.

 Product Specifications
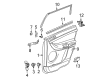
- Other Name: Weather Strip - Rear Door Belt; Door Seal, Rear Right Lower; Weatherstrip; Weatherstrip Rear Door Belt Inner
- Position: Rear Lower Passenger Side
- Replaces: 4894476AE, 4894476AC, 5054444AA, 4894476AB
- Item Weight: 1.20 Pounds
- Condition: New
- Fitment Type: Direct Replacement
- SKU: 4894476AF
- Warranty: This genuine part is guaranteed by Mopar's factory warranty.
- Product Specifications
- Other Name: Weather Strip - Front Door Belt; Door Window Belt Weatherstrip, Front Right; Door Seal; Weatherstrip Front Door Belt Inner; Weatherstrip
- Position: Front Passenger Side
- Replaces: 4894474AD, 4894474AB, 5054434AA
- Item Weight: 1.00 Pounds
- Condition: New
- Fitment Type: Direct Replacement
- SKU: 4894474AE
- Warranty: This genuine part is guaranteed by Mopar's factory warranty.
- Product Specifications
- Other Name: Weather Strip - Rear Door Belt; Door Seal, Rear Left Lower; Weatherstrip; Weatherstrip Rear Door Belt Inner
- Position: Rear Lower Driver Side
- Replaces: 4894477AC, 4894477AB, 4894477AE
- Item Weight: 1.20 Pounds
- Condition: New
- Fitment Type: Direct Replacement
- SKU: 4894477AF
- Warranty: This genuine part is guaranteed by Mopar's factory warranty.


2004 Chrysler Pacifica Front Weatherstrip Part Number: 4894390AC
Product Specifications- Other Name: Weather Strip - Front Door Sill Secondary; Rocker Panel Molding Seal, Front; Weatherstrip Front Door Sill Secondary
- Position: Front
- Replaces: 4894390AB
- Item Weight: 0.80 Pounds
- Condition: New
- Fitment Type: Direct Replacement
- SKU: 4894390AC
- Warranty: This genuine part is guaranteed by Mopar's factory warranty.
 Product Specifications
- Other Name: Weather Strip - Rear Door Sill Secondary; Rocker Panel Molding Seal, Rear, Rear Right; Weatherstrip Rear Door Sill Secondary Inner; Weatherstrip Rear Door Sill Secondary
- Position: Rear Passenger Side
- Replaces: 5054236AA, 5054107AB
- Item Weight: 0.60 Pounds
- Condition: New
- Fitment Type: Direct Replacement
- SKU: 5054236AB
- Warranty: This genuine part is guaranteed by Mopar's factory warranty.
2004 Chrysler Pacifica Weather Strip Parts and Q&A
- Q: How to Maintain the Weather Strip on a Liftgate Opening on 2004 Chrysler Pacifica?A: The first step to servicing the weather strip for your liftgate opening is to remove the liftgate sill scuff plate after opening the door. Then, get the liftgate door weather strip out of the fence and pull it off the end of the liftgate. Put the non-plug end of the weather strip at the bottom of the liftgate opening, to the left center and line it with the second slot on the left side of the striker hole for installation. weather strip the left side of the doorframe by placing it against the lower and top edges of the left fence flange, turning it from the left to the right. Place the dot on the inner part of the weather strip against the far upper corner of the liftgate opening, but do not attach the two corners. Stretch the weather strip down the right side, securing it in the two corners and then attach it to the liftgate at the top between the two upper corners. Firmly join the two ends of the weather strip and make sure they sit properly. After that, reinstall the liftgate sill scuff plate and close the liftgate door.
Related 2004 Chrysler Pacifica Parts
 2004 Chrysler Pacifica Emblem
 2004 Chrysler Pacifica Sun Visor
 2004 Chrysler Pacifica Armrest
 2004 Chrysler Pacifica Center Console Base
 2004 Chrysler Pacifica Door Moldings
 2004 Chrysler Pacifica Door Seal