JeepParts
My Garage
My Account
Cart
OEM Dodge Dart Dome Light
Interior Dome Light- Select Vehicle by Model
- Select Vehicle by VIN
Select Vehicle by Model
orMake
Model
Year
Select Vehicle by VIN
For the most accurate results, select vehicle by your VIN (Vehicle Identification Number).
9 Dome Lights found


Dodge Dart Dome Lamp Assembly, Beige/Black Part Number: 5MW35HDAAC
$72.14 MSRP: $109.00You Save: $36.86 (34%)Ships in 1-2 Business DaysDodge Dart Dome Lamp Assembly, Beige Part Number: 1TP73HDAAD
$50.80 MSRP: $96.20You Save: $45.40 (48%)Ships in 1-2 Business Days
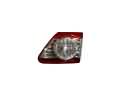
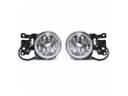
Dodge Dart Front Lamp Assembly Part Number: 5MW40HDAAB
$270.79 MSRP: $399.00You Save: $128.21 (33%)Ships in 1-3 Business DaysDodge Dart Front Lamp Assembly, Beige Part Number: 5MW39HDAAB
$336.50 MSRP: $495.00You Save: $158.50 (33%)Ships in 1-3 Business DaysDodge Dart Dome Lamp Assembly, Gray Part Number: 1TP73DX9AD
$64.68 MSRP: $90.50You Save: $25.82 (29%)Ships in 1-2 Business DaysDodge Dart Front Lamp Assembly Part Number: 5MW36HDAAB
$237.96 MSRP: $260.00You Save: $22.04 (9%)Ships in 1-2 Business Days
Dodge Dart Dome Lamp Assembly, Black/Gray Part Number: 5MW35DX9AC
$73.42 MSRP: $109.00You Save: $35.58 (33%)Dodge Dart Front Lamp Assembly, Beige Part Number: 5MW38HDAAB
Dodge Dart Front Lamp Assembly, Black/Gray Part Number: 5MW38JXPAB
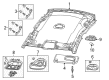
Dodge Dart Dome Light
Choose OEM Dome Light that meet Dodge factory standards. Dodge designs and tests every component for precision and durability. Each Dome Light follows strict manufacturing steps to lock in quality and fit. If your Dodge Dart matters to you, OEM parts make the smart choice. You'll get the exact look, feel, and performance you expect. Shop genuine Dart parts at the highly competitive prices online. Enjoy a manufacturer's warranty, a hassle-free return policy, and rapid delivery. No more guesswork with off brands. Get genuine parts with exact fit and true factory performance. Shop with confidence today at JeepPartsDeal.com.
Dodge Dart Dome Light will provide a practical touch to an already recognized car that combines fashion with intelligent design. The Dodge Dart was also commended because of its nimble handling, well-laid-out wheelbase and the availability of both manual and automatic gearboxes that appeal to drivers who like to be in control and have an efficient car. Critics point to the contemporary Dart cabin where digital gauges and supportive seats allow daily usage to be entertaining, and five trim levels allow owners to make the ideal choice between cost-effectiveness and sportiness. Authentic Dodge components maintain a smooth operation of the Dart and ensure the factory quality, which is valued by long-time fans in the process of restoring vintage editions or keeping the new generation. The Dome Light is located in this cabin on the ceiling, which illuminates the inside softly when the door opens so that everyone can find seat belts, phones or fallen items without having to feel their way in the darkness. The Dodge Dart Dome Light is fitted on door switches and a basic manual button and it also dims after entry to allow the occupants to become accustomed to night vision without any problems and an LED upgrade can provide even more bright, but cooler light. Durable housings and matching connectors make the Dome Light as reliable as all Dodge parts, making it secure during night time stops. To change Dome Light, unscrew the battery, snap off the lens, unscrew the old unit, fit the new harness, screw the case back, reconnect the lens and re-attached power and test.