JeepParts
My Garage
My Account
Cart
OEM 2000 Dodge Avenger Rack And Pinion
Steering Rack And Pinion- Select Vehicle by Model
- Select Vehicle by VIN
Select Vehicle by Model
orMake
Model
Year
Select Vehicle by VIN
For the most accurate results, select vehicle by your VIN (Vehicle Identification Number).
1 Rack And Pinion found

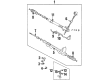
2000 Dodge Avenger Steering Gear Part Number: MB910690
Product Specifications- Other Name: Gear; Gear Assembly; Gear, W/Linkage, Power Steering; Gear Power Steering
- Item Weight: 24.20 Pounds
- Condition: New
- Fitment Type: Direct Replacement
- SKU: MB910690
- Warranty: This genuine part is guaranteed by Mopar's factory warranty.
2000 Dodge Avenger Rack And Pinion Parts and Q&A
- Q: How to Service and Repair a Rack and Pinion Steering System on 2000 Dodge Avenger?A: Your first step in servicing the rack and pinion should be to unfasten the rack's tie rod with a chisel and pry off the tab washer. To remove the pinion, use a special tool to take out the rack support cover from the gear box and then gently tap the pinion with a plastic hammer. Remove the seal ring slowly so you won't harm the pinion and valve assembly, the rack or the oil seal and ball bearing. To remove a circlip, rotate the rack stopper clockwise until it juts out and afterwards, rotate counterclockwise to take it out. Slowly take the rack out as you also take off the rack stopper and bushing. Bend the oil seal a little to take it out of the rack bushing so as not to damage the press fitting. Use a brass bar or special tool to pull the ball bearing from the gear housing and get the needle roller bearing out of the rack housing with the same kind of tool, avoiding an overstretched tip. To access inside the gear housing, use a plastic pipe or similar device, always taking care not to harm the inner area of the rack cylinder. Applying a layer of Mopar Atf Plus (Automatic transmission fluid type 7176)/Automatic transmission Fluid "Dexron Ii" around the outside of the oil seal should be done before putting the back up washer and oil seal into the rack housing together. Use the same approved fluid on the press fitting surface of the housing, then fitting the needle roller bearing. In addition to the ball bearing, add the proper fluid and press into the valve housing. After applying the right fluid to the oil seal and D-ring, press fit the oil seal so it touches the end of the rack bushing. Rub the Multi-mileage Lubricant Part No. 2525035 or equivalent grease onto the rack teeth face and do not grease the vent hole. Next, put the rack serrations under a special tool and apply the required fluid. Help the rack end by wrapping it with plastic tape, using the right fluid and adding the rack bushing and rack stopper, so the oil seal retainer spring doesn't move. Put the circlip into the rack stopper hole as you turn the rack stopper counterclockwise. Install the oil seal by coating it with the proper fluid, using tools to press it into the valve housing, making the upper edge come out about 1 mm (0.04 inch) further than the edge of the housing. Seal the threaded section on the end plug with 3M Aad Part No. 8663 or equal sealant and attach it to the air tank twice by punching. Place the rack at its center, close the rack support cover to 15 Nm (11 ft. lbs.), rotate the pinion shaft towards you and measure the total pinion torque to check it falls between 0.7 - 1.4 Nm (6 - 12 inch lbs.). After making the connection, lock the rack support cover with a lock nut and bolt the tie rod to the rack, then bend both ends of the washer tab to secure it. For installing a bellows band, hold it in place, tighten it using pliers and using a plastic hammer, bend up the convex portion. Screw the tie rod end into place and finish by attaching and locking a lock nut. Search for bends or damage to the rack, examine the oil seal surfaces against the tooth, check the pinion gear tooth surfaces for signs of wear and notice any signs of bending. Let the bearings turn quietly and without hiccups and inspect your needle roller bearings for signs of slipped rollers. Also, examine any damage on the rack support, look down the inside of the rack housing and inspect the boots on the rack for any problems. Should the dust cover be damaged, remove it, apply multipurpose grease to fill the inside, put sealant on the lip and place it back on after using a special tool. After doing this, check for cracks or damage.
Related 2000 Dodge Avenger Parts
 2000 Dodge Avenger Power Steering Hose
 2000 Dodge Avenger Power Steering Reservoir
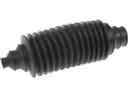 2000 Dodge Avenger Rack and Pinion Boot
 2000 Dodge Avenger Steering Column
 2000 Dodge Avenger Steering Gear Box
 2000 Dodge Avenger Tie Rod End