JeepParts
My Garage
My Account
Cart
OEM 2000 Dodge Caravan Axle Shaft
Car Axle Shaft- Select Vehicle by Model
- Select Vehicle by VIN
Select Vehicle by Model
orMake
Model
Year
Select Vehicle by VIN
For the most accurate results, select vehicle by your VIN (Vehicle Identification Number).
5 Axle Shafts found


2000 Dodge Caravan Axle Assembly Part Number: 4641960AA
$313.73 MSRP: $360.00You Save: $46.27 (13%)Ships in 1-2 Business DaysProduct Specifications- Other Name: Shaft - Axle Half; Shaft Axle Half
- Item Weight: 21.00 Pounds
- Condition: New
- Fitment Type: Direct Replacement
- SKU: 4641960AA
- Warranty: This genuine part is guaranteed by Mopar's factory warranty.

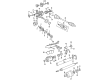
2000 Dodge Caravan Axle Assembly Part Number: 4660588AB
Product Specifications- Other Name: Shaft - Axle Half; Shaft Axle Half
- Replaces: 4808598AB, R2073718AB, R2073718AC
- Item Weight: 17.50 Pounds
- Item Dimensions: 33.9 x 7.0 x 6.6 inches
- Condition: New
- Fitment Type: Direct Replacement
- SKU: 4660588AB
- Warranty: This genuine part is guaranteed by Mopar's factory warranty.
2000 Dodge Caravan Axle Assembly, Front Part Number: 4660288AB
Product Specifications- Other Name: Shaft - Front Drive; Axle Shaft; Shaft Front Drive
- Position: Front
- Replaces: 4808298AB
- Item Weight: 21.60 Pounds
- Condition: New
- Fitment Type: Direct Replacement
- SKU: 4660288AB
- Warranty: This genuine part is guaranteed by Mopar's factory warranty.

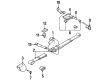
2000 Dodge Caravan Axle Beam, Rear Part Number: 4684406
Product Specifications- Other Name: Axle Rear Suspension; Axle, Assembly; Axle Rear
- Position: Rear
- Item Weight: 70.20 Pounds
- Condition: New
- Fitment Type: Direct Replacement
- SKU: 4684406
- Warranty: This genuine part is guaranteed by Mopar's factory warranty.
2000 Dodge Caravan Axle Assembly, Front Part Number: 4641981AB
Product Specifications- Other Name: Shaft - Front Drive; Axle Shaft; Shaft Front Drive
- Position: Front
- Replaces: 4641981
- Item Weight: 16.50 Pounds
- Item Dimensions: 27.6 x 5.8 x 5.1 inches
- Condition: New
- Fitment Type: Direct Replacement
- SKU: 4641981AB
- Warranty: This genuine part is guaranteed by Mopar's factory warranty.
2000 Dodge Caravan Axle Shaft Parts and Q&A
- Q: How to Remove and Reinstall an Axle Shaft on 2000 Dodge Caravan?A: Before removing the axle shaft, raise the car using jack stands or a frame contact type hoist. First, remove the cotter pin, then the nut lock, then the wheel and finally the tire from the end of the stub axle. After unscrewing the hub nut, be sure to lift the car or instead use a jack adapted to your car. After the brakes are on, loosen and pull out the stub axle to hub nut and next detach the two front brake caliper bolts on the steering knuckle and remove the caliper by twisting the top away from the knuckle and pulling up the bottom. Place a wire hook under the caliper support so that stress isn't applied to the brake flex hose before lifting off the brake rotor from the hub and bearing. After that, undo the external tie rod end nut with a 11/32 socket and hold the tie rod end in place with the socket while loosening the nut. Attach the Special Tool MB-991113 to the tie rod end which will let you remove it from the steering knuckle and then remove the steering knuckle from the ball joint stud, clamping nut and bolt. Gently push the steering knuckle off the ball joint stud with a pry bar, so you don't harm the ball joint seal. It is important to not split the inner C/V joint during this work and hold the driveshaft so it does not hang from the inner part. Take the steering knuckle away from the outer C/V joint and help up the end of the driveshaft to release the tripod joint snap ring from the transaxle side gear with a pry tool. With the inner tripod joint and its interconnected shaft held, disconnect the inner tripod from the transaxle so the spline or snap ring does not pull across the oil seal. When installing, wipe clean the spline and oil seal lip, spread some fresh transmission fluid over the part and, with your hands, insert the tripod joint into the transaxle gear. Make sure the will not come off by hand when the tripod joint is directly pushed into the side gear. Wipe away dirt and moisture from the front portion of the outer C/V joint piece as you slide it back into the steering knuckle. After that, fit the steering knuckle onto the top of the ball joint assembly stud and attach a fresh clamping bolt and nut, but make sure to tighten both to 135 Nm or 100 ft. lbs. Install the tie rod end into the steering knuckle, connection small end to the stud and tighten it with a crowfoot and 11/32 socket until it reaches 54 Nm (40 ft. lbs.). Attach the brake disc to the hub and bearing assembly first, then the disc brake caliper assembly and tighten all bolts to 17 ft lbs. Remove any debris from the outer C/V joint stub axle, place the washer and nut and make sure the nut is tight against the hub/bearing assembly. Place the front wheel and tire onto the bike and, starting from the top stud bolt, tighten all the mounting nuts to half the requested torque. After that, continue by tightening them fully to 135 Nm (100 ft. lbs.). Lower the car and press the brakes as you tighten the hub nut by 244 Nm (180 ft. lbs.). Put the spring wave washer on the front axle, then add the hub nut lock and a new cotter pin, with the prongs tightly wrapped around the hub nut lock. Look at the fluid level in your transaxle assembly and finally set the front toe to the correct specification.
Related 2000 Dodge Caravan Parts
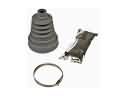 2000 Dodge Caravan CV Boot
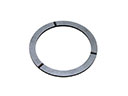 2000 Dodge Caravan Mainshaft Washer
 2000 Dodge Caravan Transfer Case Shim