JeepParts
My Garage
My Account
Cart
OEM Dodge Caravan Axle Shaft
Car Axle Shaft- Select Vehicle by Model
- Select Vehicle by VIN
Select Vehicle by Model
orMake
Model
Year
Select Vehicle by VIN
For the most accurate results, select vehicle by your VIN (Vehicle Identification Number).
21 Axle Shafts found


Dodge Caravan Axle Assembly Part Number: 4641960AA
$313.73 MSRP: $360.00You Save: $46.27 (13%)Ships in 1-2 Business Days
Dodge Caravan Axle Assembly, Front Driver Side Part Number: 4641855AE
$398.85 MSRP: $601.00You Save: $202.15 (34%)Ships in 1-3 Business DaysDodge Caravan Axle Assembly, Front Passenger Side Part Number: 4641856AF
$644.16 MSRP: $977.00You Save: $332.84 (35%)Ships in 1-2 Business Days


Dodge Caravan Axle Assembly, Rear Part Number: 4743630AB


Dodge Caravan Axle Assembly Part Number: 4511448

Dodge Caravan Axle Assembly Part Number: 4660588AB


Dodge Caravan Axle Assembly, Front Part Number: 4641051AB
Dodge Caravan Axle Assembly, Front Part Number: 4660288AB
Dodge Caravan Axle Shaft Assembly Part Number: 4641054AB
Dodge Caravan Axle Assembly Part Number: 4641962AB
Dodge Caravan Axle Assembly, Front Part Number: 4511436
Dodge Caravan Axle Assembly, Front Part Number: 4511443
Dodge Caravan Axle Assembly, Rear Driver Side Part Number: 4641897AB

Dodge Caravan Axle Assembly, Rear Part Number: 4743542AA
Dodge Caravan Axle Assembly, Front Part Number: 4641981AB
Dodge Caravan Axle Assembly Part Number: 4511435
Dodge Caravan Axle Assembly, Rear Part Number: 4684401AC
| Page 1 of 2 |Next >
1-20 of 21 Results
Dodge Caravan Axle Shaft
Choose OEM Axle Shaft that meet Dodge factory standards. Dodge designs and tests every component for precision and durability. Each Axle Shaft follows strict manufacturing steps to lock in quality and fit. If your Dodge Caravan matters to you, OEM parts make the smart choice. You'll get the exact look, feel, and performance you expect. Shop genuine Caravan parts at the highly competitive prices online. Enjoy a manufacturer's warranty, a hassle-free return policy, and rapid delivery. No more guesswork with off brands. Get genuine parts with exact fit and true factory performance. Shop with confidence today at JeepPartsDeal.com.
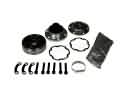
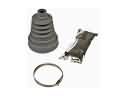
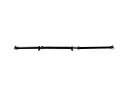
The Axle Shaft in Dodge Caravan vehicles is very crucial in transmitting power from the differential to the drive wheels to enable them rotate independently thus providing better traction during cornering. On Dodge Caravan models halfshafts are used, These are shafts that intersect CV joint at both ends of the shaft where splines are mounted for power transmission while the independent suspension system is in place. As years passed, the Dodge Caravan has mainly used u-joint halfshafts to the current models as opposed to the solid axles seem in pickup trucks and traditional RWD passenger automobiles. As halfshafts are intended to allow for this flexibility and to provide a smoother ride they can be somewhat maintenance intensive as a result of wear on the CV joints or as the result of damage sustained from their environment. In general, the Axle Shaft plays an important role in the operation of the Dodge Caravan and is critical for the delivery of power and stability of the car.
Dodge Caravan Axle Shaft Parts and Q&A
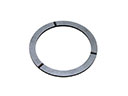
- Q: How to Service and Repair a Rear Axle Shaft on Dodge Caravan?A:Before servicing the half shaft rear, raise the vehicle using a hoist so the wheels can freely hang down and then remove the rear wheel. You should remove the cotter pin, nut lock and wave washer, then the hub nut and washer. You should torque a bolt through the hub since the vehicle will be on its wheels, as the half shaft outer CV joint holds the hub/bearing assembly in place. Once the bolts are removed, compress the inner joint a bit, then pull downward on the half shaft to clear the rear differential output flange, then pull it outward. To install, push the outer stub shaft down through the bearing, contract the inner joint half-way and keep pushing upwards so the inner flange joins with the output flange in the rear differential. Put in the inner half shaft retaining bolts, tighten them to 61 Nm, put the washer on the half shaft and bolt the hub nut to 244 Nm. Next, set up the wave washer, thread on the nut lock, install a new cotter pin and wrap its prongs around the hub nut lock so they are secure. Fasten all the new lug nuts to 135 Nm (100 ft.lbs.) while mounting the rear wheel back.
- Q: How to Remove and Install a Front Axle Shaft on Dodge Caravan?A:You should start by raising the vehicle, taking out the cotter pin and lock nut at the end of the half shaft and then loosen the wheel and tire assembly. Afterward, get rid of the wave washer at the end of the half shaft, put the car's brakes on to lock the hub and unscrew and remove the half shaft nut. Take away the front disc Brake Caliper adapter from the Steering Knuckle attaching bolts and twist the disc brake caliper upward to unlatch the top, then separate the bottom of the assembly from the machined abutment. Hold the caliper with a wire hook, removed stress from the hose and then take out the brake rotor from the hub and bearing. Remove the bolts securing the steering knuckle to the strut as you pull on the knuckle, making certain the C/V joint is not separated. Lower and pull back the steering knuckle assembly as you remove the outer C/V joint from the hub bearing. A pry bar should be used to release the tripod joint retaining snap-ring from the transaxle side gear after stabilizing the outer end of the half shaft assembly. Grab both the inner tripod joint and the attached shaft, then carefully pull the inner tripod joint straight from its place in the transaxle side gear and oil seal, without touching the spline or snap-ring to the sealing lip. Wipe the spline and oil seal surface on the tripod joint, only put a little fresh clean transmission lubricant on it, then gently install the tripod joint into the transaxle side gear. Newsflash, you absolutely need to ensure the snap-ring is locked in by inserting the tripod into the side gear and making sure it can't pop out by hand. Before you push the outer CV joint into place, remove any dirt or moisture from the part of the steering knuckle it will be installed in. Insert the steering knuckle into the clevis bracket on the strut damper and secure the bolts so the torque is 81 Nm (60 ft. lbs.) and the bolt is turned an additional quarter turn beyond the required mark. Put the braking disc on the hub with the bearing, continue with the disc brake caliper and check alignment. Screw on the brake caliper adapter attaching bolts with a torque of 169 Nm (125 ft. lbs.), wipe clean the outer CV joint threads and fasten the washer and half shaft to hub/bearing assembly nut firmly. Reattach the front wheel and tire assembly, then tighten the stud nuts only halfway; after that, repeat the procedure to obtain a full torque of 135 Nm (100 ft. lbs.). After you lower the vehicle, tighten the hub nut to 244 Nm (180 ft. lbs.) as you apply the brakes. Having done so, place the spring wave washer at the end of the half shaft, then fit the hub nut lock and insert a new cotter pin, wrap the cotter pin tightly around the lock nut and check the fluid in the transaxle assembly.