JeepParts
My Garage
My Account
Cart
OEM 2000 Dodge Grand Caravan Exhaust Manifold
Engine Exhaust Manifold- Select Vehicle by Model
- Select Vehicle by VIN
Select Vehicle by Model
orMake
Model
Year
Select Vehicle by VIN
For the most accurate results, select vehicle by your VIN (Vehicle Identification Number).
5 Exhaust Manifolds found

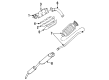
2000 Dodge Grand Caravan Exhaust Manifold Part Number: MD096958
$112.45 MSRP: $142.55You Save: $30.10 (22%)Ships in 1-2 Business DaysProduct Specifications- Other Name: Manifold; Exhaust Manifold Gasket; Manifold Gasket; Manifold, Exhaust (A) Left; Manifold, Exhaust Left; Manifold Exhaust
- Item Weight: 6.60 Pounds
- Condition: New
- Fitment Type: Direct Replacement
- SKU: MD096958
- Warranty: This genuine part is guaranteed by Mopar's factory warranty.

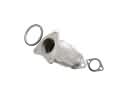
2000 Dodge Grand Caravan Exhaust Manifold, Passenger Side Part Number: 4621662
$249.76 MSRP: $316.61You Save: $66.85 (22%)Ships in 1-2 Business DaysProduct Specifications- Other Name: Manifold - Exhaust Right; Manifold; Manifold, Exhaust - Left; Manifold Exhaust
- Position: Passenger Side
- Item Weight: 13.10 Pounds
- Condition: New
- Fitment Type: Direct Replacement
- SKU: 4621662
- Warranty: This genuine part is guaranteed by Mopar's factory warranty.

2000 Dodge Grand Caravan Exhaust Manifold, Driver Side Part Number: 4448009
$43.37 MSRP: $54.98You Save: $11.61 (22%)Ships in 1-2 Business DaysProduct Specifications- Other Name: Manifold - Exhaust Left; Manifold; Manifold, Exhaust Left 3.3 & 3.8; Manifold, Exhaust - Left; Manifold, Exhaust; Manifold Exhaust
- Position: Driver Side
- Item Weight: 13.40 Pounds
- Condition: New
- Fitment Type: Direct Replacement
- SKU: 4448009
- Warranty: This genuine part is guaranteed by Mopar's factory warranty.

2000 Dodge Grand Caravan Exhaust Manifold Part Number: MD307345
Product Specifications- Other Name: Manifold; Manifold, Exhaust Right; Manifold Exhaust
- Item Weight: 11.30 Pounds
- Condition: New
- Fitment Type: Direct Replacement
- SKU: MD307345
- Warranty: This genuine part is guaranteed by Mopar's factory warranty.

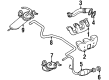
2000 Dodge Grand Caravan Crossover Pipe Part Number: 4694374
Product Specifications- Other Name: Manifold - Exhaust Manifold; Exhaust Pipe; Cross Over Pipe; Crossover Exhaust Manifold
- Condition: New
- Fitment Type: Direct Replacement
- SKU: 4694374
- Warranty: This genuine part is guaranteed by Mopar's factory warranty.
2000 Dodge Grand Caravan Exhaust Manifold Parts and Q&A
- Q: How to Service and Repair an Exhaust Manifold on 2000 Dodge Grand Caravan?A: The first step in working on an exhaust manifold is to remove the accessory drive belt and take off the negative cable from the battery. After that, remove the generator according to the instructions, raise the vehicle and remove the exhaust pipe from the rear exhaust manifold at the flex-joint. Remove the oxygen sensor cable from downstream and drop the exhaust unit to get to the rear manifold. Unhook the EGR tube from the rear manifold and take out the lead wire from the Heated Oxygen Sensor. Take off the heat shield from the engine mount at the back and afterwards remove the Generator/Power Steering Support Strut. Unscrew the bolts linked to the crossover pipe and the manifold and remove the upstream oxygen sensor's connector. Take the bolts out that hold the rear manifold to the cylinder head and remove the manifold. Raise the vehicle, turn it to the opposite side and unscrew the front heat shield from the front manifold. Take off all the bolts joining the crossover pipe to the front exhaust manifold, along with the nuts that secure the manifold to the cylinder head and lift the items off the engine. Spray the inside of the manifold with carburetor cleaner, allowing it to soak, then run the engine to clear the tube. During installation, attach the rear exhaust manifold and bolt it firmly, adding 23 Nm (200 inch lbs.) of torque. Check if the crossover pipe fasteners were damaged by heat or corrosion during use and replace them when necessary before installing the generator. After putting in a new gasket, join the crossover pipe to the exhaust manifold and tighten the bolts to the required torque of 54 Nm (40 ft. lbs.). After that, fix the extra oxygen sensor lead, then position the EGR Tube and Generator/Power Steering Strut. Set the front exhaust manifold into place and tighten its bolts until you reach 23 Nm (200 inch lbs.). Should the dipstick tube be bumped or affected, remove it, work out any damage and secure it back with Mopar Stud & Bearing Mount Adhesive. Set the new gasket on the exhaust crossover and use a torque wrench to tighten all the fasteners to 54 Nm (40 ft. lbs.) and next connect the upstream oxygen sensor's connector. Place the exhaust system, use a clean gasket to seal the exhaust pipe to the exhaust manifold and torque the bolts to 28 Nm (250 inch lbs.). Link the downstream oxygen sensor's plug, set the front manifold heat shield into place and tighten the screws to 12 Nm (105 inch lbs.). After that, place the accessory drive belt in place and secure the negative battery cable.
Related 2000 Dodge Grand Caravan Parts
 2000 Dodge Grand Caravan Catalytic Converter
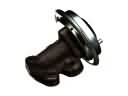 2000 Dodge Grand Caravan EGR Valve
 2000 Dodge Grand Caravan Muffler
 2000 Dodge Grand Caravan PCV Valve
 2000 Dodge Grand Caravan Canister Purge Valve
 2000 Dodge Grand Caravan EGR Tube
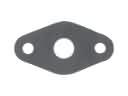 2000 Dodge Grand Caravan EGR Tube Gaskets
 2000 Dodge Grand Caravan Exhaust Heat Shield
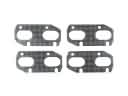 2000 Dodge Grand Caravan Exhaust Manifold Gasket
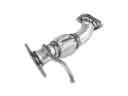 2000 Dodge Grand Caravan Exhaust Pipe
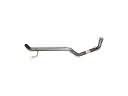 2000 Dodge Grand Caravan Tail Pipe
 2000 Dodge Grand Caravan Vapor Canister