JeepParts
My Garage
My Account
Cart
OEM 2000 Jeep Grand Cherokee Crankshaft Seal
- Select Vehicle by Model
- Select Vehicle by VIN
Select Vehicle by Model
orMake
Model
Year
Select Vehicle by VIN
For the most accurate results, select vehicle by your VIN (Vehicle Identification Number).
4 Crankshaft Seals found


2000 Jeep Grand Cherokee Rear Main Seal Part Number: 53020788AB
$32.63 MSRP: $48.35You Save: $15.72 (33%)Product Specifications- Other Name: Seal - Crankshaft Oil; Engine Crankshaft Seal, Rear; Crankshaft Seal; Seal Crankshaft Bearing Oil; Seal Crankshaft Oil Rear; Engine Crankshaft Seal
- Position: Rear
- Replaces: 68045792AA
- Item Weight: 0.70 Pounds
- Item Dimensions: 1.0 x 5.1 x 5.3 inches
- Condition: New
- Fitment Type: Direct Replacement
- SKU: 53020788AB
- Warranty: This genuine part is guaranteed by Mopar's factory warranty.


2000 Jeep Grand Cherokee Oil Seal, Front Part Number: 53021313AA
$10.49 MSRP: $15.00You Save: $4.51 (31%)Product Specifications- Other Name: Seal - Crankshaft Oil; Engine Crankshaft Seal, Front; Timing Cover Gasket; Timing Cover Seal; Crankshaft Seal; Front Crank Seal; Timing Cover Oil Seal; Engine Crankshaft Seal.
- Position: Front
- Item Weight: 1.40 Pounds
- Item Dimensions: 0.6 x 3.2 x 3.1 inches
- Condition: New
- Fitment Type: Direct Replacement
- SKU: 53021313AA
- Warranty: This genuine part is guaranteed by Mopar's factory warranty.


2000 Jeep Grand Cherokee Crankshaft Seal, Front Part Number: 33004681
$21.74 MSRP: $31.95You Save: $10.21 (32%)Ships in 1-2 Business DaysProduct Specifications- Other Name: Seal - Front Main Crankshaft; Engine Crankshaft Seal, Front; Timing Cover Seal; also services Crankshaft Front Oil Seal.
- Position: Front
- Item Weight: 0.50 Pounds
- Item Dimensions: 0.6 x 2.6 x 2.6 inches
- Condition: New
- Fitment Type: Direct Replacement
- SKU: 33004681
- Warranty: This genuine part is guaranteed by Mopar's factory warranty.

2000 Jeep Grand Cherokee Rear Main Seal Part Number: 4778126AB
Product Specifications- Other Name: Seal Kit - Crankshaft; Engine Crankshaft Seal, Rear
- Position: Rear
- Item Weight: 2.00 Pounds
- Item Dimensions: 0.7 x 1.9 x 5.1 inches
- Condition: New
- Fitment Type: Direct Replacement
- SKU: 4778126AB
- Warranty: This genuine part is guaranteed by Mopar's factory warranty.
2000 Jeep Grand Cherokee Crankshaft Seal Parts and Q&A
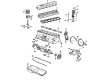
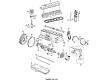
- Q: How to Replace a Crankshaft Seal and What Does It Consist Of on 2000 Jeep Grand Cherokee?A: There are two viton half pieces in the rear main bearing oil seal, each having a lip for sealing the crankshaft's rear. Since they are used as a set, you should always replace them both when performing a repair. First, lift out the transmission inspection cover, then remove the oil pan, take off the main bearing cap brace and remove the rear main bearing cap (No.7). Slide the top seal sideways out of the groove to avoid damages, while leaving the crankshaft and groove intact, then take out the lower half from the bearing cap. Clean the seal-facing surface of the crankshaft and use engine oil to apply a thin coat all along its edge. Line the upper seal up in the groove cut in the cylinder block with the edge pointing towards the front of the engine. Brush a small amount of Mopar Gasket Maker sealer, measuring about 3 mm (0.125 inch) on both the block and about 2.3 mm (0.09 inch) on the rear bearing cap, but avoid the seal's lip. Place the lower seal in the recess of the bearing cap, with it flush against the cylinder block pan rail and apply soap to the sealed surface and engine oil to the lip. Always strike the rear main bearing cap once or twice to have it properly fit, but don't hit it more than twice. After that, tighten all main bearing bolts to 108 Nm (80 ft. lbs.). Then, put on the main bearing cap brace and tighten its nuts to 47 Nm (35 ft. lbs.), next add the oil pan gasket and oil pan and tighten the 1/4 - 20 screws to 14 Nm (120 in. lbs.) and the 5/16 - 18 screws to 18 Nm (156 in. lbs.). Put Mopar Silicone Rubber Adhesive Sealant on the cylinder block at the corners of each rear main bearing cap, as well as the four places where the cylinder block meets the front cover. After that, install the transmission inspection cover.
Related 2000 Jeep Grand Cherokee Parts
 2000 Jeep Grand Cherokee Oil Filter
 2000 Jeep Grand Cherokee Oil Pump
 2000 Jeep Grand Cherokee Dipstick
 2000 Jeep Grand Cherokee Coolant Filter
 2000 Jeep Grand Cherokee Crankshaft Pulley
 2000 Jeep Grand Cherokee Crankshaft Timing Gear
 2000 Jeep Grand Cherokee Dipstick Tube
 2000 Jeep Grand Cherokee Engine Mount Bracket
 2000 Jeep Grand Cherokee Intake Valve
 2000 Jeep Grand Cherokee Piston Ring Set
 2000 Jeep Grand Cherokee Rocker Arm Pivot
 2000 Jeep Grand Cherokee Timing Chain Tensioner