JeepParts
My Garage
My Account
Cart
OEM 2001 Chrysler Concorde A/C Accumulator
Accumulator- Select Vehicle by Model
- Select Vehicle by VIN
Select Vehicle by Model
orMake
Model
Year
Select Vehicle by VIN
For the most accurate results, select vehicle by your VIN (Vehicle Identification Number).
1 A/C Accumulator found

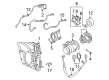
2001 Chrysler Concorde Dehydrator Part Number: 5003980AA
Product Specifications- Other Name: Drier - A/C Filter; A/C Receiver Drier; Drier Desiccant Element; A/C Accumulator; Accumulator; Drier; Drier A/C Filter With Bracket And Tube; Drier A/C Filter
- Item Weight: 1.60 Pounds
- Condition: New
- Fitment Type: Direct Replacement
- SKU: 5003980AA
- Warranty: This genuine part is guaranteed by Mopar's factory warranty.
2001 Chrysler Concorde A/C Accumulator Parts and Q&A
- Q: How to Service and Repair an A/C Accumulator on 2001 Chrysler Concorde?A: Begin serving and repairing an A/C accumulator by recovering the refrigerant first. Loosen one 8mm hex bolt that connects the bracket for the A/C accumulator with the other bolt and the nut holding the A/C lines to the expansion valve. First, take the A/C accumulator bracket off the strut tower, remove one A/C line from the A/C accumulator, and then get rid of the A/C accumulator in the vehicle. When fitting the new A/C accumulator, pull off the small line from the expansion valve and make sure to put on new O-rings when installing the filter/drier. Plug or cap the fittings on the liquid line to block moisture when the system is open. Avoid fitting sharp or irregular bends in the refrigerant piping, as they may reduce system capacity; during installation, make sure the bend is at least 10 times bigger than the hose and install the flexible lines at a distance of at least 3 inches from the exhaust manifold. Pressure-check all parts of the refrigerant system and verify annually that the flexible parts of the refrigerant line are correctly routed and in good condition. Roughly position all the parts and lines first, then tighten them after to prevent harm. Connect the small line from the A/C accumulator to the expansion valve on the new replacement and then slot the A/C accumulator into the car. Install the A/C line at the A/C accumulator, make sure it is held with a fastener tightened to 13.6 Nm (10 ft. lbs.) and slide in the A/C accumulator bracket to the strut tower. Screw the nut in place at the end of the A/C line to the expansion valve, tighten it to a torque of 23 Nm (17 ft. lbs.) and then fasten the A/C accumulator bracket bolt. After that, expand the refrigerant from its storage tank into the evacuated system.
Related 2001 Chrysler Concorde Parts
 2001 Chrysler Concorde Blend Door Actuator
 2001 Chrysler Concorde Blower Motor Resistor
 2001 Chrysler Concorde A/C Clutch
 2001 Chrysler Concorde A/C Compressor
 2001 Chrysler Concorde A/C Hose
 2001 Chrysler Concorde A/C Service Cap
 2001 Chrysler Concorde A/C Switch
 2001 Chrysler Concorde Blower Control Switches
 2001 Chrysler Concorde Evaporator
 2001 Chrysler Concorde Heater Core
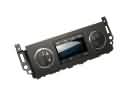 2001 Chrysler Concorde HVAC Control Module
 2001 Chrysler Concorde HVAC Pressure Switch