JeepParts
My Garage
My Account
Cart
OEM 2001 Chrysler Voyager Shock Absorber
Suspension Shock Absorber- Select Vehicle by Model
- Select Vehicle by VIN
Select Vehicle by Model
orMake
Model
Year
Select Vehicle by VIN
For the most accurate results, select vehicle by your VIN (Vehicle Identification Number).
9 Shock Absorbers found

2001 Chrysler Voyager Shock Absorber, Rear Part Number: 4743224AA
$73.12 MSRP: $96.65You Save: $23.53 (25%)Ships in 1-2 Business DaysProduct Specifications- Other Name: Absorber - Suspension; Shock Absorber, Rear;Strut/Coil Kit;ABS;Complete Strut; Shock; Shock Absorber Suspension
- Position: Rear
- Item Weight: 3.60 Pounds
- Item Dimensions: 26.8 x 4.4 x 3.4 inches
- Condition: New
- Fitment Type: Direct Replacement
- SKU: 4743224AA
- Warranty: This genuine part is guaranteed by Mopar's factory warranty.
2001 Chrysler Voyager Shock Absorber, Rear Part Number: 4743229AA
$495.04 MSRP: $751.00You Save: $255.96 (35%)Ships in 1-2 Business DaysProduct Specifications- Other Name: Absorber - Suspension; Shock Absorber, Rear;Strut/Coil Kit;ABS;Complete Strut; Shock; Shock Absorber Suspension
- Position: Rear
- Item Weight: 9.10 Pounds
- Item Dimensions: 15.8 x 6.2 x 4.5 inches
- Condition: New
- Fitment Type: Direct Replacement
- SKU: 4743229AA
- Warranty: This genuine part is guaranteed by Mopar's factory warranty.
2001 Chrysler Voyager Shock Absorber, Rear Part Number: 4743226AA
$224.10 MSRP: $505.00You Save: $280.90 (56%)Ships in 1-2 Business DaysProduct Specifications- Other Name: Absorber - Suspension; Shock Absorber, Rear;Strut/Coil Kit;ABS;Complete Strut; Shock; Shock Absorber Suspension
- Position: Rear
- Item Weight: 3.60 Pounds
- Item Dimensions: 26.6 x 5.0 x 4.1 inches
- Condition: New
- Fitment Type: Direct Replacement
- SKU: 4743226AA
- Warranty: This genuine part is guaranteed by Mopar's factory warranty.

2001 Chrysler Voyager Shock, Rear Part Number: 4743225AA
Product Specifications- Other Name: Absorber - Suspension; Shock Absorber, Rear;Strut/Coil Kit;ABS;Complete Strut; Shock Absorber Suspension; Shock Absorber
- Position: Rear
- Item Weight: 3.70 Pounds
- Item Dimensions: 18.9 x 3.9 x 2.8 inches
- Condition: New
- Fitment Type: Direct Replacement
- SKU: 4743225AA
- Warranty: This genuine part is guaranteed by Mopar's factory warranty.

2001 Chrysler Voyager Shock Absorber, Rear Part Number: 4743231AA
Product Specifications- Other Name: Absorber - Suspension; Rear Shock Absorber; Strut and Coil Spring Assembly; Shock Absorber Kit; Complete Strut.; Shock; Shock Absorber Suspension
- Position: Rear
- Item Weight: 9.20 Pounds
- Item Dimensions: 22.6 x 6.1 x 4.5 inches
- Condition: New
- Fitment Type: Direct Replacement
- SKU: 4743231AA
- Warranty: This genuine part is guaranteed by Mopar's factory warranty.
2001 Chrysler Voyager Shock Absorber, Rear Part Number: 4743230AA
Product Specifications- Other Name: Absorber - Suspension; Shock Absorber, Rear;Strut/Coil Kit;ABS;Complete Strut; Shock; Shock Absorber Suspension
- Position: Rear
- Item Weight: 9.40 Pounds
- Item Dimensions: 21.9 x 6.2 x 4.6 inches
- Condition: New
- Fitment Type: Direct Replacement
- SKU: 4743230AA
- Warranty: This genuine part is guaranteed by Mopar's factory warranty.
2001 Chrysler Voyager Shock, Rear Part Number: 4743233AA
Product Specifications- Other Name: Absorber - Suspension; Shock Absorber, Rear;Strut/Coil Kit;ABS;Complete Strut; Shock Absorber Suspension; Shock Absorber
- Position: Rear
- Item Weight: 9.00 Pounds
- Condition: New
- Fitment Type: Direct Replacement
- SKU: 4743233AA
- Warranty: This genuine part is guaranteed by Mopar's factory warranty.
2001 Chrysler Voyager Shock Absorber, Rear Part Number: 4743232AA
Product Specifications- Other Name: Absorber - Suspension; Shock Absorber, Rear;Strut/Coil Kit;ABS;Complete Strut; Shock; Shock Absorber Suspension
- Position: Rear
- Item Weight: 9.10 Pounds
- Condition: New
- Fitment Type: Direct Replacement
- SKU: 4743232AA
- Warranty: This genuine part is guaranteed by Mopar's factory warranty.
2001 Chrysler Voyager Shock, Rear Part Number: 4743227AA
Product Specifications- Other Name: Absorber - Suspension; Shock Absorber, Rear;Strut/Coil Kit;ABS;Complete Strut; Shock Absorber Suspension; Shock Absorber
- Position: Rear
- Item Weight: 4.00 Pounds
- Item Dimensions: 26.1 x 4.7 x 3.5 inches
- Condition: New
- Fitment Type: Direct Replacement
- SKU: 4743227AA
- Warranty: This genuine part is guaranteed by Mopar's factory warranty.
2001 Chrysler Voyager Shock Absorber Parts and Q&A
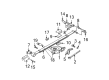
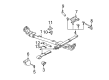
- Q: How to Service and Repair a Shock Absorber in the Front Suspension Strut Assembly on 2001 Chrysler Voyager?A: The first step to servicing and repairing the suspension assembly is taking it out of the vehicle. You can choose to use a Strut Spring Compressor or a Pentastar Service Equipment (PSE) tool W-7200 or an equivalent to press down the coil spring, always following the steps provided by the manufacturer. Squeeze the coil spring to take out the tension in the upper mount and pivot bearing before removing the strut shaft nut. Press the strut assembly into the compressor with the smaller hooks on the coil spring and connect the upper hooks by turning the upper mount inward to attach them about 1 inch from where the outer diameter of the seat starts. Take away all the tension in the coil spring, then attach Strut Nut Socket, Special Tool 6864 and a 10 mm socket to remove the nut on the strut shaft. With the spring upper seat turned upside down, take out the upper mount and removing the pivot bearing if needed. Once you've removed the clamp, let the coil spring relax and take off the upper spring seat. First, take off the dust shield and jounce bumper assembly from the strut shaft, then disconnect the jounce bumper from the dust shield. Take off the spring isolator from the bottom spring seat and examine all the parts for damage; if you find some, replace them. Always arrange the coil spring with the lower end going toward the 6 o'clock position inside the compressor for assembly. Assemble the upper seat and isolator and at the top place the hooks onto the upper seat itself. Compress the coil spring enough to help with installation of the strut and make sure that if the bearing was removed, you insert it on the upper spring seat so that the smaller part faces downwards. First, add the spring isolator to the lower spring seat, then install the jounce bumper with its small end below and finally put on the dust shield. Eagerly thrust the strut into the coil spring until the spring seat at the bottom of the coil spring touches it, making sure the clevis bracket heads toward the outside. Fasten the strut mount over the shaft and just tighten the retaining nut, so it remains loose. Use a Strut Nut Socket and a 10 mm socket to turn the upper retaining nut to 100 Nm (75 ft. lbs.), centering the upper spring seat, coil spring and strut clevis bracket. Let go of the tension slowly in the coil spring, watching that everything is properly aligned and then take off the clamp and remove the strut assembly from the compressor.
Related 2001 Chrysler Voyager Parts
 2001 Chrysler Voyager Axle Pivot Bushing
 2001 Chrysler Voyager Control Arm
 2001 Chrysler Voyager Control Arm Bushing
 2001 Chrysler Voyager Crossmember Bushing
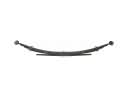 2001 Chrysler Voyager Leaf Spring
 2001 Chrysler Voyager Leaf Spring Bushing
 2001 Chrysler Voyager Steering Knuckle
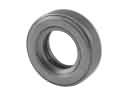 2001 Chrysler Voyager Strut Bearing
 2001 Chrysler Voyager Sway Bar Link
 2001 Chrysler Voyager Track Bar
 2001 Chrysler Voyager Wheel Bearing
 2001 Chrysler Voyager Wheel Hub