JeepParts
My Garage
My Account
Cart
OEM 2001 Dodge Caravan Rack And Pinion
Steering Rack And Pinion- Select Vehicle by Model
- Select Vehicle by VIN
Select Vehicle by Model
orMake
Model
Year
Select Vehicle by VIN
For the most accurate results, select vehicle by your VIN (Vehicle Identification Number).
2 Rack And Pinions found

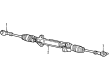
2001 Dodge Caravan Steering Gear Part Number: 4766321AF
$198.28 MSRP: $292.00You Save: $93.72 (33%)Ships in 1-3 Business DaysProduct Specifications- Other Name: Gear - Power Steering; Rack and Pinion Assembly; Steering Gearbox; Gear Assembly
- Replaces: 4766321AC, 4766321AD
- Item Weight: 25.80 Pounds
- Item Dimensions: 57.3 x 7.3 x 5.9 inches
- Condition: New
- Fitment Type: Direct Replacement
- SKU: 4766321AF
- Warranty: This genuine part is guaranteed by Mopar's factory warranty.
2001 Dodge Caravan Steering Gear Part Number: 68072214AC
Product Specifications- Other Name: Gear - Rack And Pinion; Steering Gearbox; Gear Assembly
- Replaces: 68072214AA, 68002223AB, 4766321AH, 68002223AA, 68002223AC, 68072214AB
- Item Weight: 23.90 Pounds
- Item Dimensions: 60.9 x 10.1 x 6.7 inches
- Condition: New
- Fitment Type: Direct Replacement
- SKU: 68072214AC
- Warranty: This genuine part is guaranteed by Mopar's factory warranty.
2001 Dodge Caravan Rack And Pinion Parts and Q&A
- Q: How Can Rack And Pinion Systems Be Serviced or Adjusted on 2001 Dodge Caravan?A: It's forbidden to repair or maintain the power steering rack and pinion; if any steering problem or oil leak happens, the whole assembly must go. Be sure to lock the steering column before you start, so you don't accidentally stretch the Clock Spring when you disconnect it. Open the cap that goes over the power steering reservoir and use a siphon pump to remove all the fluid you can. Even with the key locked in the ignition, turn the steering wheel to the left until it clicks into position. While the vehicle is on the ground, separate the steering column shaft coupler from the rack and pinion intermediate coupler, then jack up or hoist the vehicle, remove its front tires and remove the wheel mounting bolts. Unhook the hoses at the power steering cooler to empty the fluid, then take off the nut that holds the outer tie rod end to the steering knuckle with a socket and wrench while holding the tie rod end stud. Get rid of both tie rod ends using Puller Special Tool C-3894-A and then remove the rear bushing retainer bolts from each side of the lower control arm rear bushings. Grip the two bolts holding the cradle crossmember reinforcement to the front cradle crossmember and pull them off, both the bolts on the inside of the rear reinforcement to the rear cradle crossmember to the body, then lift out the reinforcement. When the vehicle has All-Wheel Drive, take out the power transfer unit. Loose the clamps that secure the pressure and return lines for power steering at the rack and pinion, then take out the three bolts and nuts holding the rack and pinion in place. Reduce the rack and pinion height from the suspension cradle so you can access the intermediate coupler roll pin, install Remover/Installer Special Tool 6831A down the center of the roll pin, fasten it with the knurled nut and then pull the roll pin out, holding the threaded rod still. Take the intermediate coupler apart from the rack and pinion shaft and remove the rack and pinion assembly from the car. For assembly, set the rack and pinion in the front suspension cradle and make sure there is room where the intermediate coupler will go and then use a hammer to begin rolling in the pin into the coupler before attaching it at the end of the rack and pinion shaft. Insert the roll pin into the intermediate coupler using Remover Installer Special Tool 6831A and afterward install the rack and pinion assembly to the front suspension cradle, tightening its three bolts and nuts to a torque of 183 Nm (135 ft. lbs.). Couple the power steering pressure and return lines to the rack and pinion and tighten the tube nuts to 275 inch lbs. Install the tie rod end onto the steering knuckle, putting on the attaching nut and tightening it while the stud is held by hand, followed by tightening it to 75 Nm (55 ft. lbs.) using a crowfoot and socket. Should you have All-Wheel Drive, install the replacement power transfer unit. Attach the reinforcement plate to the front suspension cradle crossmember, fastening M14 size bolts to 163 Nm (120 ft. lbs.) and M12 size bolts to 108 Nm (80 ft. lbs.). Fit the two reinforcement bolts into the lower control arm rear bushing retainer from underneath and tighten to 45 ft. lbs. When done, fit the other two bolts emerging from the cradle crossmember into the reinforcement and tighten these to 120 ft. lbs. Attach the cooler inlet and outlet lines with clamps, then place the front tires and wheels on the vehicle, tightening the nuts to 135 Nm (100 ft. lbs.). Place the vehicle so that the interior is accessible, next use the intermediate coupler to turn the front wheels to the left so the coupler shaft lines up with the steering column coupler. Put the steering column shaft coupler onto the rack and pinion intermediate coupler and tighten it with the pinch bolt, applying a torque of 28 Nm (250 inch lbs.). Finally, practice steering your car back and forth, watch for leaks and make toe adjustments at the front end.
Related 2001 Dodge Caravan Parts
 2001 Dodge Caravan Power Steering Pump
 2001 Dodge Caravan Steering Wheel
 2001 Dodge Caravan Power Steering Hose
 2001 Dodge Caravan Power Steering Reservoir
 2001 Dodge Caravan Steering Column
 2001 Dodge Caravan Steering Column Cover
 2001 Dodge Caravan Steering Gear Box
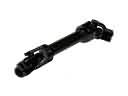 2001 Dodge Caravan Steering Shaft
 2001 Dodge Caravan Tie Rod End