JeepParts
My Garage
My Account
Cart
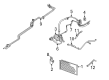
OEM 2002 Dodge Grand Caravan A/C Hose
Air Conditioning Hose- Select Vehicle by Model
- Select Vehicle by VIN
Select Vehicle by Model
orMake
Model
Year
Select Vehicle by VIN
For the most accurate results, select vehicle by your VIN (Vehicle Identification Number).
7 A/C Hoses found


2002 Dodge Grand Caravan Discharge Hose Part Number: 5005241AA
$43.04 MSRP: $61.85You Save: $18.81 (31%)Ships in 1-3 Business DaysProduct Specifications- Other Name: Line - A/C Discharge; A/C Refrigerant Discharge Hose; A/C Refrigerant Liquid Hose; A/C Hose; A/C Hoses; Line A/C Discharge
- Item Weight: 0.90 Pounds
- Item Dimensions: 19.7 x 9.6 x 3.0 inches
- Condition: New
- Fitment Type: Direct Replacement
- SKU: 5005241AA
- Warranty: This genuine part is guaranteed by Mopar's factory warranty.

2002 Dodge Grand Caravan A/C Hoses Part Number: 5005240AD
$145.97 MSRP: $186.00You Save: $40.03 (22%)Ships in 1-2 Business DaysProduct Specifications- Other Name: Line - A/C Suction; A/C Refrigerant Suction Hose; A/C Refrigerant Liquid Hose; A/C Hose; Suction Hose; Line A/C Suction
- Replaces: 5005240AB, 5005240AC
- Item Weight: 1.30 Pounds
- Item Dimensions: 30.5 x 11.7 x 2.4 inches
- Condition: New
- Fitment Type: Direct Replacement
- SKU: 5005240AD
- Warranty: This genuine part is guaranteed by Mopar's factory warranty.
2002 Dodge Grand Caravan A/C Hoses, Front Part Number: 5005243AF
$182.77 MSRP: $265.00You Save: $82.23 (32%)Ships in 1-2 Business DaysProduct Specifications- Other Name: Line - A/C Suction; A/C Refrigerant Suction Hose, Front; A/C Refrigerant Liquid Hose; A/C Hose; Suction Hose
- Position: Front
- Replaces: 5005243AC, 5005465AA, 5005243AE, 5005243AD
- Item Weight: 2.40 Pounds
- Item Dimensions: 92.8 x 10.8 x 2.3 inches
- Condition: New
- Fitment Type: Direct Replacement
- SKU: 5005243AF
- Warranty: This genuine part is guaranteed by Mopar's factory warranty.

2002 Dodge Grand Caravan A/C Hoses Part Number: 5066505AA
$103.08 MSRP: $130.68You Save: $27.60 (22%)Ships in 1-2 Business DaysProduct Specifications- Other Name: Line - A/C; A/C Refrigerant Liquid Hose; A/C Hose; Liquid Line; Line A/C Liquid To Expansion Valve
- Item Weight: 1.10 Pounds
- Item Dimensions: 42.9 x 15.0 x 6.6 inches
- Condition: New
- Fitment Type: Direct Replacement
- SKU: 5066505AA
- Warranty: This genuine part is guaranteed by Mopar's factory warranty.


2002 Dodge Grand Caravan A/C Hoses Part Number: 5066523AA
Product Specifications- Other Name: Line - Auxiliary A/C Liquid; A/C Refrigerant Liquid Hose; A/C Hose; Liquid Line; Line Auxiliary A/C Liquid; Line A/C Liquid
- Item Weight: 4.20 Pounds
- Item Dimensions: 127.2 x 13.8 x 13.8 inches
- Condition: New
- Fitment Type: Direct Replacement
- SKU: 5066523AA
- Warranty: This genuine part is guaranteed by Mopar's factory warranty.


2002 Dodge Grand Caravan A/C Hoses Part Number: 5066506AA
Product Specifications- Other Name: Line - A/C Liquid; A/C Refrigerant Liquid Hose; A/C Hose; Liquid Line; Line A/C Liquid To Condenser
- Item Weight: 3.20 Pounds
- Item Dimensions: 24.5 x 6.3 x 6.1 inches
- Condition: New
- Fitment Type: Direct Replacement
- SKU: 5066506AA
- Warranty: This genuine part is guaranteed by Mopar's factory warranty.

2002 Dodge Grand Caravan A/C Hoses, Rear Part Number: 5066520AA
Product Specifications- Other Name: Line - Auxiliary A/C Suction; A/C Refrigerant Suction Hose, Rear; A/C Refrigerant Liquid Hose; A/C Hose; Line Auxiliary A/C Suction; Line A/C Suction
- Position: Rear
- Item Weight: 2.40 Pounds
- Item Dimensions: 110.1 x 10.5 x 4.8 inches
- Condition: New
- Fitment Type: Direct Replacement
- SKU: 5066520AA
- Warranty: This genuine part is guaranteed by Mopar's factory warranty.
2002 Dodge Grand Caravan A/C Hose Parts and Q&A
- Q: How to Replace an A/C Hose in HVAC System for Discharge Hose on 2002 Dodge Grand Caravan?A: Before you do anything else, recover the refrigerant from the refrigeration system. First, remove the two large screws holding the radiator closure panel crossmember and outboard radiator-cover ends to the front fascia, then the five small screws holding the upper grille inserts to the radiator sight shield and at last, pull off the radiator sight shield. After that, unfasten the nut attaching the discharge line fitting to the condenser on the cooling module's right side and pull the discharge line off the condenser inlet port. Install plugs or tape over the fitting of the opened discharge line as well as the condenser inlet port. Unscrew the nut connecting the discharge line fitting at the top of the compressor and take out the discharge line. Be sure to replace the old seal by putting either tape or a new plug over the openings. Take out the discharge line that's connected to the engine. For installation, bring the new discharge line into the engine compartment, then take the tape or plugs out of the compressor discharge port and the fitting on the discharge line. If you are using a rubber O-ring seal for the first time, pour a pump of clean refrigerant oil on it, set it on the discharge line fitting and tighten the nut to 23 Nm (17 ft. lbs.). Unplug or cut away the old tape or plugs at the condenser inlet port and the discharge line, apply more lube to a replacement rubber O-ring and fit it onto the discharge line fitting before attaching again to the condenser inlet port and tighten the nut up to 168 in. lbs. Attach the radiator sight shield to the radiator closure panel crossmember, then install and tighten the five short screws that fasten the front inserts to the site shield, followed by tightening the two large screws on the ends to the radiator closure panel crossmember. Clear the system by evacuating and next, purge it of any air and charge it with refrigerant.
Related 2002 Dodge Grand Caravan Parts
 2002 Dodge Grand Caravan Blend Door Actuator
 2002 Dodge Grand Caravan Blower Motor
 2002 Dodge Grand Caravan Blower Motor Resistor
 2002 Dodge Grand Caravan A/C Accumulator
 2002 Dodge Grand Caravan A/C Clutch
 2002 Dodge Grand Caravan A/C Compressor
 2002 Dodge Grand Caravan A/C Condenser
 2002 Dodge Grand Caravan A/C Expansion Valve
 2002 Dodge Grand Caravan A/C Switch
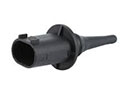 2002 Dodge Grand Caravan Ambient Temperature Sensor
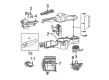
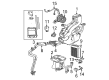
 2002 Dodge Grand Caravan Evaporator
 2002 Dodge Grand Caravan HVAC Pressure Switch