JeepParts
My Garage
My Account
Cart
OEM 2002 Dodge Grand Caravan A/C Condenser
Air Conditioning Condenser- Select Vehicle by Model
- Select Vehicle by VIN
Select Vehicle by Model
orMake
Model
Year
Select Vehicle by VIN
For the most accurate results, select vehicle by your VIN (Vehicle Identification Number).
1 A/C Condenser found

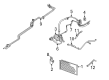
2002 Dodge Grand Caravan Condenser Part Number: 4809227AG
$192.82 MSRP: $318.00You Save: $125.18 (40%)Ships in 1-2 Business DaysProduct Specifications- Other Name: Condenser - A/C; A/C Condenser; Condenser A/C
- Replaces: 4809227AD
- Item Weight: 13.40 Pounds
- Item Dimensions: 19.8 x 2.4 x 26.4 inches
- Condition: New
- Fitment Type: Direct Replacement
- SKU: 4809227AG
- Warranty: This genuine part is guaranteed by Mopar's factory warranty.
2002 Dodge Grand Caravan A/C Condenser Parts and Q&A
- Q: How to Properly Remove and Reinstall an A/C Condenser on 2002 Dodge Grand Caravan?A: Notice where each air seal and radiator is before removing the condenser, since you will need them to guide the airflow properly. Start by removing the refrigerant from its system within the vehicle. Eliminate the two large screws that hold the front fascia and the outboard ends of the radiator visor to the radiator panel, along with the five small screws that attach the grille inserts to the radiator visor. Disconnect the radiator sight shield from the panel above the radiator, remove both screws connecting the hood latch to the front of the panel and then stow the hood latch somewhere safe so that you can reinstall it. Unplug the hoses from the oil cooler on the left side of the module, then take out the nut on the discharge line fitting to the condenser on the module's right side and unplug it from the condenser. Insert plugs or tape over each opened discharge line fitting and condenser inlet port, remove the hose nut from the condenser liquid line, separate the cap from the condenser outlet port, toss the old seal and install plugs or tape over the open liquid line fitting and condenser outlet port. Unscrew the screw connecting the top of the mounting bracket to the cooling module at each side of the condenser, then lift the condenser, transmission oil cooler and mounting brackets and pull them off the vehicle to separate the locating pin from the lower mount rubber isolators on each side of the cooling module. Next, unlock the two screws securing the mounting brackets on each side of the condenser, then the screw holding the left mounting bracket onto the side of the oil cooler and finally set the bracket aside. If the condenser needs replacing, add 30 milliliters of refrigerant oil to the refrigerant system and be sure all air seals are correctly mounted on the radiator and condenser. Slide the left mounting bracket in position on the right side, between the condenser and transmission oil cooler and install the screw on that side. Next, position the right mounting bracket and connect each with two more screws on the opposite sides, tightening all the screws to 5 Nm (45 in. lbs.). Insert the condenser, transmission oil cooler and brackets into the vehicle at once and make certain that the locating pins are fitted in the lower mount rubber isolators on both sides, plus the condenser isolators. Fasten both screws securing the top of the mounting bracket to the cooling module on each side with 5 Nm (45 in. lbs.), then take off the tape or plugs covering the condenser outlet port and liquid line mouth. Add clean refrigerant oil to a replacement O-ring seal, install it on the hole of the liquid line fitting, attach it to the condenser outlet port on the right side of the module and tighten the nut to 23 Nm. Remove the tape or plugs from the condenser inlet port and the discharge line fitting, lubricate a new rubber O-ring seal with clean refrigerant oil, attach it to the discharge line fitting and connect it to the condenser on the machine's right with a tightening of the nut to 23 Nm (17 ft. lbs.). Align the transmission oil cooler hoses above the left-side fittings, replace the hood latch above the radiator panel in the front and join and tighten the two screws to 14 Nm (123 in. lbs.). Line the radiator sight shield up on the radiator closure panel crossmember, connect and tighten the screws securing the small grille openings and then secure the front fascia to the outboard edges of the radiator sight shield and the crossmember with the big screws. Release the refrigerant system from the car and charge it up with the right coolant.
Related 2002 Dodge Grand Caravan Parts
 2002 Dodge Grand Caravan Blend Door Actuator
 2002 Dodge Grand Caravan Blower Motor
 2002 Dodge Grand Caravan Blower Motor Resistor
 2002 Dodge Grand Caravan Heater Core
 2002 Dodge Grand Caravan A/C Accumulator
 2002 Dodge Grand Caravan A/C Clutch
 2002 Dodge Grand Caravan A/C Compressor
 2002 Dodge Grand Caravan A/C Expansion Valve
 2002 Dodge Grand Caravan A/C Hose
 2002 Dodge Grand Caravan A/C Switch
 2002 Dodge Grand Caravan Ambient Temperature Sensor
 2002 Dodge Grand Caravan HVAC Pressure Switch