JeepParts
My Garage
My Account
Cart
OEM 2005 Chrysler 300 Crankshaft Seal
- Select Vehicle by Model
- Select Vehicle by VIN
Select Vehicle by Model
orMake
Model
Year
Select Vehicle by VIN
For the most accurate results, select vehicle by your VIN (Vehicle Identification Number).
6 Crankshaft Seals found


2005 Chrysler 300 Rear Main Seal Part Number: 5175829AB
$140.38 MSRP: $211.00You Save: $70.62 (34%)Ships in 1-2 Business DaysProduct Specifications- Other Name: Cover - Crankshaft Rear Oil; Engine Crankshaft Seal; Crankshaft Seal; Rear Main Seal Retainer; Retainer And Seal Crankshaft Rear Oil
- Position: Rear
- Replaces: 4663622AC, 5175829AA
- Item Weight: 1.30 Pounds
- Item Dimensions: 12.7 x 7.2 x 2.2 inches
- Condition: New
- Fitment Type: Direct Replacement
- SKU: 5175829AB
- Warranty: This genuine part is guaranteed by Mopar's factory warranty.


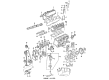
2005 Chrysler 300 Oil Seal, Front Part Number: 4792317AB
$18.16 MSRP: $26.70You Save: $8.54 (32%)Ships in 1-2 Business DaysProduct Specifications- Other Name: Seal - Crankshaft Oil; Engine Crankshaft Seal, Front; Timing Cover Gasket; Timing Cover Seal; Crankshaft Seal; Front Crank Seal; Timing Cover Assy; Front Main Crankshaft Seal.
- Position: Front
- Replaces: 4792317, 4273275
- Item Weight: 0.50 Pounds
- Item Dimensions: 0.6 x 1.9 x 1.9 inches
- Condition: New
- Fitment Type: Direct Replacement
- SKU: 4792317AB
- Warranty: This genuine part is guaranteed by Mopar's factory warranty.


2005 Chrysler 300 Rear Main Seal Part Number: 53021335AE
$94.83 MSRP: $142.00You Save: $47.17 (34%)Product Specifications- Other Name: Retainer - Crankshaft Rear Oil Seal; Engine Crankshaft Seal, Rear; Rear Main Seal Retainer; Crankshaft Rear Oil Seal not included with Long Block Engine Install Kit.
- Position: Rear
- Replaces: 53021335AD, 53021338AB, 68017721AA, 53021335BA, 53021335AC, 68060342AA, 5140028AA
- Item Weight: 3.10 Pounds
- Item Dimensions: 1.3 x 10.2 x 14.9 inches
- Condition: New
- Fitment Type: Direct Replacement
- SKU: 53021335AE
- Warranty: This genuine part is guaranteed by Mopar's factory warranty.


2005 Chrysler 300 Oil Seal, Front Part Number: 53021585AD
$24.97 MSRP: $36.70You Save: $11.73 (32%)Product Specifications- Other Name: Seal - Crankshaft Oil; Front Engine Crankshaft Seal; Timing Cover Seal; Gasket; Crankshaft Seal; Front Seal included with Long Block Engine Install Kit.
- Position: Front
- Replaces: 53021585AB
- Item Weight: 0.50 Pounds
- Item Dimensions: 1.1 x 3.3 x 3.3 inches
- Condition: New
- Fitment Type: Direct Replacement
- SKU: 53021585AD
- Warranty: This genuine part is guaranteed by Mopar's factory warranty.


2005 Chrysler 300 Front Crank Seal Part Number: 4663618
$20.20 MSRP: $29.95You Save: $9.75 (33%)Ships in 1-3 Business DaysProduct Specifications- Other Name: Seal - Crankshaft Oil; Engine Crankshaft Seal, Front; Engine Timing Cover Seal; Timing Cover Gasket; Timing Cover Seal; Front Seal; Crankshaft Oil Front; Engine Crankshaft Seal.
- Position: Front
- Item Weight: 0.40 Pounds
- Item Dimensions: 0.2 x 2.1 x 2.0 inches
- Condition: New
- Fitment Type: Direct Replacement
- SKU: 4663618
- Warranty: This genuine part is guaranteed by Mopar's factory warranty.

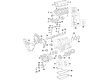
2005 Chrysler 300 Rear Main Seal Part Number: 4663870AC
$131.33 MSRP: $174.00You Save: $42.67 (25%)Ships in 1-2 Business DaysProduct Specifications- Other Name: Retainer - Crankshaft Rear Oil; Engine Crankshaft Seal; Crankshaft Seal; Rear Main Seal Retainer; Retainer And Seal Crankshaft Rear Oil
- Position: Rear
- Replaces: 4663870AB
- Item Weight: 1.10 Pounds
- Item Dimensions: 1.1 x 10.5 x 13.2 inches
- Condition: New
- Fitment Type: Direct Replacement
- SKU: 4663870AC
- Warranty: This genuine part is guaranteed by Mopar's factory warranty.
2005 Chrysler 300 Crankshaft Seal Parts and Q&A
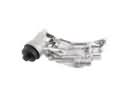
- Q: How to Service and Repair a Crankshaft Seal Assembly on 2005 Chrysler 300?A: The seal adapter holds the crankshaft rear oil seal, so they must be changed and serviced together. To start, take out the negative battery cable and then raise the vehicle. Start by removing the bolts that keep the splash shield in place, then remove the splash shield, the structural collar and finally the transmission. Following that, unscrew the bolts on the flex plate, replace the main bearing cover and remove the flex plate. The manufactures do not allow you to swap the stamped steel seal with the cast aluminum adapter and seal assembly. Use a socket to remove the two screws holding the retainer of the seal and the crankshaft rear oil seal/adapter. To do the installation, surface clean the connecting parts of the main seal and fit the assembly using special tool 6926-1. Insert the seal retaining bolts by hand, tighten enough to attach the Special Tools 8225 to the oil pan fasteners and make certain the 2.7L makings are facing the cylinder block. When using the included Special Tool 8225 to compress the seal assembly, tighten the screws to 12 Nm (105 inch lbs.) and afterwards, take off the special tool. After assembly of the oil pan, flex plate, backing plate and their bolts, position the transmission properly. Attach the retaining bolts and splash shield, secure them to the lower splash shield, drive the vehicle down, add oil, put back the negative battery cable and afterward turn on the engine to ensure there are no leaks.
Related 2005 Chrysler 300 Parts
 2005 Chrysler 300 Oil Filter Housing
 2005 Chrysler 300 Dipstick Tube
 2005 Chrysler 300 Engine Mount
 2005 Chrysler 300 Valve Cover Gasket
 2005 Chrysler 300 Timing Belt Tensioner
 2005 Chrysler 300 Camshaft Seal
 2005 Chrysler 300 Crankshaft Pulley
 2005 Chrysler 300 Exhaust Valve
 2005 Chrysler 300 Piston
 2005 Chrysler 300 Rod Bearing
 2005 Chrysler 300 Timing Chain Guide
 2005 Chrysler 300 Timing Cover Gasket