JeepParts
My Garage
My Account
Cart
OEM 2005 Chrysler Pacifica Door Latch Assembly
Door Latch- Select Vehicle by Model
- Select Vehicle by VIN
Select Vehicle by Model
orMake
Model
Year
Select Vehicle by VIN
For the most accurate results, select vehicle by your VIN (Vehicle Identification Number).
6 Door Latch Assemblys found

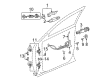
2005 Chrysler Pacifica Lock, Front Driver Side Part Number: 4894267AH
$81.24 MSRP: $120.00You Save: $38.76 (33%)Ships in 1-3 Business DaysProduct Specifications- Other Name: Latch - Front Door; Door Latch Assembly, Front Left; Door Lock Actuator Motor; Door Lock Actuator; Door Lock; Latch; Latch Front Door; Door Latch Assembly
- Position: Front Driver Side
- Item Weight: 2.90 Pounds
- Item Dimensions: 15.3 x 14.8 x 5.5 inches
- Condition: New
- Fitment Type: Direct Replacement
- SKU: 4894267AH
- Warranty: This genuine part is guaranteed by Mopar's factory warranty.
2005 Chrysler Pacifica Lock, Front Passenger Side Part Number: 4894266AH
$76.48 MSRP: $113.00You Save: $36.52 (33%)Ships in 1-3 Business DaysProduct Specifications- Other Name: Latch - Front Door; Door Latch Assembly, Front Right; Door Lock Actuator Motor; Door Lock Actuator; Door Lock; Latch; Latch Front Door; Door Latch Assembly
- Position: Front Passenger Side
- Item Weight: 2.70 Pounds
- Item Dimensions: 15.6 x 14.9 x 5.5 inches
- Condition: New
- Fitment Type: Direct Replacement
- SKU: 4894266AH
- Warranty: This genuine part is guaranteed by Mopar's factory warranty.
2005 Chrysler Pacifica Lock, Front Passenger Side Part Number: 4894266AG
$76.48 MSRP: $113.00You Save: $36.52 (33%)Ships in 1-3 Business DaysProduct Specifications- Other Name: Latch - Front Door; Door Latch Assembly, Front Right; Door Lock Actuator Motor; Door Lock Actuator; Door Lock; Latch; Latch Front Door; Door Latch Assembly
- Position: Front Passenger Side
- Replaces: 4894266AF, 4894266AC, 4894266AE, 4894266AD
- Item Weight: 1.80 Pounds
- Item Dimensions: 15.5 x 14.9 x 5.4 inches
- Condition: New
- Fitment Type: Direct Replacement
- SKU: 4894266AG
- Warranty: This genuine part is guaranteed by Mopar's factory warranty.

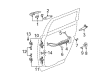
2005 Chrysler Pacifica Lock, Rear Passenger Side Part Number: 4894268AG
$73.70 MSRP: $109.00You Save: $35.30 (33%)Ships in 1-3 Business DaysProduct Specifications- Other Name: Latch - Rear Door; Door Latch Assembly, Rear Right; Door Lock Actuator Motor; Door Lock Actuator; Door Lock; Latch; Latch Rear Door; Door Latch Assembly
- Position: Rear Passenger Side
- Replaces: 4894268AF, 4894268AE, 4894268AD, 4894268AC
- Item Weight: 2.60 Pounds
- Condition: New
- Fitment Type: Direct Replacement
- SKU: 4894268AG
- Warranty: This genuine part is guaranteed by Mopar's factory warranty.

2005 Chrysler Pacifica Lock, Rear Driver Side Part Number: 4894269AG
$89.34 MSRP: $133.00You Save: $43.66 (33%)Product Specifications- Other Name: Latch - Rear Door; Door Latch Assembly, Rear Left; Door Lock Actuator Motor; Door Lock Actuator; Door Lock; Latch; Latch Rear Door; Door Latch Assembly
- Position: Rear Driver Side
- Replaces: 4894269AF, 4894269AD, 4894269AE, 4894269AC
- Item Weight: 2.20 Pounds
- Item Dimensions: 19.4 x 7.9 x 7.8 inches
- Condition: New
- Fitment Type: Direct Replacement
- SKU: 4894269AG
- Warranty: This genuine part is guaranteed by Mopar's factory warranty.
2005 Chrysler Pacifica Lock, Front Driver Side Part Number: 4894267AG
Product Specifications- Other Name: Latch - Front Door; Door Latch Assembly, Front Left; Lock Actuator Motor; Lock Actuator.; Latch
- Position: Front Driver Side
- Replaces: 4894267AD, 4894267AC, 4894267AE, 4894267AF
- Item Weight: 1.50 Pounds
- Item Dimensions: 15.9 x 14.6 x 5.4 inches
- Condition: New
- Fitment Type: Direct Replacement
- SKU: 4894267AG
- Warranty: This genuine part is guaranteed by Mopar's factory warranty.
2005 Chrysler Pacifica Door Latch Assembly Parts and Q&A
- Q: How to Service and Repair a Front Door Latch Assembly on 2005 Chrysler Pacifica?A: First, take out the door trim panel and watershield to remove the front door latch and then raise the glass. Start by pulling away the clips that tie the key cylinder and latch rods to the outer door handle and then also remove the wire connection from the power door lock motor and the push pin from the latch. First, unlatch the latch cover from the inside panel and take away the screws that secure everything, being sure the latch is below the rear guide rail before removing it. Take out the door latch with care, so you don't cause damage to the cables or rods. Position the door latch just inside the door and then feed the attached cables through the hole in the watershield. Attach the latch cover to the inner panel retainer and put the latch into the door end frame, securing it with six screws tightened to 10 N.m (90 in.lbs.) torque. Attach the linkages to the door handle, clip the connections in place, then link the wire holder to the power motor and the push pin to the latch. Check the door latches and power door locks, put on the watershield and front door trim panel and finish the latch adjustment steps. You need to use nylon patches on every threaded screw after removing the latch.
Related 2005 Chrysler Pacifica Parts
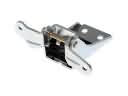 2005 Chrysler Pacifica Door Hinge
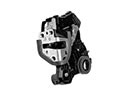 2005 Chrysler Pacifica Door Lock
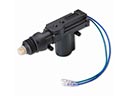 2005 Chrysler Pacifica Door Lock Actuator
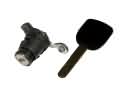 2005 Chrysler Pacifica Door Lock Cylinder
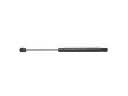 2005 Chrysler Pacifica Lift Support
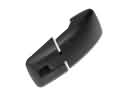 2005 Chrysler Pacifica Liftgate Hinge
 2005 Chrysler Pacifica Rear Door Striker
 2005 Chrysler Pacifica Seat Switch
 2005 Chrysler Pacifica Tailgate Handle
 2005 Chrysler Pacifica Tailgate Lock
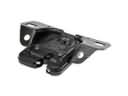 2005 Chrysler Pacifica Trunk Lid Latch
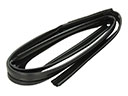 2005 Chrysler Pacifica Window Run