JeepParts
My Garage
My Account
Cart
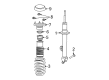
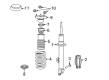
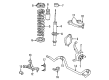
OEM 2006 Chrysler 300 Shock Absorber
Suspension Shock Absorber- Select Vehicle by Model
- Select Vehicle by VIN
Select Vehicle by Model
orMake
Model
Year
Select Vehicle by VIN
For the most accurate results, select vehicle by your VIN (Vehicle Identification Number).
15 Shock Absorbers found


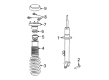
2006 Chrysler 300 Strut Part Number: 4782644AD
$242.25 MSRP: $323.00You Save: $80.75 (25%)Ships in 1-2 Business DaysProduct Specifications- Other Name: Shock - Suspension; Strut & Shock Kit; Coil Spring; ABS Set; Complete Strut; Shock Absorber.; Shock Absorber Suspension; Shock
- Item Weight: 12.20 Pounds
- Item Dimensions: 29.9 x 6.1 x 5.4 inches
- Condition: New
- Fitment Type: Direct Replacement
- SKU: 4782644AD
- Warranty: This genuine part is guaranteed by Mopar's factory warranty.


2006 Chrysler 300 Shock Absorber Part Number: 4782643AD
$294.40 MSRP: $373.21You Save: $78.81 (22%)Ships in 1-2 Business DaysProduct Specifications- Other Name: Shock - Suspension; Strut & Shock Assembly; Coil Spring; Anti-lock Braking Set; Complete Strut; Strut; Shock Absorber Suspension; Shock
- Item Weight: 9.60 Pounds
- Item Dimensions: 5.3 x 6.0 x 29.3 inches
- Condition: New
- Fitment Type: Direct Replacement
- SKU: 4782643AD
- Warranty: This genuine part is guaranteed by Mopar's factory warranty.
2006 Chrysler 300 Strut Part Number: 4782732AE
$195.40 MSRP: $294.00You Save: $98.60 (34%)Ships in 1-2 Business DaysProduct Specifications- Other Name: Shock - Suspension; Strut & Shock Kit; Coil Spring Assembly; Complete Strut; Shock Absorber
- Replaces: 4782732AD
- Item Weight: 9.70 Pounds
- Item Dimensions: 29.0 x 6.2 x 5.2 inches
- Condition: New
- Fitment Type: Direct Replacement
- SKU: 4782732AE
- Warranty: This genuine part is guaranteed by Mopar's factory warranty.

2006 Chrysler 300 Strut, Front Passenger Side Part Number: 5290471AC
$352.68 MSRP: $502.00You Save: $149.32 (30%)Ships in 1-2 Business DaysProduct Specifications- Other Name: Strut - Suspension; Front Right Shock Absorber; Strut and Coil Spring Assembly; Shock Absorber Kit; Complete Strut.; Shock Absorber Suspension; Shock Absorber; Shock
- Position: Front Passenger Side
- Replaces: 5290471AD, 5290471AB
- Item Weight: 8.80 Pounds
- Item Dimensions: 29.6 x 6.1 x 5.2 inches
- Condition: New
- Fitment Type: Direct Replacement
- SKU: 5290471AC
- Warranty: This genuine part is guaranteed by Mopar's factory warranty.
2006 Chrysler 300 Strut Part Number: 4782731AE
$147.65 MSRP: $328.00You Save: $180.35 (55%)Ships in 1-2 Business DaysProduct Specifications- Other Name: Shock - Suspension; Strut & Shock Kit; Coil Spring Assembly; Complete Strut; Shock Absorber
- Replaces: 4782731AD
- Item Weight: 10.00 Pounds
- Item Dimensions: 28.7 x 6.2 x 5.2 inches
- Condition: New
- Fitment Type: Direct Replacement
- SKU: 4782731AE
- Warranty: This genuine part is guaranteed by Mopar's factory warranty.
2006 Chrysler 300 Strut, Front Driver Side Part Number: 5290474AC
$312.72 MSRP: $476.00You Save: $163.28 (35%)Ships in 1-2 Business DaysProduct Specifications- Other Name: Strut - Suspension; Front Left Shock Absorber; Strut and Coil Spring Assembly; Shock Absorber Kit; Complete Strut.; Shock Absorber Suspension; Shock Absorber; Shock
- Position: Front Driver Side
- Replaces: 5290474AD, 5290474AB
- Item Weight: 3.70 Pounds
- Item Dimensions: 29.0 x 6.2 x 5.4 inches
- Condition: New
- Fitment Type: Direct Replacement
- SKU: 5290474AC
- Warranty: This genuine part is guaranteed by Mopar's factory warranty.

2006 Chrysler 300 Strut Part Number: 4895747AA
$126.56 MSRP: $196.00You Save: $69.44 (36%)Ships in 1-2 Business DaysProduct Specifications- Other Name: Strut - Suspension; Strut and Shock Absorber Assembly Kit; Coil Spring Assembly; Shock Absorber Kit; Complete Strut.; Shock Absorber Suspension
- Item Weight: 11.50 Pounds
- Item Dimensions: 29.9 x 7.0 x 6.4 inches
- Condition: New
- Fitment Type: Direct Replacement
- SKU: 4895747AA
- Warranty: This genuine part is guaranteed by Mopar's factory warranty.
2006 Chrysler 300 Shock Absorber, Front Part Number: 4895748AB
$190.37 MSRP: $260.00You Save: $69.63 (27%)Ships in 1-2 Business DaysProduct Specifications- Other Name: Strut - Suspension; Shock Absorber Front; Strut & Coil Spring Assembly; Complete Strut; Strut; Shock Absorber Suspension
- Position: Front
- Item Weight: 8.90 Pounds
- Item Dimensions: 29.6 x 6.2 x 5.2 inches
- Condition: New
- Fitment Type: Direct Replacement
- SKU: 4895748AB
- Warranty: This genuine part is guaranteed by Mopar's factory warranty.

2006 Chrysler 300 Shock Absorber, Rear Part Number: 4782714AD
$110.93 MSRP: $247.00You Save: $136.07 (56%)Ships in 1-2 Business DaysProduct Specifications- Other Name: Absorber - Suspension; Shock Absorber, Rear;Strut/Coil Kit;ABS;Complete Strut; Shock; Shock Absorber Suspension Rear
- Position: Rear
- Item Weight: 6.90 Pounds
- Item Dimensions: 33.3 x 9.1 x 3.8 inches
- Condition: New
- Fitment Type: Direct Replacement
- SKU: 4782714AD
- Warranty: This genuine part is guaranteed by Mopar's factory warranty.

2006 Chrysler 300 Shock Absorber Part Number: 4782712AE
$142.29 MSRP: $310.00You Save: $167.71 (55%)Ships in 1-2 Business DaysProduct Specifications- Other Name: Absorber - Suspension; Strut & Shock Assembly Kit; Coil Spring; Anti-lock Braking; Complete Strut; Shock Absorber Suspension Rear
- Item Weight: 6.60 Pounds
- Item Dimensions: 34.4 x 9.2 x 3.8 inches
- Condition: New
- Fitment Type: Direct Replacement
- SKU: 4782712AE
- Warranty: This genuine part is guaranteed by Mopar's factory warranty.
2006 Chrysler 300 Strut, Front Driver Side Part Number: 4782733AD
$188.44 MSRP: $284.00You Save: $95.56 (34%)Ships in 1-2 Business DaysProduct Specifications- Other Name: Shock Absorber, Strut & Spring Kit; Anti-lock Braking; Complete Strut; Shock Absorber Suspension; Shock Absorber; Shock
- Position: Front Driver Side
- Replaces: 4782733AC
- Item Weight: 12.10 Pounds
- Item Dimensions: 30.1 x 6.0 x 5.4 inches
- Condition: New
- Fitment Type: Direct Replacement
- SKU: 4782733AD
- Warranty: This genuine part is guaranteed by Mopar's factory warranty.


2006 Chrysler 300 Shock Absorber Part Number: 4895717AD
Product Specifications- Other Name: Shock - Suspension; Strut and Shock Absorber Assembly Kit; Anti-lock Braking Systemorber Set.; Shock; Shock Absorber Suspension Rear
- Item Weight: 6.90 Pounds
- Item Dimensions: 29.0 x 7.1 x 6.3 inches
- Condition: New
- Fitment Type: Direct Replacement
- SKU: 4895717AD
- Warranty: This genuine part is guaranteed by Mopar's factory warranty.
2006 Chrysler 300 Shock Absorber Part Number: 4895513AC
Product Specifications- Other Name: Absorber - Suspension; Strut & Shock Assembly Kit; Coil Spring; Anti-lock Braking; Complete Strut
- Replaces: 4895513AB
- Item Weight: 11.00 Pounds
- Item Dimensions: 28.8 x 5.2 x 2.7 inches
- Condition: New
- Fitment Type: Direct Replacement
- SKU: 4895513AC
- Warranty: This genuine part is guaranteed by Mopar's factory warranty.
2006 Chrysler 300 Shock Absorber Part Number: 4895729AB
Product Specifications- Other Name: Absorber - Suspension; Strut and Shock Assembly Kit; Anti-lock Braking System Set; Shock Absorber Kit.; Shock; Shock Absorber Suspension Rear
- Replaces: 4895729AA
- Item Weight: 11.60 Pounds
- Item Dimensions: 30.5 x 9.3 x 6.4 inches
- Condition: New
- Fitment Type: Direct Replacement
- SKU: 4895729AB
- Warranty: This genuine part is guaranteed by Mopar's factory warranty.

2006 Chrysler 300 Upper Retainer, Rear Part Number: 4616934
Product Specifications- Other Name: Retainer - Shock Absorber; Suspension Strut Mount Washers (Front & Rear); Shock Mount Insulator; Washer; Shock Retainer; Shock Absorber Bushing Upper; Shock Absorber Assembly
- Position: Rear Upper
- Item Weight: 0.50 Pounds
- Item Dimensions: 1.8 x 1.8 x 0.2 inches
- Condition: New
- Fitment Type: Direct Replacement
- SKU: 4616934
- Warranty: This genuine part is guaranteed by Mopar's factory warranty.
2006 Chrysler 300 Shock Absorber Parts and Q&A
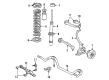
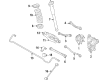
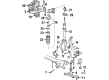
- Q: How to Effectively Remove and Install a Shock Absorber on 2006 Chrysler 300?A: The shock absorber should be removed after raising and supporting the vehicle, plus taking off the wheel mounting nuts and the tire and wheel setup. Position a utility jack or jack stand under the outer spring link so the suspension won't fully rebound. First, get rid of the shock absorber's lower mounting bolt and nut, after that remove the upper mounting bolts and lastly remove the absorber. If performing load-leveling, follow the steps done initially and, if replacing the left side, take away the fuel filler tube. Make sure the front of the engine cradle is supported by jack stands. For vehicles with dual pipes or those needing work on the right side with single exhaust, you should loosen the isolators at the bottom of the muffler and resonator before lifting. Lift up a jack to the center of the rear axle differential, lower it onto the differential and lock the jack in place. Take off the two screws in the upper bracket and the bolt and nut in the lower bracket of the shock. Don't forget to leave the spacers behind when removing crossmember bolts and do not loosen bolts on the other side of the vehicle so you do not have to adjust the rear wheels. Lower the jack slowly so that the repair-side of the crossmember is just over the body and comes down far enough to clear the flange and then tip the top of the shock outward and lift the bottom end out of the spring link pocket. First, slip the lower end of the new shock into the spring link, raise the other end to its position and secure the upper mounting screws with a tightening torque of 52 Nm. Put in the lower shock mounting bolt and nut loosely for now, then remove the jack and put on the tire and wheel assembly, fastening the wheel nuts to 150 Nm. After lowering the vehicle, drive it on the alignment rack and tighten the lower mounting bolt nut with 72 Nm. To install using load-leveling, push the bottom of the shock absorber into the spring link pocket, tip the top toward it and mount the lower bolt and nut, leaving them loose. If you have AWD, put the spacers in position and slowly lift the car with the jack so the coil spring and upper part of the shock absorber can be fitted. Set in the top mounting screws and clock them firmly to 52 Nm, taking care not to use the longer rear bolts for the front crossmember. Group and torque the crossmember mounting bolts, then check the tension link to body weld flange spacing, missing up the joints as needed to clear a minimum of 12 mm. After that, tighten each crossmember bolt to 180 Nm, lift the rear axle jack out from under the differential, reattach the exhaust isolators and replace the fuel filler tube if you removed it. Attach the tire and wheel assemblies, tighten the nuts on the wheels, lower the car and once again set it on the alignment rack to get at the bottom bolt and fasten it to 72 Nm.
Related 2006 Chrysler 300 Parts
 2006 Chrysler 300 Wheel Bearing
 2006 Chrysler 300 Sway Bar Link
 2006 Chrysler 300 Wheel Hub
 2006 Chrysler 300 Alignment Bolt
 2006 Chrysler 300 Axle Support Bushings
 2006 Chrysler 300 Bump Stop
 2006 Chrysler 300 Control Arm Bolt
 2006 Chrysler 300 Lateral Link
 2006 Chrysler 300 Leaf Spring Bushing
 2006 Chrysler 300 Shock And Strut Mount
 2006 Chrysler 300 Sway Bar Bracket
 2006 Chrysler 300 Wheel Cover