JeepParts
My Garage
My Account
Cart
OEM 2006 Dodge Grand Caravan Timing Chain
Engine Timing Chain- Select Vehicle by Model
- Select Vehicle by VIN
Select Vehicle by Model
orMake
Model
Year
Select Vehicle by VIN
For the most accurate results, select vehicle by your VIN (Vehicle Identification Number).
1 Timing Chain found

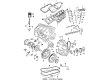
2006 Dodge Grand Caravan Timing Chain Part Number: 4666059AA
$49.99 MSRP: $73.50You Save: $23.51 (32%)Ships in 1-2 Business DaysProduct Specifications- Other Name: Chain - Timing; Engine Timing Chain; Chain Timing
- Item Weight: 1.60 Pounds
- Item Dimensions: 18.0 x 4.0 x 1.9 inches
- Condition: New
- Fitment Type: Direct Replacement
- SKU: 4666059AA
- Warranty: This genuine part is guaranteed by Mopar's factory warranty.
2006 Dodge Grand Caravan Timing Chain Parts and Q&A
- Q: How to Maintain and Fix a Timing Chain on 2006 Dodge Grand Caravan?A: To take care of servicing the timing chain and sprockets, begin by unlinking the negative terminal from the battery and then uncover the timing chain area. Keep turning the crankshaft until the timing marks can be seen standing for each other. Extract the camshaft sprocket assembly's bolt, get rid of the timing chain and next take off the crankshaft sprocket. Remove the timing chain, then take off the crankshaft sprocket with the help of Special Tools 8539, 5048-6 and 5048-1 while bracing the crankshaft so it doesn't rotate. To install, sit the sprocket on the crankshaft with the timing mark pointing out and its timing slot lined with the timing pin, then fix it in place using Special Tool 8452. Then, rotate the crankshaft so the timing arrow is at the 12 o'clock position and apply a small amount of clean engine oil to both the timing chain and sprockets before you fit them together. As you grasp the chain and camshaft, install them around the sprocket so that the chain's plated link matches the dot and the timing arrow is at 6 o'clock. Fasten the plated link of the timing chain on top of the crankshaft sprocket, where the dot is visible and put the camshaft sprocket into place. Make sure the timing marks line up with a straight edge, mount the camshaft sprocket bolt and washer and tighten the bolt to 54 Nm (40 ft. lbs.) Turn the crankshaft two full revolutions and look at the timing marks; adjust the camshaft sprocket and realign if they are not in line. After that, place the timing chain cover in place and hook the negative cable back to the battery.
Related 2006 Dodge Grand Caravan Parts
 2006 Dodge Grand Caravan Camshaft
 2006 Dodge Grand Caravan Dipstick
 2006 Dodge Grand Caravan Crankshaft Thrust Washer Set
 2006 Dodge Grand Caravan Dipstick Tube
 2006 Dodge Grand Caravan Engine Mount Bracket
 2006 Dodge Grand Caravan Exhaust Valve
 2006 Dodge Grand Caravan Intake Valve
 2006 Dodge Grand Caravan Lash Adjuster
 2006 Dodge Grand Caravan Piston
 2006 Dodge Grand Caravan Pushrod
 2006 Dodge Grand Caravan Rocker Arm
 2006 Dodge Grand Caravan Transmission Mount