JeepParts
My Garage
My Account
Cart
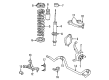
OEM 2006 Dodge Magnum Shock Absorber
Suspension Shock Absorber- Select Vehicle by Model
- Select Vehicle by VIN
Select Vehicle by Model
orMake
Model
Year
Select Vehicle by VIN
For the most accurate results, select vehicle by your VIN (Vehicle Identification Number).
9 Shock Absorbers found


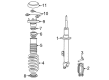
2006 Dodge Magnum Strut Part Number: 4895743AC
$99.56 MSRP: $208.00You Save: $108.44 (53%)Ships in 1-2 Business DaysProduct Specifications- Other Name: Strut - Suspension; Strut and Shock Absorber Assembly Kit; Coil Spring Assembly; Shock Absorber Kit; Complete Strut.
- Replaces: 4895743AB
- Item Weight: 8.20 Pounds
- Item Dimensions: 29.6 x 6.3 x 5.2 inches
- Condition: New
- Fitment Type: Direct Replacement
- SKU: 4895743AC
- Warranty: This genuine part is guaranteed by Mopar's factory warranty.


2006 Dodge Magnum Strut Part Number: 4782992AD
$38.14 MSRP: $219.00You Save: $180.86 (83%)Ships in 1-2 Business DaysProduct Specifications- Other Name: Shock - Suspension; Strut & Shock Kit; Coil Spring; ABS Set; Complete Strut; Shock Absorber.; Shock Absorber Suspension; Shock
- Replaces: 4782992AC
- Item Weight: 10.80 Pounds
- Item Dimensions: 29.3 x 6.1 x 5.2 inches
- Condition: New
- Fitment Type: Direct Replacement
- SKU: 4782992AD
- Warranty: This genuine part is guaranteed by Mopar's factory warranty.

2006 Dodge Magnum Shock Absorber, Rear Part Number: 4782714AD
$110.93 MSRP: $247.00You Save: $136.07 (56%)Ships in 1-2 Business DaysProduct Specifications- Other Name: Absorber - Suspension; Shock Absorber, Rear;Strut/Coil Kit;ABS;Complete Strut; Shock; Shock Absorber Suspension Rear
- Position: Rear
- Item Weight: 6.90 Pounds
- Item Dimensions: 33.3 x 9.1 x 3.8 inches
- Condition: New
- Fitment Type: Direct Replacement
- SKU: 4782714AD
- Warranty: This genuine part is guaranteed by Mopar's factory warranty.
2006 Dodge Magnum Shock Absorber Part Number: 4782993AD
$195.28 MSRP: $275.00You Save: $79.72 (29%)Ships in 1-2 Business DaysProduct Specifications- Other Name: Shock - Suspension; Strut & Shock Assembly; Coil Spring; Anti-lock Braking Set; Complete Strut; Strut; Shock Absorber Suspension; Shock
- Replaces: 4782993AC
- Item Weight: 11.80 Pounds
- Item Dimensions: 29.9 x 6.3 x 5.3 inches
- Condition: New
- Fitment Type: Direct Replacement
- SKU: 4782993AD
- Warranty: This genuine part is guaranteed by Mopar's factory warranty.


2006 Dodge Magnum Shock Absorber Part Number: 4895717AD
Product Specifications- Other Name: Shock - Suspension; Strut and Shock Absorber Assembly Kit; Anti-lock Braking Systemorber Set.; Shock; Shock Absorber Suspension Rear
- Item Weight: 6.90 Pounds
- Item Dimensions: 29.0 x 7.1 x 6.3 inches
- Condition: New
- Fitment Type: Direct Replacement
- SKU: 4895717AD
- Warranty: This genuine part is guaranteed by Mopar's factory warranty.
2006 Dodge Magnum Shock Absorber Part Number: 4895729AB
Product Specifications- Other Name: Absorber - Suspension; Strut and Shock Assembly Kit; Anti-lock Braking System Set; Shock Absorber Kit.; Shock; Shock Absorber Suspension Rear
- Replaces: 4895729AA
- Item Weight: 11.60 Pounds
- Item Dimensions: 30.5 x 9.3 x 6.4 inches
- Condition: New
- Fitment Type: Direct Replacement
- SKU: 4895729AB
- Warranty: This genuine part is guaranteed by Mopar's factory warranty.
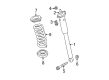
2006 Dodge Magnum Shock, Rear Part Number: 4895719AD
Product Specifications- Other Name: Shock - Suspension, Absorber, Rear; Strut & Coil Spring Assembly; ABSorber Kit; Complete Strut; Shock Absorber Suspension Rear; Shock Absorber
- Position: Rear
- Item Weight: 8.50 Pounds
- Item Dimensions: 29.0 x 6.2 x 6.4 inches
- Condition: New
- Fitment Type: Direct Replacement
- SKU: 4895719AD
- Warranty: This genuine part is guaranteed by Mopar's factory warranty.

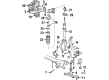
2006 Dodge Magnum Upper Retainer, Rear Part Number: 4616934
Product Specifications- Other Name: Retainer - Shock Absorber; Suspension Strut Mount Washers (Front & Rear); Shock Mount Insulator; Washer; Shock Retainer; Shock Absorber Bushing Upper; Shock Absorber Assembly
- Position: Rear Upper
- Item Weight: 0.50 Pounds
- Item Dimensions: 1.8 x 1.8 x 0.2 inches
- Condition: New
- Fitment Type: Direct Replacement
- SKU: 4616934
- Warranty: This genuine part is guaranteed by Mopar's factory warranty.
2006 Dodge Magnum Shock Absorber Part Number: 4895741AB
Product Specifications- Other Name: Strut - Suspension; Strut and Shock Absorber Assembly Kit; Coil Spring Assembly; Shock Absorber Kit; Complete Strut.; Strut; Shock Absorber Suspension
- Item Weight: 7.80 Pounds
- Condition: New
- Fitment Type: Direct Replacement
- SKU: 4895741AB
- Warranty: This genuine part is guaranteed by Mopar's factory warranty.
2006 Dodge Magnum Shock Absorber Parts and Q&A
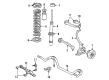
- Q: How to Effectively Service and Repair a Shock Absorber on 2006 Dodge Magnum?A: The first step is to lift and support the vehicle, then take off both the wheel mounting nuts and the tire and wheel. With an AWD model, secure the link ball joint stem to ensure you don't turn it. Then, remove the nut on the stabilizer link that's connected to the shock's clevis bracket and pull the clevis bracket off the shock assembly by removing the pinch bolt and nut. Should your RWD model have it, remove the front shock tower cap and unscrew the three nuts securing the shock tower to the shock assembly prior to lifting the vehicle and removing the wheel. After that, remove the link connecting the shock with the stabilizer, along with the cable connected to the wheel speed sensor. Remove the nut from the upper ball joint stud and then use Special Tool 9360 to take the stud off the knuckle. Lift the car and take off the shock assembly. Place the shock Spring Compressor tool over the coil spring. Once Or #6 is compressed, you can work on taking off the shock shaft nut. Take out the coil spring and look at all the parts, changing any that are damaged. To put the coil spring in position, first, put it in the compressor, then put the upper and lower isolators on the shock body and finish with the jounce bumper. Install the shock at the coil spring, making sure it sits correctly and then clamp it in place. After tightening the shock shaft retaining nut to 90 Nm, unwind the coil spring and take the shock out of the compressor carefully. Set the shock assembly into the shock tower and lock it with three nuts tightened to 27 Nm torque. For an AWD vehicle, place the clevis bracket on the shock, hold it in place with a pinch bolt and nut and attach it to the lower control arm. Secure the pinch bolt to 61 Nm torque, close the stabilizer link and screw the nut in tightly to 128 Nm torque. Make sure to install the shock assembly backwards on RWD, ensuring the upper ball joint stud is secure after tightening the nut to 47 Nm plus 90° when the stud is in its longest position. After that, slide in the tire and wheel, secure the wheel nuts with a torque of 150 Nm, let the lift down and finish by attaching the shock assembly to the shock tower.
Related 2006 Dodge Magnum Parts
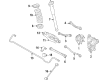
 2006 Dodge Magnum Control Arm
 2006 Dodge Magnum Axle Pivot Bushing
 2006 Dodge Magnum Axle Support Bushings
 2006 Dodge Magnum Bump Stop
 2006 Dodge Magnum Coil Spring Insulator
 2006 Dodge Magnum Coil Springs
 2006 Dodge Magnum Control Arm Bolt
 2006 Dodge Magnum Lateral Link
 2006 Dodge Magnum Leaf Spring Bushing
 2006 Dodge Magnum Shock And Strut Mount
 2006 Dodge Magnum Sway Bar Bracket
 2006 Dodge Magnum Wheel Cover