JeepParts
My Garage
My Account
Cart
OEM Dodge Magnum Shock Absorber
Suspension Shock Absorber- Select Vehicle by Model
- Select Vehicle by VIN
Select Vehicle by Model
orMake
Model
Year
Select Vehicle by VIN
For the most accurate results, select vehicle by your VIN (Vehicle Identification Number).
22 Shock Absorbers found


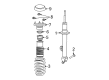
Dodge Magnum Strut Part Number: 4782992AD
$38.14 MSRP: $219.00You Save: $180.86 (83%)Ships in 1-2 Business Days


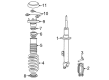
Dodge Magnum Strut Part Number: 4895467AC
$86.53 MSRP: $192.00You Save: $105.47 (55%)Ships in 1-2 Business Days
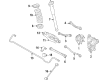
Dodge Magnum Strut Part Number: 4854577AC
$164.48 MSRP: $362.00You Save: $197.52 (55%)Ships in 1-2 Business Days

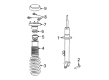
Dodge Magnum Strut Part Number: 4895743AC
$99.56 MSRP: $208.00You Save: $108.44 (53%)Ships in 1-2 Business Days

Dodge Magnum Strut Part Number: 4854576AE
$329.29 MSRP: $502.00You Save: $172.71 (35%)Ships in 1-2 Business Days
Dodge Magnum Strut Part Number: 4895466AC
$173.88 MSRP: $198.00You Save: $24.12 (13%)Ships in 1-2 Business Days
Dodge Magnum Shock Absorber, Rear Part Number: 4782714AD
$110.93 MSRP: $247.00You Save: $136.07 (56%)Ships in 1-2 Business Days
Dodge Magnum Shock Absorber Part Number: 4782712AE
$142.29 MSRP: $310.00You Save: $167.71 (55%)Ships in 1-2 Business DaysDodge Magnum Strut Part Number: 4782994AD
$100.98 MSRP: $178.00You Save: $77.02 (44%)Ships in 1-2 Business Days
Dodge Magnum Strut, Front Driver Side Part Number: 4782733AD
$188.44 MSRP: $284.00You Save: $95.56 (34%)Ships in 1-2 Business DaysDodge Magnum Strut, Front Passenger Side Part Number: 4782734AD
$215.62 MSRP: $320.00You Save: $104.38 (33%)Ships in 1-2 Business Days
Dodge Magnum Shock Absorber, Rear Part Number: 4854579AB
$355.37 MSRP: $523.00You Save: $167.63 (33%)Ships in 1-2 Business Days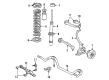
Dodge Magnum Shock Absorber Part Number: 4782993AD
$195.28 MSRP: $275.00You Save: $79.72 (29%)Ships in 1-2 Business Days
Dodge Magnum Shock Absorber Part Number: 4895717AD
Dodge Magnum Shock Absorber Part Number: 4895744AA
Dodge Magnum Shock Absorber Part Number: 4895741AB

Dodge Magnum Upper Retainer, Rear Part Number: 4616934
Dodge Magnum Shock Absorber Part Number: 4895719AC
Dodge Magnum Shock Absorber Part Number: 4895717AC
Dodge Magnum Shock, Rear Part Number: 4895719AD
| Page 1 of 2 |Next >
1-20 of 22 Results
Dodge Magnum Shock Absorber
Choose OEM Shock Absorber that meet Dodge factory standards. Dodge designs and tests every component for precision and durability. Each Shock Absorber follows strict manufacturing steps to lock in quality and fit. If your Dodge Magnum matters to you, OEM parts make the smart choice. You'll get the exact look, feel, and performance you expect. Shop genuine Magnum parts at the highly competitive prices online. Enjoy a manufacturer's warranty, a hassle-free return policy, and rapid delivery. No more guesswork with off brands. Get genuine parts with exact fit and true factory performance. Shop with confidence today at JeepPartsDeal.com.
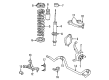
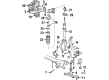
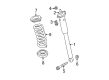
The Shock Absorber located in the Dodge Magnum automobiles is a part of the suspension system and is is designed work hand in hand with the strut. The Shock Absorber is effective in demolishing the kinetic energy into heat which results in offering a better ride quality and control on the rough surface. Over the range of production, Dodge Magnum vehicles have been fitted with Shock Absorbers of twin-tube and mono-tube mechanisms that utilize hydraulic fluid flow in various methods to optimize performance in regard to style of driving. Subclassifications such as Position Sensitive Damping (PSD) and Acceleration Sensitive Damping (ASD) presents more enhancements to the Shock Absorber's features in response to particular driving environments, electrorheological and magnetorheological dampers grant semi-active, adaptability to the suspension system based on comfort and control discriminately.
Dodge Magnum Shock Absorber Parts and Q&A
- Q: How to Install a Shock Absorber for RWD on Dodge Magnum?A:For the RWD, mount the shock assembly into the front suspension in the exact reverse order you removed it. Tightening the nut properly will shield the ball stud from possible harm. Lift the upper ball joint stud from the knuckle and push it through the upper hole making sure the nut is in place. Keep the ball joint stud fastened in place as you tighten the nut with a wrench until you reach 47 Nm plus a 90° turn of pressure. Attach the clip from the wheel speed sensor cable to the brake tube bracket. Secure the assembly by placing the lower shock bolt in the hole, but don't yet tighten the bolt. Slide the stabilizer link ball joint stem into the shock assembly from the front and screw on the nut, keeping the ball joint stud held and torque it to 128 Nm. Install the set of tires and wheels, then tighten the nuts holding the wheel onto the hub to 150 Nm. Decompress the suspension and fit the ring nuts, turning each to a tightness of 27 Nm. If there is a shock tower cap, place it above the nuts on the shock towers and snap it into its place.
- Q: How to Remove a Shock Absorber on Dodge Magnum?A:Do not try to disassemble the shock assembly until you have taken it out of your vehicle. Use a shock Spring Compressor, the Pentastar Service Equipment (PSE) tool W-7200 or an equivalent item to squeeze the coil spring according to what the manufacturer advises. The shock shaft nut should not be removed before the coil spring is compressed, since the spring is held under pressure and must have pressure relieved from both the upper and lower mounts first. The Compressor comes with holes for the shock assembly coil spring which are attached to the shock with a clamp. After that, attach the Compressor's top hooks to the upper coil spring and align the upper spring coil ends on each side by moving the shock if required. Take the tension out of the upper mount by pushing the coil spring completely down. To take the shock shaft retaining nut out, open the lock at the nut's end using Wrench Special Tool 9362, place an 8 mm socket inside the Wrench, slip it onto the hex at the shock shaft end, hold the shock shaft firmly in one hand and take out the nut using the other. Remove the clamp fastened to the coil spring's bottom, then take out the shock and lower isolator through that same path. When servicing, remove the upper mount and the coil spring from the shock shaft and note where the lower spring coil ends in relation to the compressor for a faster reassembly. Start by decreasing the Compressor drive, then pull back the upper hooks and take out the coil spring. After that, take the jounce bumper off the shock and remove the lower isolator from within the shock body. Check each component of the shock assembly for damage, checking the shock for shaft binding, checking the upper mount for cracks and warping, the upper and lower spring isolators for extreme wear, the dust shield for holes, the coil spring for fractures and rust and the jounce bumpers for breaks, replacing them if any are found.


Related Dodge Magnum Parts
 Dodge Magnum Control Arm Bushing
 Dodge Magnum Axle Beam Mount
 Dodge Magnum Axle Pivot Bushing
 Dodge Magnum Bump Stop
 Dodge Magnum Control Arm Bolt
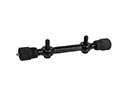 Dodge Magnum Control Arm Shaft Kit
 Dodge Magnum Lateral Link
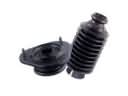 Dodge Magnum Shock and Strut Boot
 Dodge Magnum Steering Knuckle
 Dodge Magnum Sway Bar Bushing
 Dodge Magnum Sway Bar Link Bushing
 Dodge Magnum Wheel Hub
Browse Dodge Magnum Shock Absorber by Years
2008
2007
2006
2005