JeepParts
My Garage
My Account
Cart
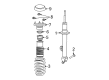
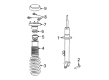
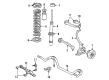
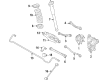
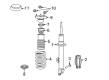
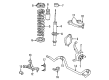
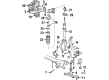
OEM 2008 Chrysler 300 Shock Absorber
Suspension Shock Absorber- Select Vehicle by Model
- Select Vehicle by VIN
Select Vehicle by Model
orMake
Model
Year
Select Vehicle by VIN
For the most accurate results, select vehicle by your VIN (Vehicle Identification Number).
18 Shock Absorbers found


2008 Chrysler 300 Strut Part Number: 4895467AC
$86.53 MSRP: $192.00You Save: $105.47 (55%)Ships in 1-2 Business DaysProduct Specifications- Other Name: Shock - Suspension; Strut & Shock Kit; Coil Spring; ABS Set; Complete Strut; Shock Absorber.; Shock Absorber Suspension; Shock
- Item Weight: 9.10 Pounds
- Item Dimensions: 5.4 x 6.1 x 29.6 inches
- Condition: New
- Fitment Type: Direct Replacement
- SKU: 4895467AC
- Warranty: This genuine part is guaranteed by Mopar's factory warranty.


2008 Chrysler 300 Strut Part Number: 5180999AA
$234.07 MSRP: $311.00You Save: $76.93 (25%)Ships in 1-2 Business DaysProduct Specifications- Other Name: Strut - Suspension; Strut and Shock Absorber Assembly Kit; Coil Spring Assembly; Shock Absorber Kit; Complete Strut.; Shock Absorber Suspension
- Replaces: 4895519AE, 4895519AD
- Item Weight: 9.50 Pounds
- Item Dimensions: 30.7 x 7.3 x 7.2 inches
- Condition: New
- Fitment Type: Direct Replacement
- SKU: 5180999AA
- Warranty: This genuine part is guaranteed by Mopar's factory warranty.

2008 Chrysler 300 Strut Part Number: 4782644AD
$242.25 MSRP: $323.00You Save: $80.75 (25%)Ships in 1-2 Business DaysProduct Specifications- Other Name: Shock - Suspension; Strut & Shock Kit; Coil Spring; ABS Set; Complete Strut; Shock Absorber.; Shock Absorber Suspension; Shock
- Item Weight: 12.20 Pounds
- Item Dimensions: 29.9 x 6.1 x 5.4 inches
- Condition: New
- Fitment Type: Direct Replacement
- SKU: 4782644AD
- Warranty: This genuine part is guaranteed by Mopar's factory warranty.


2008 Chrysler 300 Shock Absorber Part Number: 4782643AD
$294.40 MSRP: $373.21You Save: $78.81 (22%)Ships in 1-2 Business DaysProduct Specifications- Other Name: Shock - Suspension; Strut & Shock Assembly; Coil Spring; Anti-lock Braking Set; Complete Strut; Strut; Shock Absorber Suspension; Shock
- Item Weight: 9.60 Pounds
- Item Dimensions: 5.3 x 6.0 x 29.3 inches
- Condition: New
- Fitment Type: Direct Replacement
- SKU: 4782643AD
- Warranty: This genuine part is guaranteed by Mopar's factory warranty.

2008 Chrysler 300 Strut Part Number: 4895466AC
$173.88 MSRP: $198.00You Save: $24.12 (13%)Ships in 1-2 Business DaysProduct Specifications- Other Name: Shock - Suspension; Strut & Coil Spring; Shock Absorber; Complete Strut; Shock Absorber Suspension; Shock
- Item Weight: 10.00 Pounds
- Item Dimensions: 29.6 x 6.1 x 5.4 inches
- Condition: New
- Fitment Type: Direct Replacement
- SKU: 4895466AC
- Warranty: This genuine part is guaranteed by Mopar's factory warranty.
2008 Chrysler 300 Strut, Front Passenger Side Part Number: 5290471AC
$352.68 MSRP: $502.00You Save: $149.32 (30%)Ships in 1-2 Business DaysProduct Specifications- Other Name: Strut - Suspension; Front Right Shock Absorber; Strut and Coil Spring Assembly; Shock Absorber Kit; Complete Strut.; Shock Absorber Suspension; Shock Absorber; Shock
- Position: Front Passenger Side
- Replaces: 5290471AD, 5290471AB
- Item Weight: 8.80 Pounds
- Item Dimensions: 29.6 x 6.1 x 5.2 inches
- Condition: New
- Fitment Type: Direct Replacement
- SKU: 5290471AC
- Warranty: This genuine part is guaranteed by Mopar's factory warranty.

2008 Chrysler 300 Shock Absorber, Rear Part Number: 4854579AB
$355.37 MSRP: $523.00You Save: $167.63 (33%)Ships in 1-2 Business DaysProduct Specifications- Other Name: Absorber - Suspension; Rear Shock Absorber Assembly Kit; Anti-lock Braking System Shock Set; Suspension Shock Kit.; Shock Absorber Suspension Rear; Shock
- Position: Rear
- Replaces: 4854579AA
- Item Weight: 10.60 Pounds
- Condition: New
- Fitment Type: Direct Replacement
- SKU: 4854579AB
- Warranty: This genuine part is guaranteed by Mopar's factory warranty.
2008 Chrysler 300 Strut, Front Driver Side Part Number: 5290474AC
$312.72 MSRP: $476.00You Save: $163.28 (35%)Ships in 1-2 Business DaysProduct Specifications- Other Name: Strut - Suspension; Front Left Shock Absorber; Strut and Coil Spring Assembly; Shock Absorber Kit; Complete Strut.; Shock Absorber Suspension; Shock Absorber; Shock
- Position: Front Driver Side
- Replaces: 5290474AD, 5290474AB
- Item Weight: 3.70 Pounds
- Item Dimensions: 29.0 x 6.2 x 5.4 inches
- Condition: New
- Fitment Type: Direct Replacement
- SKU: 5290474AC
- Warranty: This genuine part is guaranteed by Mopar's factory warranty.

2008 Chrysler 300 Shock Absorber Part Number: 4895716AA
$121.90 MSRP: $174.00You Save: $52.10 (30%)Ships in 1-2 Business DaysProduct Specifications- Other Name: Absorber - Suspension; Strut & Shock Assembly Kit; Coil Spring; Anti-lock Braking; Complete Strut; Shock Absorber Suspension Rear
- Item Weight: 6.60 Pounds
- Item Dimensions: 29.8 x 6.1 x 5.0 inches
- Condition: New
- Fitment Type: Direct Replacement
- SKU: 4895716AA
- Warranty: This genuine part is guaranteed by Mopar's factory warranty.
2008 Chrysler 300 Strut Part Number: 4895516AC
$140.00 MSRP: $305.00You Save: $165.00 (55%)Ships in 1-2 Business DaysProduct Specifications- Other Name: Shock - Suspension; Strut & Shock Kit; Coil Spring; ABS Set; Complete Strut; Shock Absorber.; Shock Absorber Suspension; Shock
- Item Weight: 10.30 Pounds
- Item Dimensions: 30.1 x 6.9 x 6.4 inches
- Condition: New
- Fitment Type: Direct Replacement
- SKU: 4895516AC
- Warranty: This genuine part is guaranteed by Mopar's factory warranty.
2008 Chrysler 300 Strut, Front Passenger Side Part Number: 4782734AD
$215.62 MSRP: $320.00You Save: $104.38 (33%)Ships in 1-2 Business DaysProduct Specifications- Other Name: Shock - Suspension; Shock Absorber, Front Right; Strut & Spring; Anti-lock Brakes; Complete Strut.; Shock Absorber Suspension; Shock Absorber; Shock
- Position: Front Passenger Side
- Replaces: 4782734AC
- Item Weight: 9.60 Pounds
- Item Dimensions: 5.4 x 6.2 x 29.6 inches
- Condition: New
- Fitment Type: Direct Replacement
- SKU: 4782734AD
- Warranty: This genuine part is guaranteed by Mopar's factory warranty.

2008 Chrysler 300 Strut Part Number: 4895747AA
$126.56 MSRP: $196.00You Save: $69.44 (36%)Ships in 1-2 Business DaysProduct Specifications- Other Name: Strut - Suspension; Strut and Shock Absorber Assembly Kit; Coil Spring Assembly; Shock Absorber Kit; Complete Strut.; Shock Absorber Suspension
- Item Weight: 11.50 Pounds
- Item Dimensions: 29.9 x 7.0 x 6.4 inches
- Condition: New
- Fitment Type: Direct Replacement
- SKU: 4895747AA
- Warranty: This genuine part is guaranteed by Mopar's factory warranty.
2008 Chrysler 300 Shock Absorber, Front Part Number: 4895748AB
$190.37 MSRP: $260.00You Save: $69.63 (27%)Ships in 1-2 Business DaysProduct Specifications- Other Name: Strut - Suspension; Shock Absorber Front; Strut & Coil Spring Assembly; Complete Strut; Strut; Shock Absorber Suspension
- Position: Front
- Item Weight: 8.90 Pounds
- Item Dimensions: 29.6 x 6.2 x 5.2 inches
- Condition: New
- Fitment Type: Direct Replacement
- SKU: 4895748AB
- Warranty: This genuine part is guaranteed by Mopar's factory warranty.
2008 Chrysler 300 Shock Absorber, Rear Part Number: 4782714AD
$110.93 MSRP: $247.00You Save: $136.07 (56%)Ships in 1-2 Business DaysProduct Specifications- Other Name: Absorber - Suspension; Shock Absorber, Rear;Strut/Coil Kit;ABS;Complete Strut; Shock; Shock Absorber Suspension Rear
- Position: Rear
- Item Weight: 6.90 Pounds
- Item Dimensions: 33.3 x 9.1 x 3.8 inches
- Condition: New
- Fitment Type: Direct Replacement
- SKU: 4782714AD
- Warranty: This genuine part is guaranteed by Mopar's factory warranty.

2008 Chrysler 300 Shock Absorber Part Number: 4782712AE
$142.29 MSRP: $310.00You Save: $167.71 (55%)Ships in 1-2 Business DaysProduct Specifications- Other Name: Absorber - Suspension; Strut & Shock Assembly Kit; Coil Spring; Anti-lock Braking; Complete Strut; Shock Absorber Suspension Rear
- Item Weight: 6.60 Pounds
- Item Dimensions: 34.4 x 9.2 x 3.8 inches
- Condition: New
- Fitment Type: Direct Replacement
- SKU: 4782712AE
- Warranty: This genuine part is guaranteed by Mopar's factory warranty.

2008 Chrysler 300 Shock Absorber Part Number: 4895717AD
Product Specifications- Other Name: Shock - Suspension; Strut and Shock Absorber Assembly Kit; Anti-lock Braking Systemorber Set.; Shock; Shock Absorber Suspension Rear
- Item Weight: 6.90 Pounds
- Item Dimensions: 29.0 x 7.1 x 6.3 inches
- Condition: New
- Fitment Type: Direct Replacement
- SKU: 4895717AD
- Warranty: This genuine part is guaranteed by Mopar's factory warranty.

2008 Chrysler 300 Upper Retainer, Rear Part Number: 4616934
Product Specifications- Other Name: Retainer - Shock Absorber; Suspension Strut Mount Washers (Front & Rear); Shock Mount Insulator; Washer; Shock Retainer; Shock Absorber Bushing Upper; Shock Absorber Assembly
- Position: Rear Upper
- Item Weight: 0.50 Pounds
- Item Dimensions: 1.8 x 1.8 x 0.2 inches
- Condition: New
- Fitment Type: Direct Replacement
- SKU: 4616934
- Warranty: This genuine part is guaranteed by Mopar's factory warranty.
2008 Chrysler 300 Strut Part Number: 4895517AC
Product Specifications- Other Name: Shock - Suspension; Strut & Coil Spring; Shock Absorber; Complete Strut; Shock Absorber Suspension; Shock
- Item Weight: 9.90 Pounds
- Item Dimensions: 30.1 x 7.2 x 6.4 inches
- Condition: New
- Fitment Type: Direct Replacement
- SKU: 4895517AC
- Warranty: This genuine part is guaranteed by Mopar's factory warranty.
2008 Chrysler 300 Shock Absorber Parts and Q&A
- Q: How to Assemble a Shock Absorber Without Damaging the Coil Spring Coating on 2008 Chrysler 300?A: Friction coating of the spring is important for corrosion, so be careful during shock absorber assembly. Be sure to place the left and right springs in their right places. If you have removed the coil spring from the spring compressor, move onto the next step; if not, proceed to step four. Open up the coil spring so it faces up and then clip it into the lower hooks on the compressor as the manufacturer guides you. To reassemble the shock after firing it through large pipes, rotate the coil spring so that the top coil parts stick out toward the sides of the compressor. Following this, attach the upper portion of the compressor to the coil spring, then compress the spring enough so shock installation is possible. If there is an upper mount separated, attach it to the coil spring with the step on the isolator fitting over the coil end. After installing the lower spring isolator on the shock body, put the jounce bumper on the shaft's small end. Lift the bottom of the coil spring and slide the shock in from below until the lower part of the coil spring touches your isolator, ensuring the step in the isolator lines up with the bottom of the spring. Fit the stabilizer bar bracket or clevis key on AWD models so that it is pointed toward the compressor body; if it is not, move the isolator on the shock body until it is straight. Bring the shock and coil spring together and clamp them in one piece. Slide the retaining nut near the end of the shock shaft using your hands, so that you can hook the shaft's hex later using an 8 mm socket. Fit your torque wrench with the Wrench attachment, attach Special Tool 9362 onto it and then put the 8 mm socket into the hex on the end of the shock shaft. Keep the shock shaft stopped, then use a torque wrench to tighten the nut to 90 Nm (66 ft. lbs.). Completely release the spring pressure by turning the compressor drive all the way off, so that the shock pieces don't move. Take off the clamp from the shock and spring, push the spring compressor's upper and lower hooks further back so you can slip out the shock assembly and disconnect the shock from the spring. After that, place the shock assembly into the vehicle.
Related 2008 Chrysler 300 Parts
 2008 Chrysler 300 Wheel Bearing
 2008 Chrysler 300 Sway Bar Link
 2008 Chrysler 300 Wheel Hub
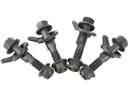 2008 Chrysler 300 Alignment Bolt
 2008 Chrysler 300 Axle Support Bushings
 2008 Chrysler 300 Bump Stop
 2008 Chrysler 300 Control Arm Bolt
 2008 Chrysler 300 Lateral Link
 2008 Chrysler 300 Leaf Spring Bushing
 2008 Chrysler 300 Shock And Strut Mount
 2008 Chrysler 300 Sway Bar Bracket
 2008 Chrysler 300 Wheel Cover