JeepParts
My Garage
My Account
Cart
OEM 2009 Dodge Charger Timing Chain
Engine Timing Chain- Select Vehicle by Model
- Select Vehicle by VIN
Select Vehicle by Model
orMake
Model
Year
Select Vehicle by VIN
For the most accurate results, select vehicle by your VIN (Vehicle Identification Number).
3 Timing Chains found


2009 Dodge Charger Timing Chain Part Number: 4892349AA
$256.73 MSRP: $315.00You Save: $58.27 (19%)Ships in 1-2 Business DaysProduct Specifications- Other Name: Chain - Timing Primary; Engine Timing Chain; Chain Timing Primary; Chain Timing
- Item Weight: 2.30 Pounds
- Item Dimensions: 22.7 x 5.2 x 2.0 inches
- Condition: New
- Fitment Type: Direct Replacement
- SKU: 4892349AA
- Warranty: This genuine part is guaranteed by Mopar's factory warranty.

2009 Dodge Charger Chain Part Number: 4663674AF
$64.67 MSRP: $73.15You Save: $8.48 (12%)Ships in 1-2 Business DaysProduct Specifications- Other Name: Chain - Timing Secondary; Engine Timing Chain; Chain Timing Secondary; Timing Chain
- Item Weight: 0.90 Pounds
- Item Dimensions: 0.7 x 5.3 x 13.1 inches
- Condition: New
- Fitment Type: Direct Replacement
- SKU: 4663674AF
- Warranty: This genuine part is guaranteed by Mopar's factory warranty.


2009 Dodge Charger Timing Chain Part Number: 53022316AC
$65.71 MSRP: $96.70You Save: $30.99 (33%)Product Specifications- Other Name: Chain - Timing; Engine Timing Chain; Chain Timing
- Item Weight: 1.30 Pounds
- Item Dimensions: 4.1 x 4.8 x 5.4 inches
- Condition: New
- Fitment Type: Direct Replacement
- SKU: 53022316AC
- Warranty: This genuine part is guaranteed by Mopar's factory warranty.
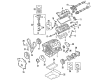
2009 Dodge Charger Timing Chain Parts and Q&A
- Q: How to Inspect and Install Sprockets, Chain Guides, and Reset a Timing Chain Tensioner on 2009 Dodge Charger?A: Examine sprockets 4, 9 and 11 and all chain guides 2, 5 and 10-repair or replace them if they are worn. Should you remove them, insert new right and left side short chain guides 10, tightening the bolts to 28 Nm (250 in. lbs.). Place the crankshaft sprocket's timing mark line up with the oil pump housing mark 3, then apply engine oil to the timing chain and the guides before installing everything. Put the left side main chain sprocket on the chain so the timing mark is centered between plated timing links 1, then drop the chain through the opening in the left cylinder head. Move the camshaft sprocket loosely into the camshaft hub so the timing plated link matches the mark on the crankshaft sprocket 3. Set the first gear of the chain onto the water pump sprocket 11, place the right camshaft sprocket timing mark above the mark on the timing chain 8 and then line this chain over the camshaft hub. Check that every chained link on your bike is situated along the correct timing marks on every sprocket. Attach the left side lower chain guide 2 and tensioner arm 5 after which you should tighten all the bolts to 28 Nm (250 in. lbs.). Examine the O-ring of each chain guide access plug before fitting them in their place and switch it when needed. Fasten the chain guide access plugs to the cylinder heads with a tightening force of 20 Nm (15 ft. lbs.). Use the check ball 2 end of Chain Tensioner Gauge 8186 3 to purge oil from the tensioner by slowly pushing the check ball into the end with the shallow hole. Let the plunger 4 in Chain Tensioner Gauge 8186 3 drop all the way, then press the cylinder plunger down until the tensioner makes a clicking sound. The tensioner must fully rest with the lower arch 4 touching the guideline on Chain Tensioner Gauge 8186 3 and check tensioner O-ring 2, replacing it if you find any nicks or cuts. Set the reset chain tensioner 1 inside the right cylinder head, place the tensioner retaining plate 2 and tighten bolts 3 using 12 Nm or 105 in. lbs. With the right cylinder bank, set camshaft damper 1 (if present) on top of its hub, slide a 3/8" square drive extension with a breaker bar into the intake camshaft drive hub and then rotate the camshaft until the hub fits the camshaft sprocket and the damper holes. Attach the bolts to the sprocket and tighten them up to 28 Nm (250 in. lbs.). Place a 1-inch extension with a breaker bar onto the intake camshaft drive hub's 3/8" drive and turn the camshaft until the installation bolts can be inserted and tightened to 26 lb. by 1 ft. Turn the crankshaft by hand clockwise to remove any tension from the timing chain if it is required. Use the flat bladed pry tool to press the tensioner arm towards the tensioner, let go of the arm and watch to see if the tensioner extends. Put the camshaft position sensor 2 into place and join the electrical connection. Fit the timing chain cover, crankshaft vibration damper and accessory drive belt during this installation. Secure the cylinder head covers, place the upper intake manifold and install the air cleaner housing assembly. Attach the negative battery cable and tighten the nut to 5 Nm or 45 in. lbs. Make sure the cooling system is full. Shortly after installing a reset tensioner, your engine may make a little noise as it warms up, but this noise goes away after just a few seconds. Run the vehicle until it gets to its normal operating temperature and monitor the engine cooling fluid. Any time a repair or replacement is done to the powertrain system's flywheel, valvetrain, camshaft or crankshaft sensors, it is necessary to perform the Cam/Crank Variation Relearn procedure.
Related 2009 Dodge Charger Parts
 2009 Dodge Charger Oil Filter
 2009 Dodge Charger Crankshaft
 2009 Dodge Charger Dipstick
 2009 Dodge Charger Oil Pan Gasket
 2009 Dodge Charger Crankshaft Pulley
 2009 Dodge Charger Cylinder Head
 2009 Dodge Charger Cylinder Head Gasket
 2009 Dodge Charger Engine Mount Bracket
 2009 Dodge Charger Oil Pump Gasket
 2009 Dodge Charger Piston Ring Set
 2009 Dodge Charger Timing Belt Tensioner
 2009 Dodge Charger Timing Cover