JeepParts
My Garage
My Account
Cart
OEM Chrysler Voyager Control Arm Bushing
Suspension Arm Bushing- Select Vehicle by Model
- Select Vehicle by VIN
Select Vehicle by Model
orMake
Model
Year
Select Vehicle by VIN
For the most accurate results, select vehicle by your VIN (Vehicle Identification Number).
3 Control Arm Bushings found


Chrysler Voyager Lower Control Arm Bushing Part Number: 4684120
$13.54 MSRP: $24.00You Save: $10.46 (44%)Ships in 1-2 Business Days


Chrysler Voyager Lower Control Arm Bushing Part Number: 4743556AA
$24.46 MSRP: $37.90You Save: $13.44 (36%)Ships in 1-2 Business Days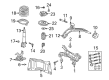
Chrysler Voyager Lower Control Arm Rear Bushing Part Number: 4743095AA
Chrysler Voyager Control Arm Bushing
Choose OEM Control Arm Bushing that meet Chrysler factory standards. Chrysler designs and tests every component for precision and durability. Each Control Arm Bushing follows strict manufacturing steps to lock in quality and fit. If your Chrysler Voyager matters to you, OEM parts make the smart choice. You'll get the exact look, feel, and performance you expect. Shop genuine Voyager parts at the highly competitive prices online. Enjoy a manufacturer's warranty, a hassle-free return policy, and rapid delivery. No more guesswork with off brands. Get genuine parts with exact fit and true factory performance. Shop with confidence today at JeepPartsDeal.com.
Chrysler Voyager Control Arm Bushing is a vital product and an element of the' suspension system widely known for its dependability and durability across several versions of the Voyager. This critical part is functioned to dampen any shock and reduce wear in between the control arm and the car frame. The Control Arm Bushing is also somewhat similar to the pivot point and enables the control arms to make proper interaction with the road and the piloting wheel while making the connection between separated wheels maintain proper alignment; this is exceptionally crucial not just for consumption of power but safety as well. control arm bushing parts that Chrysler has used for this Control Arm Bushing are rubber, steel, aluminum, and polyurethane as it offers all the requirements suited to a driver's type. Different cloth choices can greatly affect the performance of the Chrysler Voyager; they can produce basic fabric for daily use or produce a cloth type that is challenging to wear. The function of the Control Arm Bushing is diverse, and thus it makes a contribution to the ride quality of the Voyager, making it a reliable minivan. As mentioned earlier with its history dating back to the 1980's and cumulative sale of more than 12 million units Chrysler Voyager is still preferred by many families. The new sixth generation Voyager based on the Compact Wide architecture present state of the art engineering that takes the importance of the Control Arm Bushing to the next level in providing safer and smoother ride. Al in all it will besafe to conclude that the Chrysler Voyager Control Arm Bushing is highly relevant in the automotive market since its purpose is vital for maintaining a vehicle's function and life expectancy.
Chrysler Voyager Control Arm Bushing Parts and Q&A
- Q: How to Maintain and Fix a Control Arm Bushing on Chrysler Voyager?A:To repair the lower control arm rear bushing, you should remove it from the front suspension cradle and secure it in a vise so that you don't damage it. For basic bushings, take a sharp knife and divide the bushing down the middle to remove it from the lower control arm. When replacing hydro bushings, pull out the lower control arm, fix Special Tool 8460 on the hydro-bushing so the Removal Pin, Special Tool 8460-3, comes through the back hole and tighten the Bridge, Special Tool 8460-1, step. To make standard bushings easier to install, use Mopar Silicone Spray Lube inside the hole of the lower control arm rear bushing, slide the bushing until it seats firmly over the upset at the end and then hold the lower control arm firmly in a vice. For hydro bushings, hold the lower control arm in a vise, position the master spline on the bushing inner sleeve at the bottom control arm rear bushing stem and fit the bushing by hand. Place Installer Cup on the bushing and put Bridge over it, then slide Insert, Special Tool 8460-3, through the flange on the lower control arm and slip Bridge inside it. Place a wedge, Special Tool 8460-4, between the flange and the bushing inner sleeve as it comes close to the flange, then screw in the bushing against the wedge, tightening the bridge forcing screw with a torque wrench to 50 Nm (37 ft. lbs.). Don't force it any more, push back the forcing screw, remove the tool and set the new lower control arm into place.
- Q: How to Service and Repair a Control Arm Bushing for the Rear Suspension on Chrysler Voyager?A:First, disconnect the lower control arm from the front suspension cradle and clamp it loosely in a vise for servicing and repairing its rear bushing. Use a sharp tool such as a razor, to open the bushing lengthwise on the lower control arm, then carefully remove the bushing. As you start to fit the lower control arm rear bushing, spray some Mopar Silicone Spray Lube into the hole, as you shouldn't use anything else as a lubricant. When the lower control arm is stable in a vise, push the bushing onto it and turn it sideways until you see it passed the edge of the upset. The rear bushing should be placed on the lower control arm exactly as instructed. After that, put the lower control arm back onto the vehicle.


Related Chrysler Voyager Parts
 Chrysler Voyager Axle Pivot Bushing
 Chrysler Voyager Bump Stop
 Chrysler Voyager Coil Springs
 Chrysler Voyager Control Arm
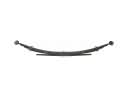 Chrysler Voyager Leaf Spring
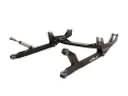 Chrysler Voyager Radius Arm
 Chrysler Voyager Shock Absorber
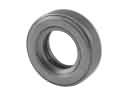 Chrysler Voyager Strut Bearing
 Chrysler Voyager Strut Housing
 Chrysler Voyager Strut Mounts
 Chrysler Voyager Sway Bar Link
 Chrysler Voyager Sway Bar Link Bushing