JeepParts
My Garage
My Account
Cart
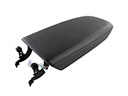
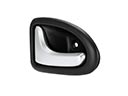
OEM Dodge Charger Center Console Base
- Select Vehicle by Model
- Select Vehicle by VIN
Select Vehicle by Model
orMake
Model
Year
Select Vehicle by VIN
For the most accurate results, select vehicle by your VIN (Vehicle Identification Number).
6 Center Console Bases found

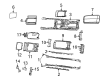
Dodge Charger Base, Center Part Number: 1LD99DX9AA
$35.47 MSRP: $204.00You Save: $168.53 (83%)Ships in 1-2 Business Days
Dodge Charger Console Body, Center Part Number: 68270656AE
$152.96 MSRP: $226.00You Save: $73.04 (33%)Ships in 1-3 Business DaysDodge Charger Console Body, Center Part Number: 68159701AC
$79.08 MSRP: $117.00You Save: $37.92 (33%)
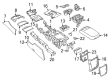
Dodge Charger Floor Console, Dark Gray, Center Part Number: 1AJ731D1AA
Dodge Charger Floor Console, Center Part Number: 1BX61XDVAA
Dodge Charger Floor Console, Gray, Center Part Number: 1BX611P7AA
Dodge Charger Center Console Base
Choose OEM Center Console Base that meet Dodge factory standards. Dodge designs and tests every component for precision and durability. Each Center Console Base follows strict manufacturing steps to lock in quality and fit. If your Dodge Charger matters to you, OEM parts make the smart choice. You'll get the exact look, feel, and performance you expect. Shop genuine Charger parts at the highly competitive prices online. Enjoy a manufacturer's warranty, a hassle-free return policy, and rapid delivery. No more guesswork with off brands. Get genuine parts with exact fit and true factory performance. Shop with confidence today at JeepPartsDeal.com.
Dodge Charger Center Console Base Parts and Q&A
- Q: How to Install a Center Console Base on Dodge Charger?A:Position the floor console back far enough that you can reach and attach the jumper wire to the accessory power outlet under the console and if there is a heated seat in the rear, connect the connector as well. Jam one side of the console into its slot on the lower panel, then use the front of the console to place the ears in the openings at the front of the panel. You should then see two alignment holes on the console matching up with the two pins on the instrument panel. Push the pin on the rear of the console into the dark hole behind your steering wheel and install and tighten both front screws to 3 Nm (23 in. lbs.). Following this, install and secure the three 8 mm bolts into the rear bin that connect the console to the floor panel transmission tunnel by turning them to 5 Nm (40 in. lbs.). Put the console shifter bezel over the gear selector lever so the tabs match the holes in the floor console, add the two screws at the front to hold it and tighten them to 3 Nm (23 in. lbs.). In the back of the console, set the mat so its curve is facing forward and, in the front of the console, place it in the cubby bin. Drop the shifter trim ring all the way to its position, then move the gear selector lever into the Park spot. For cars which have Automatic Express Up power windows, any time the door module's power is interrupted, calibration is required and the battery reconnect procedure must also be performed after disconnecting the battery. Lastly, hook the negative Battery Cable back to the car. For the install, attach the center console cover with DVD, tighten it using six screws and set the side covers in place.
- Q: How to Access the Center Console Base by Removing the Floor Console and DVD Cover on Dodge Charger?A:To remove the floor console, apply the parking brake, turn the ignition switch on, apply both service brakes and push the gear selector lever into Neutral position. Afterward, move the ignition to Off and open the service brakes. If power to the door module is disrupted in an Automatic Express Up equipped vehicle, calibration should be done. If the battery was also removed, a battery reconnect procedure should follow. Release the negative side of the battery before taking out the mat hidden at the console's front cubby and the mat found in the rear bin after you lift its lid. After that, take out the two screws from the front of the console shifter bezel, pull the bezel away from the console with a trim stick and remove the bezel from the gear selector. Unscrew the eight millimeter bolts at the rear bin and then remove the two screws that hold the front of the console to the instrument panel. Pull the console back to reach and remove the jumper wire from the accessory outlet under the console and if there is one, take out the rear heated seat harness too, before removing the floor console. To get to the Center Console Cover with DVD, lift up the console lid, take off the side covers, remove six screws and then remove the console cover.