JeepParts
My Garage
My Account
Cart
OEM Dodge Intrepid CV Boot
Axle Boot- Select Vehicle by Model
- Select Vehicle by VIN
Select Vehicle by Model
orMake
Model
Year
Select Vehicle by VIN
For the most accurate results, select vehicle by your VIN (Vehicle Identification Number).
3 CV Boots found

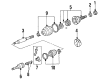
Dodge Intrepid Boot Kit Part Number: 4863722

Dodge Intrepid Inner Boot Part Number: 4728262
Dodge Intrepid Inner Boot Part Number: 4728261
Dodge Intrepid CV Boot
Choose OEM CV Boot that meet Dodge factory standards. Dodge designs and tests every component for precision and durability. Each CV Boot follows strict manufacturing steps to lock in quality and fit. If your Dodge Intrepid matters to you, OEM parts make the smart choice. You'll get the exact look, feel, and performance you expect. Shop genuine Intrepid parts at the highly competitive prices online. Enjoy a manufacturer's warranty, a hassle-free return policy, and rapid delivery. No more guesswork with off brands. Get genuine parts with exact fit and true factory performance. Shop with confidence today at JeepPartsDeal.com.
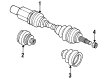
The Dodge Intrepid CV Boot serves as an essential part which enhances both reliability and performance capabilities of the Dodge Intrepid full-sized sedan model produced over 1993 to 2004. The durable rubber or plastic material which forms the flexible cover functions as an important protective layer for the CV joint because this component allows power transfer between the transaxle and wheels. Through its protective functions the Dodge Intrepid CV Boot maintains CV joint grease while blocking outside elements and this protects the drivetrain system efficiency and vehicle safety performance. This CV Boot fits multiple Dodge Intrepid versions because it follows each model requirement ensuring exceptional performance in every generation. A reliable reputation follows the Dodge Intrepid because its CV Boot has shown to extend the lifespan of the vehicle. The automaker automobile CV Boot distinguishes itself in the automotive market by combining its durable build with strength under challenging driving situations which establishes it as a preferred component for car owners. As the car CV Boot extends both functional capabilities and durability it proves to be a critical component which guarantees model vehicles remain reliable family-friendly options for all driving enthusiasts.
Dodge Intrepid CV Boot Parts and Q&A
- Q: How to Replace a CV Boot on the Inner Constant Velocity Joint on Dodge Intrepid?A:Before putting in a new inner constant velocity boot, you need to take the halfshafts out of the vehicle. Remove the big boot clamp from where it attaches the inner tripod boot to the tripod joint, along with the little clamp on the boot at the shaft connection, then lift the inner tripod boot out of the housing and slide it down the shaft. Put one hand between the spider joint and tripod joint housing to keep the rollers from falling out. Then, move the interconnecting shaft and spider assembly out of the tripod joint housing, unseat the snap ring joining the spider to the shaft and remove the spider using a brass drift if required. Examine and clean the spider assembly, tripod joint housing and shaft for heavy wear, as any worn parts mean the halfshaft must be changed because the components are not serviceable. Start installation by putting the retaining clamp on the shaft, then install the new inner tripod joint sealing boot so that just the thinest groove is exposed. Put the spider assembly onto the shaft and make sure it is all the way in to set up for the snap ring. Put about half of the grease from the seal boot service package inside the tripod housing and the rest in the sealing boot. Introduce the spider assembly and connecting shaft into the tripod point, then use Crimper, Special Tool C-4975, to evenly clamp the seal onto the shaft so it does not show any dimples. Slide the tripod housing retaining groove over the sealing boot and then clamp it in place using the same crimping tool. After that, place the halfshaft back into the vehicle.

Related Dodge Intrepid Parts
 Dodge Intrepid Shift Cable
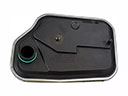 Dodge Intrepid Automatic Transmission Filter
 Dodge Intrepid Automatic Transmission Shift Levers
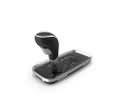 Dodge Intrepid Automatic Transmission Shifter
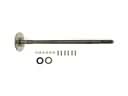 Dodge Intrepid Axle Shaft
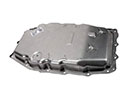 Dodge Intrepid Transmission Pan
Browse Dodge Intrepid CV Boot by Years
2004
2003
2002
2001
2000
1999
1998
1997
1996
1995
1994
1993