JeepParts
My Garage
My Account
Cart
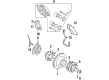
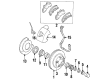
OEM Dodge Ram 3500 Parking Brake Shoe
Emergency Parking Brake Shoe- Select Vehicle by Model
- Select Vehicle by VIN
Select Vehicle by Model
orMake
Model
Year
Select Vehicle by VIN
For the most accurate results, select vehicle by your VIN (Vehicle Identification Number).
5 Parking Brake Shoes found


Dodge Ram 3500 Parking Brake Shoes, Rear Part Number: 68049116AA
$52.54 MSRP: $77.85You Save: $25.31 (33%)Ships in 1-2 Business DaysDodge Ram 3500 Parking Brake Shoes, Rear Part Number: 5018550AB
$145.99 MSRP: $220.00You Save: $74.01 (34%)Ships in 1-2 Business Days
Dodge Ram 3500 Shoes Part Number: 5015337AC
Dodge Ram 3500 Shoes Part Number: 5013813AB
Dodge Ram 3500 Parking Brake Shoes, Rear Part Number: 5179334AC
Dodge Ram 3500 Parking Brake Shoe
Choose OEM Parking Brake Shoe that meet Dodge factory standards. Dodge designs and tests every component for precision and durability. Each Parking Brake Shoe follows strict manufacturing steps to lock in quality and fit. If your Dodge Ram 3500 matters to you, OEM parts make the smart choice. You'll get the exact look, feel, and performance you expect. Shop genuine Ram 3500 parts at the highly competitive prices online. Enjoy a manufacturer's warranty, a hassle-free return policy, and rapid delivery. No more guesswork with off brands. Get genuine parts with exact fit and true factory performance. Shop with confidence today at JeepPartsDeal.com.
Parking Brake Shoe is efficiently used in Dodge Ram 3500 vehicles; an important component which holds the wheels in place when the parking brake is on. Through use of brake lining, the Parking Brake Shoe make rubbing contact with the drum wall, the wheels therefore will not rotate and the vehicle will not move. Although there can be differences in the kind or type of Parking Brake Shoe in Ram 3500 different models, still, the general usage and working of this part does not have much change, especially when it comes to the essence of this component to the safety and stability of the automobile.
Dodge Ram 3500 Parking Brake Shoe Parts and Q&A
- Q: How to Service and Repair Parking Brake Shoes on Dodge Ram 3500?A:Service and repairs should be done with the vehicle lifted, the tire and wheel assembly removed, along with the rotor and caliper. On the Parking Brake Cable, apply locking pins (2) and pull the brake part back so you can remove the park brake shoes with less difficulty. Remove the axleshaft (1) next and separate the rear park brake shoes (4). Clean the framework outside the brake pad using damp water on a cloth or spraying brake cleaner, but don't use other cleaners. Fine sandpaper should be used to deal with light rust and scale on the brake shoe contact pads found on the support plate. Riveted brake shoes (2) should be changed once the linings are worn to within 0.78 mm (1/32 inch) of the rivet heads and lining on bonded brake shoes should be changed at a thickness of 1.6 mm (1/16 inch). Examine the lining contact on each shoe to look for bending or narrowing down near the drum; only perfectly symmetrical (2) shoes should be kept and the drum should be inspected for any runout or change in shape. If there is damage to the fineness teaching screw or the tinny part or if severe discoloration is noted, replace the whole slider assembly (5). Remove and discard any worn, crooked or damaged brake springs (3) and retainer springs (4) and replace them if there is brake drag, because heat can damage the springs. Look at the contact pads on support plate (1) and change the support plate if any are worn, rusted or if it is misshapen. When finished changing the parking brake lining, drive that section at 25 mph on dry pavement and use about half the pressure of the parking brake foot pedal to condition the system. Assemble the rear park brake shoes (1), slide the axleshaft (1) into place and link the end of the park brake cable to the back of the support plate before unlocking it. Set the disc brake rotor together with the caliper, adjust the rear brake shoes, put on the tire and then wheel assembly and lower the vehicle after.
- Q: How to Maintain and Fix Parking Brake Shoes on Dodge Ram 3500?A:Before servicing or repairing the parking brake shoes, jack the vehicle up and support it, take off the tire and wheel assembly and then the disc Brake Caliper and disc brake rotor. Secure the Parking Brake Cable so it doesn't get in the way and unhook it from the back of the brake rotor to make uncovering the park brake shoes simpler. After that, take off the Axle Shaft and unscrew the rear park brake shoes. Use water dampened cloths or brake cleaner to wipe down the surfaces of the cover and other brake parts, but not any other cleaning solutions. Gently rub the rusted and scaly brake shoe contact pads with fine sandpaper to remove them. Change riveted brake shoes once the rivets are within 0.78 mm from the original lining, but bonded lining needs to go if it is worn down to 1.6 mm. For shoes, ensure that the design of the lining is not changed by bending or twisting and inspect the adjuster screw assembly, swapping it if the star wheel or threads are bad or if it has rusted fast. Throw out any bending, worn or breaking springs and retainer parts, primarily if brakes drag, as the heat from normal driving can weaken them. Examine the brake shoe contact pads on the support plate and replace the whole plate if you find that any of the pads are worn or rusty or the plate is bent. For installation, put the rear park brake shoes together, insert the axle shaft and attach the park brake cable to the lever behind the support plate before unlocking the cable. Later, you should install the caliper and rotor, adjust the rear shoes, assemble the tire and wheel and then slowly lower your car. We suggest stopping a new vehicle or a vehicle with new lining from 25 mph on dry pavement or concrete using only medium or gentle pressure on the parking brake pedal.

Related Dodge Ram 3500 Parts
 Dodge Ram 3500 Parking Brake Cable
 Dodge Ram 3500 ABS Control Module
 Dodge Ram 3500 Brake Caliper
 Dodge Ram 3500 Brake Caliper Bracket
 Dodge Ram 3500 Brake Caliper Piston
 Dodge Ram 3500 Brake Disc
 Dodge Ram 3500 Brake Pad
 Dodge Ram 3500 Brake Proportioning Valve
 Dodge Ram 3500 Speed Sensor
 Dodge Ram 3500 Wheel Bearing Dust Cap
 Dodge Ram 3500 Wheel Cylinder
 Dodge Ram 3500 Wheel Seal