JeepParts
My Garage
My Account
Cart
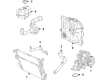
OEM Jeep Grand Cherokee Water Pump
H2O Pump- Select Vehicle by Model
- Select Vehicle by VIN
Select Vehicle by Model
orMake
Model
Year
Select Vehicle by VIN
For the most accurate results, select vehicle by your VIN (Vehicle Identification Number).
21 Water Pumps found


Jeep Grand Cherokee Water Pump Part Number: 68382492AA
$210.74 MSRP: $315.00You Save: $104.26 (34%)


Jeep Grand Cherokee Water Pump Part Number: 53022189AH
$176.17 MSRP: $267.00You Save: $90.83 (35%)Ships in 1-2 Business Days


Jeep Grand Cherokee Water Pump Part Number: 68382489AA
$255.26 MSRP: $387.00You Save: $131.74 (35%)Ships in 1-2 Business Days


Jeep Grand Cherokee Water Pump Part Number: 68165882AD
$632.06 MSRP: $961.00You Save: $328.94 (35%)


Jeep Grand Cherokee Water Pump Part Number: 68211202AB
$761.35 MSRP: $1150.00You Save: $388.65 (34%)


Jeep Grand Cherokee Water Pump Part Number: 68382493AA
$138.26 MSRP: $207.00You Save: $68.74 (34%)Ships in 1-2 Business Days


Jeep Grand Cherokee Water Pump Part Number: 68346915AA
$241.33 MSRP: $355.00You Save: $113.67 (33%)Ships in 1-2 Business Days

Jeep Grand Cherokee Water Pump Part Number: 53022095AJ
$351.71 MSRP: $498.00You Save: $146.29 (30%)

Jeep Grand Cherokee Water Pump Part Number: 68311108AE
$146.56 MSRP: $202.00You Save: $55.44 (28%)
Jeep Grand Cherokee Auxiliary Pump Part Number: 68306477AB
$436.25 MSRP: $635.00You Save: $198.75 (32%)
Jeep Grand Cherokee Water Pump Part Number: 68633984AA
$110.81 MSRP: $166.00You Save: $55.19 (34%)Ships in 1-2 Business Days
Jeep Grand Cherokee Pump - Water Part Number: 5048709AH
$66.85 MSRP: $98.40You Save: $31.55 (33%)Ships in 1-2 Business Days
Jeep Grand Cherokee Auxiliary Pump Part Number: 68381479AB
$55.85 MSRP: $82.00You Save: $26.15 (32%)Ships in 1-2 Business Days
Jeep Grand Cherokee Water Pump Part Number: 68408707AB
$54.00 MSRP: $77.60You Save: $23.60 (31%)Ships in 1-2 Business Days
Jeep Grand Cherokee Pump - Water Part Number: 68346916AB
$299.25 MSRP: $419.00You Save: $119.75 (29%)
Jeep Grand Cherokee Pump - Water Part Number: 68670653AA
$206.96 MSRP: $284.00You Save: $77.04 (28%)


Jeep Grand Cherokee Water Pump Part Number: 5184498AH
$57.94 MSRP: $83.50You Save: $25.56 (31%)


Jeep Grand Cherokee Water Pump Part Number: 4626215AF
$83.56 MSRP: $123.00You Save: $39.44 (33%)
Jeep Grand Cherokee Water Pump Part Number: 53022340AC

Jeep Grand Cherokee Pump - Water Part Number: 68667064AA
$213.00 MSRP: $314.00You Save: $101.00 (33%)
| Page 1 of 2 |Next >
1-20 of 21 Results
Jeep Grand Cherokee Water Pump
Choose OEM Water Pump that meet Jeep factory standards. Jeep designs and tests every component for precision and durability. Each Water Pump follows strict manufacturing steps to lock in quality and fit. If your Jeep Grand Cherokee matters to you, OEM parts make the smart choice. You'll get the exact look, feel, and performance you expect. Shop genuine Grand Cherokee parts at the highly competitive prices online. Enjoy a manufacturer's warranty, a hassle-free return policy, and rapid delivery. No more guesswork with off brands. Get genuine parts with exact fit and true factory performance. Shop with confidence today at JeepPartsDeal.com.
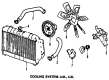
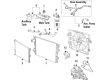
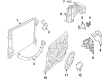
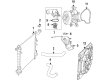
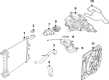
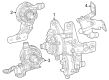
The Water Pump in Jeep Grand Cherokee vehicles is critical in circulating the coolant in the vehicle's water jacket and the radiator so as to cool the engine. On the other hand it enables coolant to accumulate heat produced by combustion process in the engine and release it in the atmospheric air. Historically, the water pump of Jeep Grand Cherokee has always been driven by belt from the crank, however with advancing technology, the latest models are incorporating electric water pumps which help in reducing the losses of parasitic and controlling the flow of the coolant depending on the present temperature of the engine. For years, Jeep Grand Cherokee has been having different types of water pump such as the cast iron and aluminum types. Whereas early models of water pumps used cast iron, modern water pumps are predominantly aluminum, a rotating shaft with an impeller for increased coolant circulation rate. Performance water pumps are also offered, to be used in high compression engines and produce better flow rates and efficiency. These pumps can be of mechanical or electrical type with electric type as being more versatile in terms of installation and use, so good for both standard and after market Jeep Grand Cheroke Jeep grand cherokee.
Jeep Grand Cherokee Water Pump Parts and Q&A
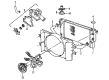
- Q: How Is a Water Pump Serviced on 3.7L Engines on Jeep Grand Cherokee?A:The timing chain case cover on 3.7L vehicles secures the mounted water pump. Take off the negative cable from the battery and drain your cooling system first. To work with constant tension hose clamps, use the special clamp tool (number 6094) or a larger tool like the Snap-On clamp (number HPC-20) and always have safety glasses on. Be sure, when using constant tension clamps, to pick the exact same clamps with the same numbers or letters as those installed before. Loosen the two screws that hold the fan shroud-to-radiator pieces and unplug the coolant overflow hose. After that, take out the accessory Drive Belt, remove the lower radiator hose clamp and remove the lower hose at the water pump. Remove the seven water pump bolts and one stud bolt, without prying at the water pump on the timing chain case to prevent damage. Throw away the gasket after you remove both the water pump and gasket and carefully clean the sealing area without damaging it. Look at the water pump assembly for fractures, shaft-seal leaks, breakage or wobbliness of bearings or the impeller touching the inside of the pump or its cover/case. For installing the unit, first, clean the land around the gasket, put the new water pump gasket in place and screw in the bolts to a tightness of 54 Nm (40 ft. lbs.). Rotate the water pump to prevent the impeller from touching the timing chain case/cover and connect the radiator lower hose to the water pump after that. Adjust the tension on the Belt Tensioner, then place the drive belt making certain it avoids overheating thanks to correct placement of the water pump; use the Belt Routing Label close to the engine for guidance on the path. Tighten the fan shroud so that all air flows through the radiator and after that, put in the two screws connecting the shroud to the radiator. There should be at least 25 mm (1.0 inches) between the tips of the fan blades and the fan shroud. Pour the correct coolant, reattach the negative Battery Cable, start up the engine and look for leaks.
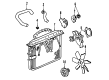
- Q: How to Remove and Replace a Water Pump on a 3.7L Engine on Jeep Grand Cherokee?A:The first step is to cut the negative cable of the battery and drain away the cooling fluid. To remove and install constant tension clamps correctly, use a Snap-on clamp tool (hpc-20) for larger types and make sure you wear safety glasses. Should you ever replace a constant tension clamp, only use a clamp that corresponds with the number or letter stamped on the device's tongue. After that, unlock the two fan shroud-to-radiator screws and disconnect the coolant overflow hose. Later, take off the accessory Drive Belt, remove the clamp on the lower radiator hose and pull the lower hose away from the water pump. Work your way through the seven removal bolts and the one stud bolt for the water pump, being careful not to try to pull off the water pump connected to the timing chain case/cover, to prevent damaging anything and possibly developing leaks. In the end, detach the water pump as well as its gasket and toss out the gasket.


Related Jeep Grand Cherokee Parts
 Jeep Grand Cherokee Radiator Cap
 Jeep Grand Cherokee Thermostat Housing
 Jeep Grand Cherokee Drive Belt
 Jeep Grand Cherokee Belt Tensioner
 Jeep Grand Cherokee Fan Clutch
 Jeep Grand Cherokee Intercooler
 Jeep Grand Cherokee Coolant Pipe
 Jeep Grand Cherokee Coolant Reservoir Cap
 Jeep Grand Cherokee Fan Blade
 Jeep Grand Cherokee Idler Pulley Bolt
 Jeep Grand Cherokee Water Hose
 Jeep Grand Cherokee Water Pump Gasket