JeepParts
My Garage
My Account
Cart
OEM 2000 Dodge Dakota Timing Cover
Engine Timing Cover- Select Vehicle by Model
- Select Vehicle by VIN
Select Vehicle by Model
orMake
Model
Year
Select Vehicle by VIN
For the most accurate results, select vehicle by your VIN (Vehicle Identification Number).
1 Timing Cover found


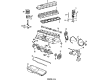
2000 Dodge Dakota Timing Cover Part Number: 53020222
$172.36 MSRP: $254.00You Save: $81.64 (33%)Ships in 1-2 Business DaysProduct Specifications- Other Name: Cover - Timing Belt; Engine Timing Cover; Front Cover; Timing Cover Assembly with Seal; Timing Belt Cover.
- Item Weight: 2.30 Pounds
- Item Dimensions: 14.3 x 9.6 x 3.7 inches
- Condition: New
- Fitment Type: Direct Replacement
- SKU: 53020222
- Warranty: This genuine part is guaranteed by Mopar's factory warranty.
2000 Dodge Dakota Timing Cover Parts and Q&A
- Q: How to Service and Repair a Timing Cover on 2000 Dodge Dakota?A: Before touching the timing cover for service or repair, disconnect the battery negative cable. Remove the drive belt and then remove the accessory drive brackets fixed to the timing case cover. After that, remove the fan and hub assembly together with the fan shroud. If the A/C compressor and generator bracket assembly is installed, pull it off the cyinder head and keep it somewhere safe. After that, take out the vibration damper, then the oil pan-to-timing case cover bolts and finally the timing case cover-to-cylinder block bolts. Remove the cover and gasket from the timing case on the engine's side and pry the crankshaft seal out of the cover from the front area. Before installing the engine, first make sure to clean the surfaces of the timing case cover, oil pan and cylinder block gasket. Replace the old crankshaft oil seal in the timing case cover with the open end facing inside, use the Seal Installation Tool 6139 and support the cover around the seal area as you push it home. Put the oil pan gasket and the timing case cover on top of the cylinder block, then set the gasket on top. Drop Timing Case Cover Alignment and Seal Installation Tool 6139 into the crankshaft opening on the cover. Put the cover unit on top of the block, holding it in place with the 1/4 cover bolts and finish by installing the 5/16 front cover bolts and tightening both with the correct torque. After removing the cover alignment tool, cover the seal hub with a light amount of engine oil, then put Mopar Silicone Rubber Adhesive Sealant on the keyway of the crankshaft. After putting the key in, attach the vibration damper, washer and bolt, lubricating the bolt and tightening it to 108 Nm (80 ft. lbs.). Put back the A/C compressor and generator bracket assembly, then the engine fan and hub with the shroud. After fitting the accessory drive belt, tighten it to the correct tension and connect the battery's negative cable once more.
Related 2000 Dodge Dakota Parts
 2000 Dodge Dakota Timing Chain
 2000 Dodge Dakota Camshaft Plug
 2000 Dodge Dakota Crankshaft
 2000 Dodge Dakota Crankshaft Pulley
 2000 Dodge Dakota Crankshaft Thrust Washer Set
 2000 Dodge Dakota Lash Adjuster
 2000 Dodge Dakota Oil Filler Cap
 2000 Dodge Dakota Piston
 2000 Dodge Dakota Piston Ring Set
 2000 Dodge Dakota Timing Belt Tensioner
 2000 Dodge Dakota Timing Cover Gasket
 2000 Dodge Dakota Valve Stem Seal