JeepParts
My Garage
My Account
Cart
OEM 2000 Dodge Neon Steering Knuckle
Front Steering Knuckle- Select Vehicle by Model
- Select Vehicle by VIN
Select Vehicle by Model
orMake
Model
Year
Select Vehicle by VIN
For the most accurate results, select vehicle by your VIN (Vehicle Identification Number).
2 Steering Knuckles found


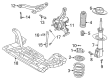
2000 Dodge Neon Knuckle, Front Driver Side Part Number: 4656091AE
$113.96 MSRP: $218.00You Save: $104.04 (48%)Ships in 1-2 Business DaysProduct Specifications- Other Name: Knuckle - Front; Steering Knuckle, Front Left; Knuckle Front
- Position: Front Driver Side
- Replaces: 4656091AD
- Item Weight: 10.90 Pounds
- Item Dimensions: 14.3 x 13.4 x 6.8 inches
- Condition: New
- Fitment Type: Direct Replacement
- SKU: 4656091AE
- Warranty: This genuine part is guaranteed by Mopar's factory warranty.
2000 Dodge Neon Knuckle, Front Passenger Side Part Number: 4656090AE
$194.86 MSRP: $320.00You Save: $125.14 (40%)Ships in 1-2 Business DaysProduct Specifications- Other Name: Knuckle - Front; Steering Knuckle, Front Right; Knuckle Front
- Position: Front Passenger Side
- Replaces: 4656090AD
- Item Weight: 11.60 Pounds
- Item Dimensions: 13.7 x 12.1 x 6.3 inches
- Condition: New
- Fitment Type: Direct Replacement
- SKU: 4656090AE
- Warranty: This genuine part is guaranteed by Mopar's factory warranty.
2000 Dodge Neon Steering Knuckle Parts and Q&A
- Q: How to Service a Steering Knuckle on 2000 Dodge Neon?A: When servicing the steering knuckle, put the brakes on, lift the vehicle and take off the front tire and wheel assembly. While you press the brakes, undo and take out the hub nut from the driveshaft. Later, remove the two guide pin bolts connecting the front brake caliper and the steering knuckle and gently pull the caliper away from the brake rotor. Place the caliper somewhere it won't put pressure on the hydraulic hose. Take out any plastic clips from the mounting studs and lift off the rotor. Loosen the nut on the outer tie rod where it meets the steering knuckle, while you hold the rod stud with the wrench. To remove the tie rod end and heat shield, use the Remover, Special Tool MB991113. Don't remove the spindle clamping screw that connects the steering knuckle to the strut assembly. Taking care not to harm the seal, remove both bolts that secure the strut to the steering knuckle. Pry down on the lower control arm to take the ball joint stud away from the steering knuckle. Support the driveshaft so the inner CV joint doesn't move and pull the steering knuckle off the driveshaft C/V joints splines. Should you replace the steering knuckle, make a note to change the wheel bearing as well, because the front cartridge type bearing cannot be carried over. Put the hub of the steering knuckle onto the driveshaft C/V joint splines, line it up with the ball joint stud and tighten it with a new pinch bolt and nut to 95 Nm (70 ft. lbs.). Hold the strut assembly-to-steering knuckle attaching bolts still while adding the nuts, then secure the lower end of the strut assembly with the upper end of the steering knuckle, add the two attaching bolts, with the nuts facing the front of the vehicle and tighten them to 53 Nm (40 ft. lbs.) plus an additional 90° turn of a wrench. Slide the tie rod heat shield on the knuckle arm, match the hole and tighten the outer tie rod ball stud nut with 55 Nm (40 ft. lbs.) of force with a crowfoot wrench. Attach the brake rotor to the hub, after which the disc brake caliper should be installed with both sides in correct alignment. Hold the caliper in place by tightening the two guide pin bolts to 22 Nm (192 inch lbs.). Brush any debris off the outer section of the driveshaft C/V joint, add the hub nut and tighten it. As the helper keeps the brakes pressed, tighten the hub nut to 244 Nm (180 ft. lbs.). After that, fit the tire and wheel onto the hub, tighten all wheel nuts to 135 Nm (100 ft. lbs.), drive the vehicle off the lift and finally adjust toe to the proper amount at the front.
Related 2000 Dodge Neon Parts
 2000 Dodge Neon Control Arm
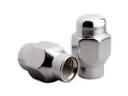 2000 Dodge Neon Lug Nuts
 2000 Dodge Neon Wheel Bearing
 2000 Dodge Neon Wheel Hub
 2000 Dodge Neon Bump Stop
 2000 Dodge Neon Coil Spring Insulator
 2000 Dodge Neon Coil Springs
 2000 Dodge Neon Shock Absorber
 2000 Dodge Neon Shock And Strut Mount
 2000 Dodge Neon Sway Bar Bracket
 2000 Dodge Neon Sway Bar Kit
 2000 Dodge Neon Sway Bar Link