JeepParts
My Garage
My Account
Cart
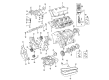
OEM 2001 Chrysler Concorde Engine Mount
Engine Motor Mount- Select Vehicle by Model
- Select Vehicle by VIN
Select Vehicle by Model
orMake
Model
Year
Select Vehicle by VIN
For the most accurate results, select vehicle by your VIN (Vehicle Identification Number).
7 Engine Mounts found

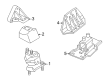
2001 Chrysler Concorde Front Mount, Driver Side Part Number: 4593287AB
$32.32 MSRP: $160.00You Save: $127.68 (80%)Ships in 1-2 Business DaysProduct Specifications- Other Name: Support - Engine Support; Engine Mount, Left; Engine Mount Torque Strut; Engine Mount Bracket; Motor Mount; Front Insulator; Mount
- Position: Driver Side
- Item Weight: 4.70 Pounds
- Condition: New
- Fitment Type: Direct Replacement
- SKU: 4593287AB
- Warranty: This genuine part is guaranteed by Mopar's factory warranty.


 Product Specifications
- Other Name: Bracket - Engine Mount; Engine Mount Bracket, Right; Engine Mount Torque Strut; Motor Mount; Mount Bracket; Bracket Engine Mount; Engine Mount Bracket
- Position: Passenger Side
- Item Weight: 2.20 Pounds
- Item Dimensions: 10.3 x 10.6 x 10.5 inches
- Condition: New
- Fitment Type: Direct Replacement
- SKU: 4593182
- Warranty: This genuine part is guaranteed by Mopar's factory warranty.
- Product Specifications
- Other Name: Support - Engine Support; Engine Mount, Front, Front Right, Right; Engine Mount Bracket; Motor Mount; Mount
- Position: Passenger Side
- Item Weight: 5.30 Pounds
- Item Dimensions: 5.4 x 4.5 x 4.5 inches
- Condition: New
- Fitment Type: Direct Replacement
- SKU: 4593184AB
- Warranty: This genuine part is guaranteed by Mopar's factory warranty.
2001 Chrysler Concorde Front Mount, Driver Side Part Number: 4593285AB
Product Specifications- Other Name: Support - Engine Support; Engine Mount, Front, Front Left, Left; Engine Mount Bracket; Motor Mount; Mount
- Position: Driver Side
- Condition: New
- Fitment Type: Direct Replacement
- SKU: 4593285AB
- Warranty: This genuine part is guaranteed by Mopar's factory warranty.
- Product Specifications
- Other Name: Bracket - Engine Mount; Engine Mount Bracket, Left; Engine Mount Torque Strut; Motor Mount; Mount Bracket; Bracket Engine Mount; Engine Mount Bracket
- Position: Driver Side
- Condition: New
- Fitment Type: Direct Replacement
- SKU: 4593245
- Warranty: This genuine part is guaranteed by Mopar's factory warranty.

 Product Specifications
- Other Name: Bracket - Engine Mount; Engine Mount Bracket, Right; Engine Mount Torque Strut; Motor Mount; Front Bracket; Bracket Engine Mount; Engine Mount Bracket
- Position: Passenger Side
- Condition: New
- Fitment Type: Direct Replacement
- SKU: 4593244
- Warranty: This genuine part is guaranteed by Mopar's factory warranty.
2001 Chrysler Concorde Mount Bracket, Driver Side Part Number: 4593243
Product Specifications- Other Name: Bracket - Engine Mount; Engine Mount Bracket, Left; Engine Mount Torque Strut; Motor Mount; Front Bracket; Bracket Engine Mount; Engine Mount Bracket
- Position: Driver Side
- Item Weight: 1.40 Pounds
- Condition: New
- Fitment Type: Direct Replacement
- SKU: 4593243
- Warranty: This genuine part is guaranteed by Mopar's factory warranty.
2001 Chrysler Concorde Engine Mount Parts and Q&A
- Q: How to Service and Repair a Right Engine Mount on 2001 Chrysler Concorde?A: First, set your car on a hoist and unscrew the nuts that hold the isolator to the mount's top bracket. Set the jack under the frame and place a block of wood below it, close to the engine, then remove the nuts attaching the isolator to the frame's bottom. Jack up the engine just enough so you can remove the isolator with the heat shield. Begin installation by fixing the isolator mount with the heat shield onto the frame, then set the engine into place on the mount. After taking off the jack, close the isolator to frame nuts to 61 Nm (45 ft. lbs.) and set the upper attaching nuts on the mount, tightening each of them to 61 Nm (45 ft. lbs.). After everything else, bring the vehicle down.
Related 2001 Chrysler Concorde Parts
 2001 Chrysler Concorde Cam Gear
 2001 Chrysler Concorde Camshaft Seal
 2001 Chrysler Concorde Crankshaft Pulley
 2001 Chrysler Concorde Cylinder Head
 2001 Chrysler Concorde Cylinder Head Gasket
 2001 Chrysler Concorde Dipstick Tube
 2001 Chrysler Concorde Lash Adjuster
 2001 Chrysler Concorde Oil Filter
 2001 Chrysler Concorde Oil Pan Gasket
 2001 Chrysler Concorde Rocker Arm
 2001 Chrysler Concorde Timing Chain Tensioner
 2001 Chrysler Concorde Transmission Mount