JeepParts
My Garage
My Account
Cart
OEM 2001 Chrysler Sebring Intake Manifold
Engine Intake Manifold- Select Vehicle by Model
- Select Vehicle by VIN
Select Vehicle by Model
orMake
Model
Year
Select Vehicle by VIN
For the most accurate results, select vehicle by your VIN (Vehicle Identification Number).
4 Intake Manifolds found

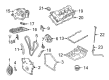
2001 Chrysler Sebring Intake Manifold, Upper Part Number: 4792596AG
$157.87 MSRP: $302.00You Save: $144.13 (48%)Ships in 1-2 Business DaysProduct Specifications- Other Name: Plenum - Intake Manifold; Engine Intake Manifold, Upper; Intake Plenum; Plenum Intake Manifold
- Position: Upper
- Item Weight: 9.20 Pounds
- Condition: New
- Fitment Type: Direct Replacement
- SKU: 4792596AG
- Warranty: This genuine part is guaranteed by Mopar's factory warranty.


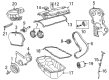
2001 Chrysler Sebring Intake Manifold Part Number: MD354398
Product Specifications- Other Name: Manifold - Engine Intake; Manifold Engine Intake
- Item Weight: 5.40 Pounds
- Condition: New
- Fitment Type: Direct Replacement
- SKU: MD354398
- Warranty: This genuine part is guaranteed by Mopar's factory warranty.

2001 Chrysler Sebring Intake Manifold, Lower Part Number: 4591273AB
Product Specifications- Other Name: Manifold - Intake; Engine Intake Manifold, Lower; Manifold Intake
- Position: Lower
- Item Weight: 1.60 Pounds
- Item Dimensions: 16.5 x 4.3 x 1.5 inches
- Condition: New
- Fitment Type: Direct Replacement
- SKU: 4591273AB
- Warranty: This genuine part is guaranteed by Mopar's factory warranty.

2001 Chrysler Sebring Intake Manifold Part Number: 4792432AD
Product Specifications- Other Name: Manifold - Intake; Engine Intake Manifold; Manifold Intake
- Condition: New
- Fitment Type: Direct Replacement
- SKU: 4792432AD
- Warranty: This genuine part is guaranteed by Mopar's factory warranty.
2001 Chrysler Sebring Intake Manifold Parts and Q&A
- Q: How to Service an Intake Manifold on 2001 Chrysler Sebring?A: To work on the intake manifold, empty the IC fuel pressure, ventilate where you are working and do not use anything that could spark. Remove the negative cable from the battery and let all the cooling fluid drain out. Unhook the air inlet hose from the throttle body, then remove the whole air cleaner housing assembly. Next, disconnect both cables attached to the throttle lever. Cut off the EGR tube and remove the oil dipstick with its tube, then seal the cut hole in the block to keep dirt from entering the crankcase. Unplug the vacuum hoses you need and the fuel quick connect at the fuel rail and then wrap shop towels around the loose ends to stop any spills. Release the bolt on the fuel rail bracket that keeps it to the side of the cylinder head and also remove the electrical connectors from the fuel injectors, knock sensor, ECT sensor, IAC, TPS, MAP sensor, A/C pressure sensor, A/C compressor clutch and generator. Once the wiring harness is in place, take out the fuel rail, coolant outlet connector and intake manifold fasteners to remove the whole unit. Toss the gaskets and clean each area that makes a seal. Examine all manifold surfaces to make sure they are flat within 0.15 mm per 300 mm (0.006 in. per foot) of its total length and if you find cracks or signs of distortion, replace the manifold. When installing, connect the new manifold and gasket, gripping each bolt slowly and progressively until they're tightened to 12 Nm (105 in. lbs.) in the correct sequence. Connect the coolant outlet connector, the fuel rail and attach the loose electrical connections. Fixed the fuel rail bracket to the cylinder head next, looked at the hose connectors for damage and then secured the supply hose into the rail assembly. Once the engine is in place, snap the vacuum lines, the engine oil dipstick tube, EGR tube and the connections from the throttle and speed control cables into the engine bracket and throttle lever. Add liquid to the cooling system, put the negative battery cable back on and use the DRB scan tool to ASD Fuel System Test to pressurize the system and look for possible leaks, remembering that the ASD relay stays on for 7 minutes or until you choose the Stop All Test mode.
Related 2001 Chrysler Sebring Parts
 2001 Chrysler Sebring Fuel Filter
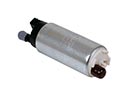 2001 Chrysler Sebring Fuel Pump
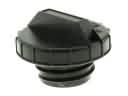 2001 Chrysler Sebring Gas Cap
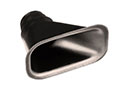 2001 Chrysler Sebring Air Duct
 2001 Chrysler Sebring Air Filter Box
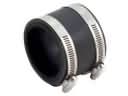 2001 Chrysler Sebring Air Intake Coupling
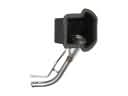 2001 Chrysler Sebring Fuel Filler Neck
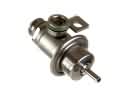 2001 Chrysler Sebring Fuel Pressure Regulator
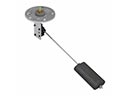 2001 Chrysler Sebring Fuel Sending Unit
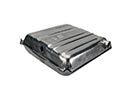 2001 Chrysler Sebring Fuel Tank
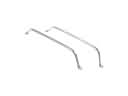 2001 Chrysler Sebring Fuel Tank Strap
 2001 Chrysler Sebring Intake Manifold Gasket