JeepParts
My Garage
My Account
Cart
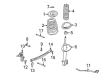
OEM 2002 Dodge Neon Shock Absorber
Suspension Shock Absorber- Select Vehicle by Model
- Select Vehicle by VIN
Select Vehicle by Model
orMake
Model
Year
Select Vehicle by VIN
For the most accurate results, select vehicle by your VIN (Vehicle Identification Number).
2 Shock Absorbers found

2002 Dodge Neon Strut, Rear Passenger Side Part Number: 4656474AE
Product Specifications- Other Name: Strut - Rear Suspension; Suspension Strut, Rear Right
- Position: Rear Passenger Side
- Replaces: 4656474AC, 4656474AD
- Item Weight: 13.50 Pounds
- Condition: New
- Fitment Type: Direct Replacement
- SKU: 4656474AE
- Warranty: This genuine part is guaranteed by Mopar's factory warranty.
2002 Dodge Neon Strut, Rear Driver Side Part Number: 4656475AE
Product Specifications- Other Name: Strut - Rear Suspension; Suspension Strut, Rear Left
- Position: Rear Driver Side
- Replaces: 4656475AD
- Item Weight: 11.90 Pounds
- Condition: New
- Fitment Type: Direct Replacement
- SKU: 4656475AE
- Warranty: This genuine part is guaranteed by Mopar's factory warranty.
2002 Dodge Neon Shock Absorber Parts and Q&A
- Q: How to Service a Shock Absorber in the Rear Suspension Strut Assembly on 2002 Dodge Neon?A: The first step in servicing the rear suspension strut assembly is to raise the car, take out the rear tire and remove the wheel assembly. If your car has rear drum brakes, uncork the screw holding the brake hose bracket to the strut assembly; if it has the ABS, remove the one for the ABS wheel speed sensor bracket. After that, get the nut off the rear stabilizer bar link bolt, remove the bolt and take out the link. On rear disc brake-equipped cars, first loosen the two guide pin bolts connecting the front disc brake caliper to the steering knuckle, take off the caliper and use a wire hanger to suspend it, ensuring it's not hanging by its hydraulic hose. The bolts at the strut-to-knuckle connection have serrations and must not move when you remove the nuts; instead, use a pin punch to tap them out. Unscrew the nuts and bolts linking the strut to the rear knuckle and then simply lower the vehicle to a height at which you can install the upper mount bolts through the access panel in the trunk. Open the rear ceiling, lift out the carpet if there is one and break the three strut assembly bolts loose, but do not take them all out. Grasp the strut assembly so it can't move, then unscrew the three mounting nuts and slide the strut toward the lower arm, lowering it and lifting the top out sideways through the well opening. When disassembling, use a strut spring compressor, PSE W-720O or the equivalent to compress the coil spring as described by the manufacturer. Leave a mark on the coil spring near the strut assembly when replacing both struts at one time. Fasten the strut assembly into the compressor, hook up the upper end and fasten the clamp to the bottom end of the coil spring. Before compressing the coil spring, do not take out the strut shaft nut. Squeeze the spring with a tool until it is flat, holding the strut shaft. Then, take out the nut keeping the strut in place with Special Tool 6864. First, remove the upper mount, then the clamp, dust shield and jounce bumper off the bottom side of the strut shaft. Take off the lower spring isolator from the lower spring seat. Reach the relaxed position of the coil spring by stepping down on the compressor drive and taking out the spring. Check every piece of the strut assembly for damage and replace those that require it. Install the coil spring in the compressor as noted above, turn it to the same position and press it down until there is space to take it out. Secure the lower spring isolator to the strut in the first step, after which you place the jounce bumper downward and then fit the dust shield. Pull the strut up through the coil spring up to where the lower spring seat touches the coil spring. Secure the support end of the coil spring and strut to each other. Put the upper mount over the strut shaft so that the arrow on it points the same way as the clevis bracket. Loose the retaining nut first, then increase the torque to 75 Nm (55 ft. lbs.). Slowly lower the tension from the coil spring to make sure the upper mount is aligned correctly. Open the clamp, put in place the strut assembly by placing the lower end over the knuckle and raising the top into the strut tower, making sure the studs are in the holes. Install the three nuts in the upper mount and fasten them to 34 Nm (300 inch lbs.), then set the carpet in place and shut the deck lid. When you lift the vehicle again, keep an eye to make sure the bolts at the strut and knuckle do not move during installation. Position the strut clevis bracket over the knuckle holes, bolt it down with the two bolts and tighten the nuts to 88 Nm (65 ft. lbs.). For disc brake vehicles, place the caliper and brake rotor back on, insert two new guide pin bolts and fasten them with 22 Nm of torque (192 inch lbs.). Put on the stabilizer bar link by putting through the bushing and securing a nut in the bottom while leaving the top tolerance loose. For those vehicles with ABS, fix the bolt for the ABS wheel speed sensor bracket, tightening it until the reading is 13 Nm (120 inch lbs.) and for cars with rear drum brakes, tighten the bolt for the brake line bracket to 31 Nm (275 inch lbs.). Next, put on the tire and wheel assembly and screw the wheel stud nuts halfway in, then screw them all the way in to 135 Nm (100 ft. lbs.); lower the vehicle to the ground, screw in the stabilizer bar link nut to 23 Nm (200 inch lbs.) and set the rear toe to the appropriate setting if needed.
Related 2002 Dodge Neon Parts
 2002 Dodge Neon Control Arm
 2002 Dodge Neon Wheel Hub
 2002 Dodge Neon Axle Beam Mount
 2002 Dodge Neon Axle Pivot Bushing
 2002 Dodge Neon Axle Support Bushings
 2002 Dodge Neon Bump Stop
 2002 Dodge Neon Control Arm Bushing
 2002 Dodge Neon Lateral Link
 2002 Dodge Neon Steering Knuckle
 2002 Dodge Neon Sway Bar Bracket
 2002 Dodge Neon Sway Bar Bushing
 2002 Dodge Neon Sway Bar Link