JeepParts
My Garage
My Account
Cart
OEM Dodge Neon Shock Absorber
Suspension Shock Absorber- Select Vehicle by Model
- Select Vehicle by VIN
Select Vehicle by Model
orMake
Model
Year
Select Vehicle by VIN
For the most accurate results, select vehicle by your VIN (Vehicle Identification Number).
3 Shock Absorbers found

Dodge Neon Strut, Rear Driver Side Part Number: 4656475AE
Dodge Neon Strut, Rear Passenger Side Part Number: 4656474AE

Dodge Neon Strut Part Number: 4656356AB
Dodge Neon Shock Absorber
Choose OEM Shock Absorber that meet Dodge factory standards. Dodge designs and tests every component for precision and durability. Each Shock Absorber follows strict manufacturing steps to lock in quality and fit. If your Dodge Neon matters to you, OEM parts make the smart choice. You'll get the exact look, feel, and performance you expect. Shop genuine Neon parts at the highly competitive prices online. Enjoy a manufacturer's warranty, a hassle-free return policy, and rapid delivery. No more guesswork with off brands. Get genuine parts with exact fit and true factory performance. Shop with confidence today at JeepPartsDeal.com.
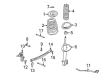
The cultural factor in Dodge neon car is known as the Shock Absorber and it mainly works in the suspension system whose major function is to reduce extreme bouncing. Through conversion of kinetic energy to heat through hydraulic means, the Shock Absorber is able to cushion shock impulses thereby adding to maneuverability over challenging terrains. Dodge Neon over the years have used a variety of shock absorbers which range from the twin tube and the mono tube. Twin-tube shocks are also present, although this type of shock consists of only two tubes, it is quite simple but can be gas charged in order to enhance its stability. The mono-tube shocks on the other hand provide excellent heat transfer and performance and also allow multi-directional mounting. Additional features like Position Sensitive Damping (PSD) and Acceleration Sensitive Damping (ASD) is the added niceties that can tune into particular situations, which gives ideas to the progression of the Dodge Neon's suspension system.
Dodge Neon Shock Absorber Parts and Q&A
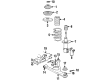
- Q: How to Remove a Shock Absorber from the Rear Strut Assembly on Dodge Neon?A:The rear strut assembly can only be disassembled after it has been removed from the vehicle. To compress the coil spring, apply a strut spring compressor, use PSE tool W-7200 or an alternative tool as shown in the manufacturer's instructions. If handling both struts together, label the coil spring and strut bar on the driver's side and the passenger's side. Install the strut assembly below the compressor, attaching the lower hook to the coil, the upper hook to the upper mount and make sure the strut clevis bracket points inward. Put on a clamp at the base of the coil spring to make sure the strut does not move after you remove the strut shaft nut. Before you unscrew the strut shaft nut, first compress the coil spring to let off the tension in the upper mount and bearing. After the spring is compressed, put Strut Nut Socket, Special Tool 6864, on the nut secured to the strut shaft and with the strut shaft held, take out the nut. With the upper mount taken off, remove the clamp and carefully pull the strut through the coil spring. After taking off the dust shield and jounce bumper from the strut shaft, lose the lower spring isolator on the lower spring seat of the strut. Should the coil spring need attention, stop the drive of the compressor, press back the hooks and lift out the broken part of the coil spring. Inspect the strut assembly by looking for problems such as shaft binding, cracks, wear on the jounce bumper, damage to the upper mount and its retaining studs, rips in the dust shield, aging in the isolators and any harm to the coil spring's protective coating, repairing and replacing parts as needed.
- Q: How to Install a Shock Absorber into the Strut Tower on Dodge Neon?A:Place the strut assembly in the strut tower and join the upper mount studs with the holes by using the three mounting nuts and tighten them to 34 Nm (300 inch lbs.). Close the engine cover of the car. When putting together the strut to Steering Knuckle, the bolts have serrations and need to remain held by the steering knuckle, so do not turn them. Lay the lower end of the strut assembly in touch with the upper end of the steering knuckle, bring the mounting holes together and fasten the attachments bolts in place with their nuts facing ahead. Without giving the nuts their final torque, turn them by 90° after you reach the specified value. When ABS is on-board, attach the wheel speed sensor to the back of the strut with its mounting screw and tighten the screw to 13 Nm (120 inch lbs.). Attach the ground strap to the lower rear part of the strut by its screw and ensure the tightness is 13 Nm (120 inch lbs.). Mount the tire and wheel assembly, ensuring the wheel bolts are tightened following the correct pattern to a half of their requirement and repeat that sequence to get the bolts to the desired full 135 Nm (100 ft lbs.). After that, bring the vehicle down to its normal setting.

Related Dodge Neon Parts
 Dodge Neon Wheel Hub
 Dodge Neon Axle Beam Mount
 Dodge Neon Axle Pivot Bushing
 Dodge Neon Axle Support Bushings
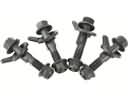 Dodge Neon Camber and Alignment Kit
 Dodge Neon Coil Spring Insulator
 Dodge Neon Control Arm Bolt
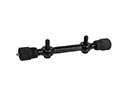 Dodge Neon Control Arm Shaft Kit
 Dodge Neon Shock and Strut Boot
 Dodge Neon Steering Knuckle
 Dodge Neon Sway Bar Bushing
 Dodge Neon Sway Bar Link Bushing