JeepParts
My Garage
My Account
Cart
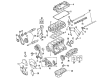
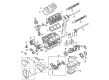
OEM 2002 Dodge Stratus Piston
Engine Pistons- Select Vehicle by Model
- Select Vehicle by VIN
Select Vehicle by Model
orMake
Model
Year
Select Vehicle by VIN
For the most accurate results, select vehicle by your VIN (Vehicle Identification Number).
6 Pistons found


2002 Dodge Stratus Vibration Damper Part Number: 5142303AB
$56.55 MSRP: $81.25You Save: $24.70 (31%)Ships in 1-3 Business DaysProduct Specifications- Other Name: Piston; Piston Pin And Rod
- Replaces: 5142303AA, 5066565AB
- Item Weight: 3.00 Pounds
- Item Dimensions: 5.7 x 4.4 x 12.6 inches
- Condition: New
- Fitment Type: Direct Replacement
- SKU: 5142303AB
- Warranty: This genuine part is guaranteed by Mopar's factory warranty.

2002 Dodge Stratus Piston Part Number: MD357068
$45.47 MSRP: $65.35You Save: $19.88 (31%)Ships in 1-2 Business DaysProduct Specifications- Other Name: Piston - Standard; Piston & Pin Assembly Standard
- Item Weight: 1.30 Pounds
- Item Dimensions: 3.8 x 3.8 x 2.7 inches
- Condition: New
- Fitment Type: Direct Replacement
- SKU: MD357068
- Warranty: This genuine part is guaranteed by Mopar's factory warranty.


2002 Dodge Stratus Piston Part Number: 5018627AD
$316.65 MSRP: $576.00You Save: $259.35 (46%)Ships in 1-2 Business DaysProduct Specifications- Other Name: Piston Pin And Rod; Piston Pin And Rod
- Replaces: 5018627AB, 5018627AA, 5018627AC
- Item Weight: 2.60 Pounds
- Item Dimensions: 13.3 x 5.2 x 4.4 inches
- Condition: New
- Fitment Type: Direct Replacement
- SKU: 5018627AD
- Warranty: This genuine part is guaranteed by Mopar's factory warranty.
2002 Dodge Stratus Piston Part Number: MD357067
$89.79 MSRP: $133.00You Save: $43.21 (33%)Ships in 1-2 Business DaysProduct Specifications- Other Name: Piston - Standard; Piston & Pin Assembly Standard; Piston And Pin
- Item Weight: 1.30 Pounds
- Item Dimensions: 3.8 x 3.9 x 2.7 inches
- Condition: New
- Fitment Type: Direct Replacement
- SKU: MD357067
- Warranty: This genuine part is guaranteed by Mopar's factory warranty.
2002 Dodge Stratus Piston Part Number: MD357066
Product Specifications- Other Name: Piston - Standard; Piston & Pin Assembly Standard
- Item Weight: 1.40 Pounds
- Item Dimensions: 3.9 x 3.8 x 2.7 inches
- Condition: New
- Fitment Type: Direct Replacement
- SKU: MD357066
- Warranty: This genuine part is guaranteed by Mopar's factory warranty.

2002 Dodge Stratus Piston Part Number: MD367089
Product Specifications- Other Name: Piston - Standard; Piston & Pin Assembly Standard; Piston And Pin Standard
- Item Weight: 1.60 Pounds
- Condition: New
- Fitment Type: Direct Replacement
- SKU: MD367089
- Warranty: This genuine part is guaranteed by Mopar's factory warranty.
2002 Dodge Stratus Piston Parts and Q&A
- Q: How to Properly Remove and Install Pistons and Connecting Rods in an Engine on 2002 Dodge Stratus?A: The pistons and connecting rods cannot be removed unless the cylinder head has been taken off first. Start by inserting a proper ridge reamer into the cylinder bores and cover up the pistons' tops while you do so. A directional marking must be pressed onto the front side of each piston and should always face the front of the engine. After that, remove the oil pan and the Balance Shaft Carrier Assembly. Insure the safety of the connecting rod by marking the cylinder number on each cap with a paint marker, not a number stamp or punch. Loosen and take out the connecting rod bolts and cap with caution so you don't mar the fracture rod and cap surfaces, as these bolts may only be used once. The crank should be turned to properly center each connecting rod in the cylinder bore and afterwards, the whole piston and rod should be pushed out from the top of the cylinder block without scratching the crankshaft journals. With the rod removed, add the bearing cap to the mating rod and then service each piston and connecting rod assembly together as they are meant to be. When installing, position the compression ring gaps unevenly and let the oil ring expander match the rail length at both sides. Insert the piston head into some oil first, next slide on the ring compressor to keep the piston's ring positions the same. The front of the engine should again face the direction where the piston's stamp is printed. Centralize the connecting rod journal inside the bore using the crankshaft, put the rod and piston together and insert it over the crankshaft journal. Hit the end of the piston with the hammer handle to bring the connecting rod into line. Before placing the new connecting rod cap bolts finger-tightly, rub clean engine oil on their threads and for the last step, alternately tighten each bolt without measuring the torque. Close out the grips by tightening the screws to 27 Nm plus a 1/4 turn. Use a feeler gauge to measure the connecting rod side clearance at the last step and then reattach the Balance Shaft Carrier Assembly, the oil pan and the cylinder head.
Related 2002 Dodge Stratus Parts
 2002 Dodge Stratus Oil Filter
 2002 Dodge Stratus Timing Chain
 2002 Dodge Stratus Camshaft Seal
 2002 Dodge Stratus Crankshaft Timing Gear
 2002 Dodge Stratus Cylinder Head Gasket
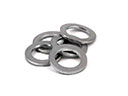 2002 Dodge Stratus Drain Plug Washer
 2002 Dodge Stratus Harmonic Balancer
 2002 Dodge Stratus Oil Pan Gasket
 2002 Dodge Stratus Timing Belt Tensioner
 2002 Dodge Stratus Timing Chain Tensioner
 2002 Dodge Stratus Timing Cover
 2002 Dodge Stratus Valve Stem Seal