JeepParts
My Garage
My Account
Cart
OEM 2003 Dodge Caravan A/C Switch
Air Conditioning Switch- Select Vehicle by Model
- Select Vehicle by VIN
Select Vehicle by Model
orMake
Model
Year
Select Vehicle by VIN
For the most accurate results, select vehicle by your VIN (Vehicle Identification Number).
7 A/C Switches found

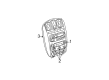
2003 Dodge Caravan Control Assembly, Front Part Number: 5005004AI
Product Specifications- Other Name: Control - A/C And Heater; HVAC Temperature Control Panel, Front; Climate Control Module; Dash Control Unit; Control A/C And Heater
- Position: Front
- Replaces: 5005004AH, 5005004AG, 5005004AE, 5005004AF, 5005004AD
- Item Weight: 1.80 Pounds
- Item Dimensions: 10.3 x 6.5 x 6.8 inches
- Condition: New
- Fitment Type: Direct Replacement
- SKU: 5005004AI
- Warranty: This genuine part is guaranteed by Mopar's factory warranty.
2003 Dodge Caravan Control Assembly, Front Part Number: 5005003AI
Product Specifications- Other Name: Control - A/C And Heater; HVAC Temperature Control Panel, Front; Climate Control Module; Dash Control Unit; Control A/C And Heater
- Position: Front
- Replaces: 5005003AH, 5005003AG
- Item Weight: 1.70 Pounds
- Item Dimensions: 12.6 x 5.5 x 4.5 inches
- Condition: New
- Fitment Type: Direct Replacement
- SKU: 5005003AI
- Warranty: This genuine part is guaranteed by Mopar's factory warranty.
2003 Dodge Caravan Control Unit, Front Part Number: 5005009AC
Product Specifications- Other Name: Control - A/C And Heater; HVAC Temperature Control Panel, Front; Climate Control Module; Heater Control; Control A/C and Heater Rear Headliner, ATC; Control A/C and Heater.
- Position: Front
- Item Weight: 0.80 Pounds
- Condition: New
- Fitment Type: Direct Replacement
- SKU: 5005009AC
- Warranty: This genuine part is guaranteed by Mopar's factory warranty.

2003 Dodge Caravan Control Assembly, Front Part Number: 5005001AK
Product Specifications- Other Name: Control - A/C And Heater; HVAC Temperature Control Panel, Front; Climate Control Module; Dash Control Unit
- Position: Front
- Replaces: 5005001AI, 5005001AH, 5005001AJ
- Item Weight: 1.80 Pounds
- Item Dimensions: 9.3 x 6.2 x 5.2 inches
- Condition: New
- Fitment Type: Direct Replacement
- SKU: 5005001AK
- Warranty: This genuine part is guaranteed by Mopar's factory warranty.
2003 Dodge Caravan Heater Control, Front Part Number: 5005000AI
Product Specifications- Other Name: Control - A/C And Heater; HVAC Temperature Control Panel, Front; Climate Control Module; Control Assembly; Dash Control Unit
- Position: Front
- Replaces: 5005000AE, 5005000AG, 5005000AH, 5005000AD, 5005000AF
- Item Weight: 1.80 Pounds
- Item Dimensions: 12.6 x 5.5 x 4.5 inches
- Condition: New
- Fitment Type: Direct Replacement
- SKU: 5005000AI
- Warranty: This genuine part is guaranteed by Mopar's factory warranty.
 Product Specifications
- Other Name: Control - A/C And Heater; HVAC Temperature Control Panel, Front; Climate Control Module; Dash Control Unit
- Position: Front
- Replaces: 5005002AI, 5005002AH
- Item Weight: 1.40 Pounds
- Item Dimensions: 12.0 x 5.2 x 4.1 inches
- Condition: New
- Fitment Type: Direct Replacement
- SKU: 5005002AJ
- Warranty: This genuine part is guaranteed by Mopar's factory warranty.

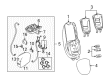
2003 Dodge Caravan Knob, Front Part Number: 5019526AA
Product Specifications- Other Name: A/C And Heater Control - Ro; HVAC Heater Control Knob, Front; Knob A/C And Heater Control - Rotary
- Position: Front
- Item Weight: 0.40 Pounds
- Item Dimensions: 1.6 x 1.5 x 1.3 inches
- Condition: New
- Fitment Type: Direct Replacement
- SKU: 5019526AA
- Warranty: This genuine part is guaranteed by Mopar's factory warranty.
2003 Dodge Caravan A/C Switch Parts and Q&A
- Q: How to Service the Rear A/C Switch for Temperature Control on 2003 Dodge Caravan?A: Start by disconnecting and separating the battery negative cable to work on the A/C heater control for the rear. Gently slide a slim trim stick or wide narrow tool under the edge of the rear heater-A/C control bezel to release the snap clip retainers. To remove the connector, first slide the rear heater-A/C control and bezel unit back, then unplug the headliner wire harness connector from the control connector receptacle. Take the rear heater-A/C control out of the headliner and take the three screws holding the control in place from the bezel to remove it. First, fit the rear heater-A/C buttons onto the panel on the instrument cluster, then screw them in with three 2 Nm (17 in. lbs.) screws. After that, set the rear heater-A/C control and bezel in the headliner and link the headliner wire harness connector. Slide the hidden tabs on the back of the unit behind the lip of the headliner and then move the unit forward to snap the tabs into the receptacles in the headliner. Pull the bezel up from the top so that you feel and hear all the snaps clipped into place. Reattach the negative cable of the battery and let the DRB III do the Rear Temperature Selector calibration reset. Make sure that Front Control Actuator Calibration has passed and address any errors that are found. To calibrate, first move the Rear Temperature Selector to the Cold Position and hold for 5 seconds. Move it counterclockwise again to the Hot Position and hold there for another 5 seconds.
Related 2003 Dodge Caravan Parts
 2003 Dodge Caravan Cabin Air Filter
 2003 Dodge Caravan Blend Door Actuator
 2003 Dodge Caravan Heater Core
 2003 Dodge Caravan Blower Motor
 2003 Dodge Caravan Blower Motor Resistor
 2003 Dodge Caravan A/C Accumulator
 2003 Dodge Caravan A/C Compressor
 2003 Dodge Caravan A/C Condenser
 2003 Dodge Caravan A/C Expansion Valve
 2003 Dodge Caravan A/C Hose
 2003 Dodge Caravan Blower Control Switches
 2003 Dodge Caravan Evaporator