JeepParts
My Garage
My Account
Cart
OEM 2003 Dodge Caravan ABS Control Module
Anti Lock Brake Control Module- Select Vehicle by Model
- Select Vehicle by VIN
Select Vehicle by Model
orMake
Model
Year
Select Vehicle by VIN
For the most accurate results, select vehicle by your VIN (Vehicle Identification Number).
4 ABS Control Modules found


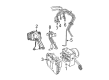
2003 Dodge Caravan Modulator Valve Part Number: 5018252AA
Product Specifications- Other Name: Accumulator - Anti-Lock Brake System; ABS Hydraulic Assembly; ABS Control Module; ABS Control Unit; Hydraulic Control Unit Anti-Lock Brake System
- Item Weight: 5.10 Pounds
- Item Dimensions: 7.3 x 7.0 x 6.7 inches
- Condition: New
- Fitment Type: Direct Replacement
- SKU: 5018252AA
- Warranty: This genuine part is guaranteed by Mopar's factory warranty.

2003 Dodge Caravan Control Module Part Number: 5093988AA
Product Specifications- Other Name: Control - Anti-Lock Brakes; ABS Control Module; Electronic Control; Module Anti-Lock Brakes With Mounting Screws; Module Anti-Lock Brakes
- Replaces: 5086175AA
- Item Weight: 2.10 Pounds
- Item Dimensions: 5.8 x 4.4 x 2.7 inches
- Condition: New
- Fitment Type: Direct Replacement
- SKU: 5093988AA
- Warranty: This genuine part is guaranteed by Mopar's factory warranty.
2003 Dodge Caravan Control Module Part Number: 5093986AA
Product Specifications- Other Name: Control - Anti-Lock Brakes; ABS Control Module; Electronic Control; Module Anti-Lock Brakes With Mounting Screws; Module Anti-Lock Brakes
- Replaces: 5086174AA
- Item Weight: 2.00 Pounds
- Item Dimensions: 5.8 x 4.7 x 2.8 inches
- Condition: New
- Fitment Type: Direct Replacement
- SKU: 5093986AA
- Warranty: This genuine part is guaranteed by Mopar's factory warranty.
2003 Dodge Caravan Modulator Valve Part Number: 5018253AA
Product Specifications- Other Name: Accumulator - Anti-Lock Brake System; ABS Hydraulic Assembly; ABS Control Module; ABS Control Unit; Hydraulic Control Unit Anti-Lock Brake System
- Item Weight: 6.20 Pounds
- Item Dimensions: 7.3 x 7.2 x 6.4 inches
- Condition: New
- Fitment Type: Direct Replacement
- SKU: 5018253AA
- Warranty: This genuine part is guaranteed by Mopar's factory warranty.
2003 Dodge Caravan ABS Control Module Parts and Q&A
- Q: How to Service and Repair an ABS Control Module on 2003 Dodge Caravan?A: When servicing or fixing the Electronic Brake Control Module, first take out the battery and detach both battery cables. After that, take out the vacuum hose connector attached to the tank inside the battery tray and remove the screw connecting the coolant filler neck to the tray. After that, take out the battery tray. Operate the lock on the CAB's electrical connector and remove the 24-way electrical cable. Aft that, unplug the pump or motor lead from the CAB. Loose the screws keeping the CAB connected to the HCU and then gently pull the CAB forward once the HCU is open. To set up the CAB, slide it onto the HCU and use screws to attach it, making sure the torque is no more than 2 Nm which is 17 in lbs. Insert the ends of both wiring connectors into their proper places. Set the battery tray in place and tighten the coolant filler neck screw to the battery tray. Put the vacuum hose back onto the battery's coolant tank, install the battery and next, resemble the battery cables.
Related 2003 Dodge Caravan Parts
 2003 Dodge Caravan Brake Booster
 2003 Dodge Caravan Brake Caliper
 2003 Dodge Caravan Speed Sensor
 2003 Dodge Caravan Brake Caliper Bracket
 2003 Dodge Caravan Brake Disc
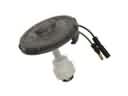 2003 Dodge Caravan Brake Fluid Level Sensor
 2003 Dodge Caravan Brake Line
 2003 Dodge Caravan Brake Pad
 2003 Dodge Caravan Brake Proportioning Valve
 2003 Dodge Caravan Hydraulic Hose
 2003 Dodge Caravan Parking Brake Shoe
 2003 Dodge Caravan Wheel Stud