JeepParts
My Garage
My Account
Cart
OEM 2002 Dodge Caravan ABS Control Module
Anti Lock Brake Control Module- Select Vehicle by Model
- Select Vehicle by VIN
Select Vehicle by Model
orMake
Model
Year
Select Vehicle by VIN
For the most accurate results, select vehicle by your VIN (Vehicle Identification Number).
4 ABS Control Modules found


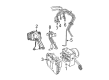
2002 Dodge Caravan Modulator Valve Part Number: 5018252AA
Product Specifications- Other Name: Accumulator - Anti-Lock Brake System; ABS Hydraulic Assembly; ABS Control Module; ABS Control Unit; Hydraulic Control Unit Anti-Lock Brake System
- Item Weight: 5.10 Pounds
- Item Dimensions: 7.3 x 7.0 x 6.7 inches
- Condition: New
- Fitment Type: Direct Replacement
- SKU: 5018252AA
- Warranty: This genuine part is guaranteed by Mopar's factory warranty.

2002 Dodge Caravan Control Module Part Number: 5093988AA
Product Specifications- Other Name: Control - Anti-Lock Brakes; ABS Control Module; Electronic Control; Module Anti-Lock Brakes With Mounting Screws; Module Anti-Lock Brakes
- Replaces: 5086175AA
- Item Weight: 2.10 Pounds
- Item Dimensions: 5.8 x 4.4 x 2.7 inches
- Condition: New
- Fitment Type: Direct Replacement
- SKU: 5093988AA
- Warranty: This genuine part is guaranteed by Mopar's factory warranty.
2002 Dodge Caravan Control Module Part Number: 5093986AA
Product Specifications- Other Name: Control - Anti-Lock Brakes; ABS Control Module; Electronic Control; Module Anti-Lock Brakes With Mounting Screws; Module Anti-Lock Brakes
- Replaces: 5086174AA
- Item Weight: 2.00 Pounds
- Item Dimensions: 5.8 x 4.7 x 2.8 inches
- Condition: New
- Fitment Type: Direct Replacement
- SKU: 5093986AA
- Warranty: This genuine part is guaranteed by Mopar's factory warranty.
2002 Dodge Caravan Modulator Valve Part Number: 5018253AA
Product Specifications- Other Name: Accumulator - Anti-Lock Brake System; ABS Hydraulic Assembly; ABS Control Module; ABS Control Unit; Hydraulic Control Unit Anti-Lock Brake System
- Item Weight: 6.20 Pounds
- Item Dimensions: 7.3 x 7.2 x 6.4 inches
- Condition: New
- Fitment Type: Direct Replacement
- SKU: 5018253AA
- Warranty: This genuine part is guaranteed by Mopar's factory warranty.
2002 Dodge Caravan ABS Control Module Parts and Q&A
- Q: How to Remove and Install an ABS Control Module in a Right-Hand Drive on 2002 Dodge Caravan?A: Before you remove the Assembly, disconnect the negative battery terminal and keep it isolated. If you use a brake pedal depressor, you can prevent the master cylinder from emptying its brake fluid. Get the vehicle up and remove the small clip that hooks the ICU wiring harness to the ICU bracket. Never apply 12 volts to any of the terminals in the HCU connector when it is unplugged. Grab the lock on the 24-way connector, pull it out and that will unlock it from the CAB. Make sure you use a brake cleaner like Mopar Brake Parts Cleaner to wipe down all of the HCU and brake tube nut surfaces, to stop any dirt from getting into the HCU ports. Take the brake tubes from each HCU port and then take out the three bolts holding the ICU mounting bracket to the front suspension crossmember before removing the ICU and bracket together. Remove the three bolts to split up the ICU from the mounting bracket. Install the ICU back on its mounting bracket and assure it is safe with the three attached bolts which must be tightened to 11 Nm (97 in. lbs.). It is best to mount the ICU to the bracket using bolts designed and made by Mopar because of their unique way of preventing rust. Attach the ICU to the front suspension crossmember, fastened with three bolts that require 28 Nm (250 in. lbs.) of torque. Be sure the brake tubes are angled correctly and do not make contact with each other or with other parts and replace all spacer clips on the brake tubes. Secure all the six chassis tubes to the HCU valve block in the right places and tighten each tube nut to 17 Nm (145 in. lbs.). Before joining the 24-way connector with the CAB, check that the seal is put on correctly. Set the 24-way connector into the CAB socket and then push until it locks into place. Route the CAB harness away from the brake tubes and the body using the ICU mounting bracket. Attach the clips between the brake and steering tubes, take the car down again, reconnect its negative battery terminal, drain the base and ABS brake systems and give the car a quick road test to make sure everything is working.
Related 2002 Dodge Caravan Parts
 2002 Dodge Caravan Brake Booster
 2002 Dodge Caravan Brake Caliper
 2002 Dodge Caravan Speed Sensor
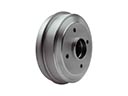 2002 Dodge Caravan Brake Drum
 2002 Dodge Caravan Brake Disc
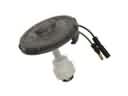 2002 Dodge Caravan Brake Fluid Level Sensor
 2002 Dodge Caravan Brake Line
 2002 Dodge Caravan Brake Pad
 2002 Dodge Caravan Brake Proportioning Valve
 2002 Dodge Caravan Hydraulic Hose
 2002 Dodge Caravan Parking Brake Shoe
 2002 Dodge Caravan Wheel Stud