JeepParts
My Garage
My Account
Cart
OEM 2003 Dodge Dakota Piston
Engine Pistons- Select Vehicle by Model
- Select Vehicle by VIN
Select Vehicle by Model
orMake
Model
Year
Select Vehicle by VIN
For the most accurate results, select vehicle by your VIN (Vehicle Identification Number).
5 Pistons found

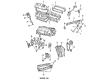
2003 Dodge Dakota Piston Part Number: 68067503AA
$32.19 MSRP: $185.00You Save: $152.81 (83%)Ships in 1-2 Business DaysProduct Specifications- Replaces: 4778865AB, 4778861AB
- Item Weight: 4.00 Pounds
- Condition: New
- Fitment Type: Direct Replacement
- SKU: 68067503AA
- Warranty: This genuine part is guaranteed by Mopar's factory warranty.


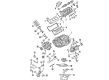
2003 Dodge Dakota Piston Part Number: 68233351AA
Product Specifications- Replaces: 5012362AF, 5012362AE, 5012362AC, 5012362AD
- Item Weight: 3.00 Pounds
- Item Dimensions: 10.5 x 6.3 x 6.5 inches
- Condition: New
- Fitment Type: Direct Replacement
- SKU: 68233351AA
- Warranty: This genuine part is guaranteed by Mopar's factory warranty.


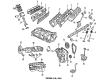
2003 Dodge Dakota Piston Part Number: 68067510AA
Product Specifications- Replaces: 4778872AD, 4778876AB, 4778876AD, 4778876, 4778874AD, 4778876AC
- Item Weight: 3.60 Pounds
- Condition: New
- Fitment Type: Direct Replacement
- SKU: 68067510AA
- Warranty: This genuine part is guaranteed by Mopar's factory warranty.

2003 Dodge Dakota Piston Part Number: 68067509AA
Product Specifications- Replaces: 4778871AC, 4778875AD, 4778875AC, 4778873AB, 4778873AC, 4778871AB, 4778871AD, 4778873AD
- Item Weight: 4.00 Pounds
- Condition: New
- Fitment Type: Direct Replacement
- SKU: 68067509AA
- Warranty: This genuine part is guaranteed by Mopar's factory warranty.
2003 Dodge Dakota Piston Part Number: 68067504AA
Product Specifications- Replaces: 4778862AB, 4778864AB
- Item Weight: 4.00 Pounds
- Condition: New
- Fitment Type: Direct Replacement
- SKU: 68067504AA
- Warranty: This genuine part is guaranteed by Mopar's factory warranty.
2003 Dodge Dakota Piston Parts and Q&A
- Q: How to Remove and Replace a Piston in an Engine on 2003 Dodge Dakota?A: Start by unconnecting the negative cable from the battery and remove the oil pan, gasket/windage tray, cylinder head covers, timing chain cover and both cylinder heads. When needed, bore out the top ridges in the cylinder bores with a reliable ridge reamer, shielding the top of each piston. Make sure to take out the piston and connecting rod assemblies from the top of the cylinder block with the crankshaft turned so each connecting rod ends up in the center of the cylinder. To safeguard the connecting rods or caps, don't punch or stamp them with a number and securely mark their positions with a permanent scribe, pen or ink marker instead. Pull off the connecting rod cap, pop in the Special Tool 8507 Connecting Rod Guides into the connecting rod you have removed and remove the pistons from the cylinders, repeating for each one. Following removal, place the bearing cap on the connecting rod quickly to avoid harm to any parts. Gently take off the piston rings, beginning with the top one and use a proper solvent to clean the pistons so you don't remove the Moly coating. Examine the connecting rod journal for signs of being worn down, with a taper or with scoring and inspect the connecting rod itself for a twist or bend. Pistons should be free of any tapering, elliptical shape, scratches or grooves and reviews should be done for any cracks or breakdown in the ring lands. Prior to installation, put the piston rings in place and dip the piston head and all rings into clean engine oil. After that, position a ring compressor over top and tighten it to hold things in place. Press the bearing into the engine until it fits evenly into the connecting rod hole and then wet the bearing surface with clean engine oil. Screw the Special Tool 8507 Connecting Rod Guides into the connecting road bolt threads. For the piston pin bore, make certain the raised "F" mark is facing forward from the front of the engine and the oilslinger slot is facing the front end as well. Put engine oil in the cylinder bore, turn the crankshaft until the rod journal is in the center and gradually insert the rod and piston along with the connecting rod in place. Press forward on the connecting rod as you use the hammer handle to force the piston down. Whenever the Torque to Yield Bolts are removed or loosened, switch them with new ones, apply engine oil to the rod bolts and bearing surfaces, fit the bearing and rod cap and tighten bolts to 27 Nm (20 ft. lbs.) plus 90° is recommended. Then, reattach the cylinder head(s), timing chain and cover, the cylinder head covers and the oil pan and gasket/windage tray, fill the crankcase with the correct levels of engine oil and reconnect the negative cable to the battery.
Related 2003 Dodge Dakota Parts
 2003 Dodge Dakota Cylinder Head
 2003 Dodge Dakota Valve Cover Gasket
 2003 Dodge Dakota Cam Gear
 2003 Dodge Dakota Crankshaft
 2003 Dodge Dakota Crankshaft Thrust Washer Set
 2003 Dodge Dakota Dipstick Tube
 2003 Dodge Dakota Exhaust Valve
 2003 Dodge Dakota Intake Valve
 2003 Dodge Dakota Rocker Arm Pivot
 2003 Dodge Dakota Timing Chain Tensioner
 2003 Dodge Dakota Timing Cover
 2003 Dodge Dakota Timing Cover Gasket