JeepParts
My Garage
My Account
Cart
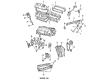
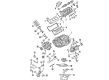
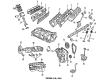
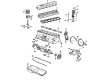
OEM 2002 Dodge Dakota Piston
Engine Pistons- Select Vehicle by Model
- Select Vehicle by VIN
Select Vehicle by Model
orMake
Model
Year
Select Vehicle by VIN
For the most accurate results, select vehicle by your VIN (Vehicle Identification Number).
7 Pistons found

2002 Dodge Dakota Piston Part Number: 68067503AA
$32.19 MSRP: $185.00You Save: $152.81 (83%)Ships in 1-2 Business DaysProduct Specifications- Replaces: 4778865AB, 4778861AB
- Item Weight: 4.00 Pounds
- Condition: New
- Fitment Type: Direct Replacement
- SKU: 68067503AA
- Warranty: This genuine part is guaranteed by Mopar's factory warranty.


2002 Dodge Dakota Piston Part Number: 4798329AC
$138.85 MSRP: $200.00You Save: $61.15 (31%)Ships in 1-2 Business DaysProduct Specifications- Other Name: Piston Pin And Rod; Piston Pin And Rod
- Item Weight: 3.20 Pounds
- Item Dimensions: 13.8 x 6.2 x 4.7 inches
- Condition: New
- Fitment Type: Direct Replacement
- SKU: 4798329AC
- Warranty: This genuine part is guaranteed by Mopar's factory warranty.


2002 Dodge Dakota Piston Part Number: 68233351AA
Product Specifications- Replaces: 5012362AF, 5012362AE, 5012362AC, 5012362AD
- Item Weight: 3.00 Pounds
- Item Dimensions: 10.5 x 6.3 x 6.5 inches
- Condition: New
- Fitment Type: Direct Replacement
- SKU: 68233351AA
- Warranty: This genuine part is guaranteed by Mopar's factory warranty.


2002 Dodge Dakota Piston Part Number: 68067510AA
Product Specifications- Replaces: 4778872AD, 4778876AB, 4778876AD, 4778876, 4778874AD, 4778876AC
- Item Weight: 3.60 Pounds
- Condition: New
- Fitment Type: Direct Replacement
- SKU: 68067510AA
- Warranty: This genuine part is guaranteed by Mopar's factory warranty.

2002 Dodge Dakota Piston Part Number: 68067509AA
Product Specifications- Replaces: 4778871AC, 4778875AD, 4778875AC, 4778873AB, 4778873AC, 4778871AB, 4778871AD, 4778873AD
- Item Weight: 4.00 Pounds
- Condition: New
- Fitment Type: Direct Replacement
- SKU: 68067509AA
- Warranty: This genuine part is guaranteed by Mopar's factory warranty.
2002 Dodge Dakota Piston Part Number: 68067504AA
Product Specifications- Replaces: 4778862AB, 4778864AB
- Item Weight: 4.00 Pounds
- Condition: New
- Fitment Type: Direct Replacement
- SKU: 68067504AA
- Warranty: This genuine part is guaranteed by Mopar's factory warranty.
2002 Dodge Dakota Piston Part Number: 4798332AC
Product Specifications- Other Name: Piston Pin And Rod; Piston Pin And Rod
- Replaces: 4798333AC, 4798331AC, 4798333AB, 4798330AB, 4798330AC
- Item Weight: 3.20 Pounds
- Item Dimensions: 13.3 x 6.1 x 4.4 inches
- Condition: New
- Fitment Type: Direct Replacement
- SKU: 4798332AC
- Warranty: This genuine part is guaranteed by Mopar's factory warranty.
2002 Dodge Dakota Piston Parts and Q&A
- Q: How to Remove and Replace a Piston in an Engine on 2002 Dodge Dakota?A: Before removing or replacing the piston, take the engine out of the car, remove the cylinder head and then the oil pan. Remove the top ridge on cylinder bores using a trusted ridge reamer as you keep the piston crowns covered. Name each connecting rod and connecting rod cap after their cylinder number, then take out the connecting rod caps and fit the connecting rod bolt guide set on the bolts. Pull out the pistons and connecting rods by rotating the crankshaft to have the connecting rod in the bottom of its bore right at BDC. After you remove the bearing, screw the bearing cap on to the rod. Wash the piston and connecting rod together with a proper solvent, then monitor the connecting rod journal to ensure there is no heavy wear, taper or damage such as scoring. While you are at it, check for signs of a twist or bending in the rod. Check the piston for any sign of taper, if it has an elliptical shape and if either the walls or ring lands show scoring or deterioration. When installing, put the compression ring gaps so they don't line up with the oil ring rail gap. Before using the ring compressor, check that both sides of the oil ring expander are flush and your rail gaps are adjusted correctly. Soak the head and rings of the piston in clean engine oil, then slide the C-385 Piston Ring Compressor Tool over the piston while the wrench is tightening the tool around the ring. Make sure the main protector on the bolt is installed on the numbered side of your connecting rod. Move the crankshaft until the connecting rod journal is right in the middle of the cylinder bore and confirm that their numbers are the same. Gently place the rod and piston inside the cylinder bore, direct the rod over the journal on the crankshaft and use a hammer handle to push the piston into the head. The notch of the piston should face toward the front of the engine and the connecting rod's larger hole should face the crankshaft journal fillet. Snap each of the rod caps on, confirming that all the numbers from the connecting rod, connecting rod cap and cylinder bore are the same, then place the nuts on the cleaned and oiled bolts and tighten them to 61 Nm (45 ft. lbs.) torque. After that, install the oil pan, cylinder head and the engine into the vehicle.
Related 2002 Dodge Dakota Parts
 2002 Dodge Dakota Cylinder Head
 2002 Dodge Dakota Valve Cover Gasket
 2002 Dodge Dakota Cam Gear
 2002 Dodge Dakota Crankshaft
 2002 Dodge Dakota Crankshaft Thrust Washer Set
 2002 Dodge Dakota Dipstick Tube
 2002 Dodge Dakota Exhaust Valve
 2002 Dodge Dakota Intake Valve
 2002 Dodge Dakota Rocker Arm Pivot
 2002 Dodge Dakota Timing Chain Tensioner
 2002 Dodge Dakota Timing Cover
 2002 Dodge Dakota Timing Cover Gasket