JeepParts
My Garage
My Account
Cart
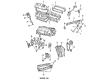
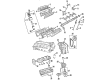
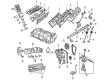
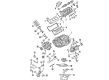
OEM Dodge Dakota Piston
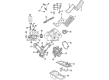
Engine Pistons- Select Vehicle by Model
- Select Vehicle by VIN
Select Vehicle by Model
orMake
Model
Year
Select Vehicle by VIN
For the most accurate results, select vehicle by your VIN (Vehicle Identification Number).
17 Pistons found

Dodge Dakota Piston Part Number: 68067503AA
$32.19 MSRP: $185.00You Save: $152.81 (83%)Ships in 1-2 Business Days

Dodge Dakota Piston Part Number: 4798329AC
$138.85 MSRP: $200.00You Save: $61.15 (31%)Ships in 1-2 Business Days
Dodge Dakota Piston Part Number: 4778876AB
$199.41 MSRP: $228.00You Save: $28.59 (13%)Ships in 1-2 Business Days
Dodge Dakota Piston Part Number: 68067507AA
$206.24 MSRP: $237.00You Save: $30.76 (13%)Ships in 1-2 Business Days
Dodge Dakota Piston Part Number: 4778875AC
$178.11 MSRP: $262.00You Save: $83.89 (33%)Ships in 1-2 Business DaysDodge Dakota Piston Part Number: 4778873AB
$178.11 MSRP: $262.00You Save: $83.89 (33%)Ships in 1-2 Business Days

Dodge Dakota Pistons Part Number: 4773037
$13.94 MSRP: $17.67You Save: $3.73 (22%)Ships in 1-2 Business Days

Dodge Dakota Piston Part Number: 68233351AA

Dodge Dakota Piston Part Number: 68031605AD
$173.35 MSRP: $255.00You Save: $81.65 (33%)Dodge Dakota Piston Part Number: 68067504AA


Dodge Dakota Piston Part Number: 5019316AC
Dodge Dakota Piston Part Number: 68067508AA

Dodge Dakota Piston Part Number: 68067509AA

Dodge Dakota Piston Part Number: 4778871AB

Dodge Dakota Piston Part Number: 68067510AA


Dodge Dakota Piston Part Number: 5018018AB
Dodge Dakota Piston Part Number: 4798332AC
Dodge Dakota Piston
Choose OEM Piston that meet Dodge factory standards. Dodge designs and tests every component for precision and durability. Each Piston follows strict manufacturing steps to lock in quality and fit. If your Dodge Dakota matters to you, OEM parts make the smart choice. You'll get the exact look, feel, and performance you expect. Shop genuine Dakota parts at the highly competitive prices online. Enjoy a manufacturer's warranty, a hassle-free return policy, and rapid delivery. No more guesswork with off brands. Get genuine parts with exact fit and true factory performance. Shop with confidence today at JeepPartsDeal.com.
Dodge Dakota Piston Parts and Q&A
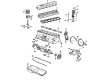
- Q: How to Install Piston and Connecting Rod Assemblies into the Bore on Dodge Dakota?A:The piston rings should be installed before the piston and connecting rod assemblies are put into the bore. Dip the piston head and rings in clean engine oil, place a ring compressor over them, tighten the compressor and confirm the rings stay in their original position. Locate the bearing on the connecting rod so that the lubrication opening in both matches, add clean engine oil to the bearing surface and secure the two pieces together. Put Connecting Rod Guides on top of each connecting rod bolt thread. A raised "F" is placed on both piston pin bore surfaces, showing where the pistons should be installed to ensure the connecting rod oil slinger is placed in front. After wiping the cylinder clean, smear some clean engine oil onto it to keep everything lubricated. Align the connecting rod journal at the center of the bore and fit the rod and piston inside the cylinder. After that, make certain that the guides on the connecting rod are correctly over the Crankshaft journal. With the hammer handle, gently strike the piston into the cylinder bore and at the same time, place the connecting rod over its journal. Do not use connecting rod bolts more than once, as they should always be replaced if removed or loosened. Coat the bolt shaft and touch the connecting rod with oil, put the new cap and bearing in place and turn the bolts to 27 Nm (20 ft. lbs.) plus 90°. Assemble the heads, the Timing Chain, cover, cover gaskets, timing chain cover and Oil Pan with the windage tray or gasket. Make sure you add the proper oil to the engine crankcase and attach the negative cable to the battery.
- Q: How to Safely Remove and Replace a Piston in an Engine on Dodge Dakota?A:Before removing the piston, first take off the negative cable from the battery. After that, pull off the Oil Pan and its gasket/windage tray, the cylinder head covers, the timing chain cover and cylinder head(s). Should this step be needed, turn a reliable reamer into the ridge of the bore and cover the tops of those pistons with it. First, you need to remove the piston and connecting rod from the top of the cylinder block and move the Crankshaft to ensure every connecting rod is in the cylinder's center as you remove it. Do not use a number stamp or punch on the connecting rods or caps to prevent damage and use a permanent ink marker or scribe tool to show the positions, not harming the fractured joint surfaces. With Special Tool 8507 Connecting Rod Guides installed into the connecting rod being replaced, loosen the piston and take it out of the cylinder bore and repeat with each piston. After you have removed the bearing, place the bearing cap on the connecting rod right away to prevent harm. When cleaning, do not use a wire wheel or abrasive device on the pistons or connecting rods because of the Moly coating; instead, soak the pistons in a suitable solvent in warm water and dry with a towel, using a wood or plastic scraper for the grooves in the piston ring without taking out the piston pin. Check the journal inside the connecting rod for signs of extra wear, taper and scoring and look at the connecting rod itself for any twist or bend. For installation, the piston rings should be set before the piston and connecting rod assemblies are put into the bore and the piston head and rings are covered in clean engine oil. Use a ring compressor to hold the piston and rings together before you begin to tighten them, so the rings don't change position. Match the location of the hole in the bearing shell with that of the connecting rod and smear clean engine oil on the bearing surface. Drop in Special Tool 8507 Connecting Rod Guides into the connecting rod bolt thread holes. An "F" is stamped above the piston pin bore surface to show which way the pistons should be installed. They should all face the front end, along with the oil slinger slot, of the engine on both side banks. Apply engine oil and clean the cylinder bore, spin the crankshaft until the connecting rod journal is in the center and then gently insert both the rod and piston, ensuring the rod slides right onto the journal. Hold the connecting rod and start the piston at the top of the cylinder bore, then tap the piston down with the hammer handle as you guide the rod. Bossa abandons Connecting Rod Bolts every time they are used since they are Torque to Yield; never try to reuse them after removal. Coat the rod bolts and bearing parts with engine oil, place the cap and bearing on the rod and secure with bolts tightened to 27 Nm (20 ft. lbs.) plus 90°. Once done, replace the cylinder head(s), timing chain and cover, cylinder head covers and oil pan and gasket/windage tray, pour the required engine oil into the crankcase and reattach the negative cable to the battery.


Related Dodge Dakota Parts
 Dodge Dakota Cylinder Head
 Dodge Dakota Oil Pan
 Dodge Dakota Oil Pump
 Dodge Dakota Cam Gear
 Dodge Dakota Camshaft Thrust Plate
 Dodge Dakota Crankshaft
 Dodge Dakota Crankshaft Pulley
 Dodge Dakota Crankshaft Thrust Washer
 Dodge Dakota Piston Ring Set
 Dodge Dakota Rocker Arm
 Dodge Dakota Rocker Arm Pivot
 Dodge Dakota Timing Chain Tensioner