JeepParts
My Garage
My Account
Cart
OEM 2003 Dodge Neon Ball Joint
Control Arm Joint- Select Vehicle by Model
- Select Vehicle by VIN
Select Vehicle by Model
orMake
Model
Year
Select Vehicle by VIN
For the most accurate results, select vehicle by your VIN (Vehicle Identification Number).
1 Ball Joint found

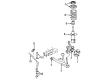
2003 Dodge Neon Ball Joint, Front Lower Part Number: 4656010AE
$70.36 MSRP: $157.00You Save: $86.64 (56%)Ships in 1-2 Business DaysProduct Specifications- Other Name: Ball Join - Lower Control Arm; Suspension Ball Joint, Front; Lower Ball Joint; Ball Joint Kit Lower Control Arm; Ball Joint Lower Control Arm; Suspension Ball Joint
- Position: Front Lower
- Replaces: 4656010AB, 4656010AD, 4656010AC
- Item Weight: 1.20 Pounds
- Item Dimensions: 4.1 x 3.0 x 2.1 inches
- Condition: New
- Fitment Type: Direct Replacement
- SKU: 4656010AE
- Warranty: This genuine part is guaranteed by Mopar's factory warranty.
2003 Dodge Neon Ball Joint Parts and Q&A
- Q: How to Service and Repair a Ball Joint on 2003 Dodge Neon?A: To work on the lower ball joint, first take off the lower control arm from the vehicle. Release the seal boot from the ball joint using a screwdriver or tool that fits the purpose. Fit the Receiver, Special Tool 6908-2, onto a hydraulic press and place the lower control arm so its ball joint lowers into the Receiver cup. Place the Adapter, Special Tool 6804, onto the ball joint, then use the press to fully extract it. After removing the tools, ball joint and arm from the press, place the new ball joint in the bore on the lower control arm to avoid it being cocked. With Special Tool 6758, reverse it and use it to support the lower control arm. Align the ball joint stud with the Installer's cup at this time. Place Special Tool 6804, with the wide end towards the ball joint, on top of it and push it into the lower control arm until the shoulder comes to rest on the inner part. With the tools removed, put in a new seal boot with the upside facing out, so heat is shielded from entering. Press the seal boot down onto the lower control arm with the help of the Installer, Special Tool 6758. If there isn't one fitted, put a standard zirc grease fitting into the ball joint. Place the ball joint into the grease cup of the hand pump and push in the grease until it comes out past the stem, then wipe the final bits from around the stem. Rather than using the standard grease fitting, add a headless grease fitting when rebuilding the original ball joint, making sure the joint is clean before you do. The last step is to put on the lower control arm.
Related 2003 Dodge Neon Parts
 2003 Dodge Neon Wheel Hub
 2003 Dodge Neon Axle Beam Mount
 2003 Dodge Neon Axle Pivot Bushing
 2003 Dodge Neon Axle Support Bushings
 2003 Dodge Neon Bump Stop
 2003 Dodge Neon Coil Spring Insulator
 2003 Dodge Neon Coil Springs
 2003 Dodge Neon Control Arm Bushing
 2003 Dodge Neon Shock And Strut Mount
 2003 Dodge Neon Steering Knuckle
 2003 Dodge Neon Sway Bar Kit
 2003 Dodge Neon Sway Bar Link