JeepParts
My Garage
My Account
Cart
OEM 2003 Dodge Stratus Control Arm
Suspension Arm- Select Vehicle by Model
- Select Vehicle by VIN
Select Vehicle by Model
orMake
Model
Year
Select Vehicle by VIN
For the most accurate results, select vehicle by your VIN (Vehicle Identification Number).
12 Control Arms found


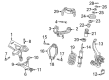
2003 Dodge Stratus Lower Control Arm, Front Passenger Side Part Number: 4764500AG
$707.79Ships in 1-2 Business DaysProduct Specifications- Other Name: Arm - Control; Front Right Lower Suspension Control Arm and Ball Joint Assembly.
- Position: Front Lower Passenger Side
- Replaces: 4764500AE, 4764500AF, 4764500AD
- Item Weight: 16.80 Pounds
- Item Dimensions: 22.9 x 12.0 x 3.7 inches
- Condition: New
- Fitment Type: Direct Replacement
- SKU: 4764500AG
- Warranty: This genuine part is guaranteed by Mopar's factory warranty.


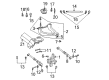
2003 Dodge Stratus Upper Control Arm, Rear Passenger Side Part Number: 4895276AC
$190.41 MSRP: $321.00You Save: $130.59 (41%)Ships in 1-2 Business DaysProduct Specifications- Other Name: Arm - Control; Rear Right Upper Suspension Control Arm and Ball Joint Assembly.; Arm Control; Control Arm
- Position: Rear Upper Passenger Side
- Replaces: 4895276AB
- Item Weight: 10.10 Pounds
- Item Dimensions: 4.2 x 14.2 x 14.6 inches
- Condition: New
- Fitment Type: Direct Replacement
- SKU: 4895276AC
- Warranty: This genuine part is guaranteed by Mopar's factory warranty.

2003 Dodge Stratus Upper Control Arm, Front Driver Side Part Number: 4782975AE
$115.67 MSRP: $174.00You Save: $58.33 (34%)Ships in 1-2 Business DaysProduct Specifications- Other Name: Arm - Control; Front Left Upper Suspension Control Arm and Ball Joint Assembly.; Arm Control; Control Arm
- Position: Front Upper Driver Side
- Replaces: 4782975AC, 4782975AA, 4782975AB, 4782975AD, 4764409AC
- Item Weight: 2.70 Pounds
- Item Dimensions: 10.8 x 9.3 x 3.7 inches
- Condition: New
- Fitment Type: Direct Replacement
- SKU: 4782975AE
- Warranty: This genuine part is guaranteed by Mopar's factory warranty.
2003 Dodge Stratus Upper Control Arm, Front Passenger Side Part Number: 4782974AE
$121.10 MSRP: $160.00You Save: $38.90 (25%)Ships in 1-2 Business DaysProduct Specifications- Other Name: Arm - Control; Front Right Upper Suspension Control Arm and Ball Joint Assembly.; Arm Control; Control Arm
- Position: Front Upper Passenger Side
- Replaces: 4782974AD, 4782974AC
- Item Weight: 3.00 Pounds
- Item Dimensions: 11.0 x 9.2 x 3.4 inches
- Condition: New
- Fitment Type: Direct Replacement
- SKU: 4782974AE
- Warranty: This genuine part is guaranteed by Mopar's factory warranty.
2003 Dodge Stratus Upper Control Arm, Rear Driver Side Part Number: 4895277AC
$211.12 MSRP: $315.00You Save: $103.88 (33%)Ships in 1-2 Business DaysProduct Specifications- Other Name: Arm - Control; Rear Left Upper Suspension Control Arm and Ball Joint Assembly.; Arm Control; Control Arm
- Position: Rear Upper Driver Side
- Replaces: 4895277AB
- Item Weight: 10.30 Pounds
- Item Dimensions: 14.7 x 14.5 x 4.3 inches
- Condition: New
- Fitment Type: Direct Replacement
- SKU: 4895277AC
- Warranty: This genuine part is guaranteed by Mopar's factory warranty.


2003 Dodge Stratus Lower Control Arm, Rear Driver Side Part Number: MR369664
$24.96 MSRP: $71.60You Save: $46.64 (66%)Ships in 1-2 Business DaysProduct Specifications- Other Name: Arm - Control; Suspension Control Arm, Rear Left Lower, Rear Left Lower Forward; Front Lower Control Arm; Arm Control
- Position: Rear Lower Driver Side
- Item Weight: 2.50 Pounds
- Condition: New
- Fitment Type: Direct Replacement
- SKU: MR369664
- Warranty: This genuine part is guaranteed by Mopar's factory warranty.

2003 Dodge Stratus Lower Control Arm, Rear Passenger Side Part Number: MR369665
$24.96 MSRP: $71.60You Save: $46.64 (66%)Ships in 1-2 Business DaysProduct Specifications- Other Name: Arm - Control; Suspension Control Arm, Rear Right Lower, Rear Right Lower Forward; Front Lower Control Arm; Arm Control
- Position: Rear Lower Passenger Side
- Item Weight: 2.40 Pounds
- Condition: New
- Fitment Type: Direct Replacement
- SKU: MR369665
- Warranty: This genuine part is guaranteed by Mopar's factory warranty.
- Product Specifications
- Other Name: Arm - Control; Front Left Lower Suspension Control Arm and Ball Joint Assembly.
- Position: Front Lower Driver Side
- Replaces: 4764501AD, 4764501AE, 4764501AF
- Item Weight: 16.80 Pounds
- Item Dimensions: 22.7 x 12.1 x 3.8 inches
- Condition: New
- Fitment Type: Direct Replacement
- SKU: 4764501AG
- Warranty: This genuine part is guaranteed by Mopar's factory warranty.


2003 Dodge Stratus Lower Control Arm Part Number: MR554376
Product Specifications- Other Name: Arm - Control; Suspension Control Arm and Ball Joint Assembly.; Arm Control
- Item Weight: 17.70 Pounds
- Condition: New
- Fitment Type: Direct Replacement
- SKU: MR554376
- Warranty: This genuine part is guaranteed by Mopar's factory warranty.
2003 Dodge Stratus Lower Control Arm Part Number: MR554375
Product Specifications- Other Name: Arm - Control; Arm Control
- Item Weight: 16.10 Pounds
- Condition: New
- Fitment Type: Direct Replacement
- SKU: MR554375
- Warranty: This genuine part is guaranteed by Mopar's factory warranty.
 Product Specifications
- Other Name: Arm - Control; Suspension Control Arm, Rear Right Upper; Arm Control; Control Arm
- Position: Rear Upper Passenger Side
- Condition: New
- Fitment Type: Direct Replacement
- SKU: MR369956
- Warranty: This genuine part is guaranteed by Mopar's factory warranty.
- Product Specifications
- Other Name: Arm - Control; Suspension Control Arm, Rear Left Upper; Arm Control; Control Arm
- Position: Rear Upper Driver Side
- Item Weight: 4.10 Pounds
- Item Dimensions: 12.9 x 10.2 x 5.7 inches
- Condition: New
- Fitment Type: Direct Replacement
- SKU: MR369955
- Warranty: This genuine part is guaranteed by Mopar's factory warranty.
2003 Dodge Stratus Control Arm Parts and Q&A
- Q: How to remove and install a lower control arm on 2003 Dodge Stratus?A: Before unfastening the lower control arm, raise the car and take out the wheel and tire set. Remove the nut from the outer tie rod as you grip the tie rod stud with a socket. Take out the outer tie rod using Remover, Special Tool C-3894-A. After that, take out the cotter pin and castle nut from the lower ball joint stud, making sure you don't insert any tool between the knuckle and the lower ball joint. Pull the knuckle outward and strike the knuckle boss with a hammer until it separates from the lower ball joint, being sure not to hurt the lower control arm or the ball joint seal. Just unfasten the clevis nut and bolt from the lower control arm bushing to release the shock absorber and hold the stud on the lower control arm with an Allen wrench while you remove the nut from the end of the stabilizer bar link. Take out the screws that hold the stabilizer bar bushing clamp to the front suspension crossmember and pull the stabilizer bar down away from the control arm. Take out the bolts and nuts on both sides of the lower control arm attached to the front end of the suspension crossmember, keeping the control arm even to avoid binding. Install the rear part of the control arm into the front crossmember of the suspension, the front part afterward and put all the bolts and nuts on, only leaving the front one loose. Turn the rear attaching nut and bolt until the torque reaches 95 Nm (70 ft. lbs.) Put the lower control arm ball joint stud into the steering knuckle and attach the castle nut without tightening it yet. Put the outer tie rod stud into the steering knuckle and fasten it with 45 ft. lbs. (61 Nm) torque. Set the castle nut on the ball joint of the lower control arm to 74 Nm (55 ft. lbs.) and add the cotter pin. Place the stabilizer bar link into its hole and center the bushing clamp over the remaining holes, tighten the bolts using 61 Nm (45 ft. lbs.) torque. Put a wrench on the Allen screw and use it to tighten the nut until you get 102 Nm (75 ft. lbs.) torque while you hold the stud. Attach the clevis of the shock onto the bushing inside the lower control arm and secure them with the through-bolt, but not tightening it yet. Place a jack stand on the bottom side of the lower control arm, but make sure it isn't under the ball joint cap and then lower the car onto the stand. Fasten the clevis-to-lower control arm bushing through-bolt nut to 88 Nm (65 ft. lbs.) of torque and afterwards tighten the front lower control arm nut and bolt to 182 Nm (135 ft. lbs.). Place the jack under the vehicle again to lift it and remove the jack stand. Then set the wheel and assembly in place, tighten the lug nuts to 135 Nm (100 ft. lbs.) following the correct pattern and now lower the car to ensure the alignment is proper.
Related 2003 Dodge Stratus Parts
 2003 Dodge Stratus Sway Bar Link
 2003 Dodge Stratus Axle Beam Mount
 2003 Dodge Stratus Axle Pivot Bushing
 2003 Dodge Stratus Coil Spring Insulator
 2003 Dodge Stratus Coil Springs
 2003 Dodge Stratus Control Arm Bushing
 2003 Dodge Stratus Crossmember Bushing
 2003 Dodge Stratus Lateral Link
 2003 Dodge Stratus Leaf Spring Bushing
 2003 Dodge Stratus Shock Absorber
 2003 Dodge Stratus Sway Bar Bushing
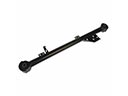 2003 Dodge Stratus Trailing Arm