JeepParts
My Garage
My Account
Cart
OEM 2004 Dodge Ram 1500 Control Arm
Suspension Arm- Select Vehicle by Model
- Select Vehicle by VIN
Select Vehicle by Model
orMake
Model
Year
Select Vehicle by VIN
For the most accurate results, select vehicle by your VIN (Vehicle Identification Number).
8 Control Arms found


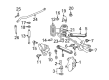
2004 Dodge Ram 1500 Upper Control Arm, Front Part Number: 52013797AC
$261.72 MSRP: $389.00You Save: $127.28 (33%)Product Specifications- Other Name: Arm - Upper Control; Suspension Control Arm, Front Lower, Front Upper; Arm Upper Control Front; Suspension Control Arm; Control Arm
- Position: Front Upper
- Replaces: 52013797AB, 52106784AD, 52013797AA, 52106784AC, 52106784AB
- Item Weight: 4.20 Pounds
- Item Dimensions: 2.4 x 3.0 x 20.0 inches
- Condition: New
- Fitment Type: Direct Replacement
- SKU: 52013797AC
- Warranty: This genuine part is guaranteed by Mopar's factory warranty.

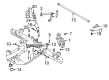
2004 Dodge Ram 1500 Lower Control Arm, Front Driver Side Part Number: 52106561AE
$442.87 MSRP: $798.00You Save: $355.13 (45%)Ships in 1-2 Business DaysProduct Specifications- Other Name: Arm - Lower Control; Front Left Suspension Control Arm and Ball Joint Assembly.
- Position: Front Lower Driver Side
- Replaces: 52106561AD
- Item Weight: 39.00 Pounds
- Item Dimensions: 22.2 x 22.3 x 4.9 inches
- Condition: New
- Fitment Type: Direct Replacement
- SKU: 52106561AE
- Warranty: This genuine part is guaranteed by Mopar's factory warranty.


 Product Specifications
- Other Name: Arm - Lower Control; Front Left Suspension Control Arm and Ball Joint Assembly.
- Position: Front Lower Driver Side
- Replaces: 52106559AD, 52106559AE
- Item Weight: 34.40 Pounds
- Item Dimensions: 23.3 x 19.5 x 6.0 inches
- Condition: New
- Fitment Type: Direct Replacement
- SKU: 52106559AF
- Warranty: This genuine part is guaranteed by Mopar's factory warranty.


 Product Specifications
- Other Name: Arm - Lower Control; Front Right Lower Suspension Control Arm and Ball Joint Assembly.
- Position: Front Lower Passenger Side
- Replaces: 52106558AD, 52106558AE
- Item Weight: 39.30 Pounds
- Item Dimensions: 24.7 x 21.4 x 11.4 inches
- Condition: New
- Fitment Type: Direct Replacement
- SKU: 52106558AF
- Warranty: This genuine part is guaranteed by Mopar's factory warranty.


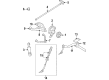
2004 Dodge Ram 1500 Upper Control Arm, Front Part Number: 52106577AI
Product Specifications- Other Name: Arm - Upper Control; Front Upper Suspension Control Arm and Ball Joint Assembly.; Bushings
- Position: Front Upper
- Replaces: 52106577AB, 52106577AA, 52106577AD, 52106577AF, 52106577AH, 52106580AB, 52106577AE, 52106577AC
- Item Weight: 3.20 Pounds
- Item Dimensions: 5.0 x 11.8 x 14.2 inches
- Condition: New
- Fitment Type: Direct Replacement
- SKU: 52106577AI
- Warranty: This genuine part is guaranteed by Mopar's factory warranty.
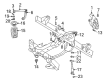
2004 Dodge Ram 1500 Lower Control Arm Part Number: 55366373AB
Product Specifications- Other Name: Arm - Lower Control; Control Arm
- Position: Lower
- Item Weight: 63.60 Pounds
- Item Dimensions: 25.5 x 17.9 x 6.0 inches
- Condition: New
- Fitment Type: Direct Replacement
- SKU: 55366373AB
- Warranty: This genuine part is guaranteed by Mopar's factory warranty.
- Product Specifications
- Other Name: Arm - Lower Control; Front Right Suspension Control Arm and Ball Joint Assembly.
- Position: Front Lower Passenger Side
- Replaces: 52106560AD
- Item Weight: 20.50 Pounds
- Item Dimensions: 23.4 x 15.6 x 5.9 inches
- Condition: New
- Fitment Type: Direct Replacement
- SKU: 52106560AE
- Warranty: This genuine part is guaranteed by Mopar's factory warranty.
2004 Dodge Ram 1500 Lower Control Arm Part Number: 55366372AB
Product Specifications- Other Name: Arm - Lower Control; Control Arm
- Position: Lower
- Item Weight: 65.40 Pounds
- Item Dimensions: 24.3 x 17.2 x 6.1 inches
- Condition: New
- Fitment Type: Direct Replacement
- SKU: 55366372AB
- Warranty: This genuine part is guaranteed by Mopar's factory warranty.
2004 Dodge Ram 1500 Control Arm Parts and Q&A
- Q: How to service and repair a Control Arm on 2004 Dodge Ram 1500?A: Remove the tire and wheel first and after that, raise and support the vehicle before you work on the control arm. Support the vehicle's weight by holding the lower control arm at its outer side and pull the old shock away from the bracket. Set the Spring Compressor DD-1278 into the frame at the shock hole through the suspension arm and the coil spring, so the bell-shaped adapter talks to the suspension arm and tighten the nut at the shock hole, but loosen it half a circle so the spring is held. After that, take out the stabilizer link and nut at the steering knuckle, use the Ball Joint Remover 8677 tool and make sure to support the upper arm and knuckle from below as the joint remover does its job. Then take out the support for the lower control arm and lower it until you have enough room to unscrew the ball joints by increasing the pressure on the spring compressor. Ease the pressure from the spring compressor gradually, so that the lower suspension arm can move down and then take out the spring compressor and the coil spring and isolator pad. Loosen both pivot bolts found at the front and rear of the lower control arm and then unbolt the arm. Put the lower control arm into place and tighten each of the pivot bolts on the front and rear control arms with your fingers. Add the coil spring to the frame pocket and then use Spring Compressor DD-1278 to compact it, just as you did before. With the upper control arm and steering knuckle no longer supported, let the lower ball joint slide into the steering knuckle, add the retaining nut and tighten it to 52 Nm (38 ft. lbs.) for the 1500 series or 135 Nm (100 ft. lbs.) for the HD 4X2 series. With the lower control arm at the outboard side held up, remove the spring compressor, attach the shock absorber and put on the stabilizer link. Once the lower support for the control arm is gone, set up the wheel and tire and allow the car to lower to the ground. After that, carefully adjust the vehicle to the floor with its weight secured, tighten the pivot bolts on the front and rear control arms to the recommended torque and complete the wheel alignment.
Related 2004 Dodge Ram 1500 Parts
 2004 Dodge Ram 1500 Wheel Bearing
 2004 Dodge Ram 1500 Steering Knuckle
 2004 Dodge Ram 1500 Leaf Spring Bushing
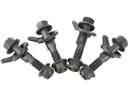 2004 Dodge Ram 1500 Alignment Bolt
 2004 Dodge Ram 1500 Axle Beam Mount
 2004 Dodge Ram 1500 Axle Support Bushings
 2004 Dodge Ram 1500 Bump Stop
 2004 Dodge Ram 1500 Control Arm Bolt
 2004 Dodge Ram 1500 Crossmember Bushing
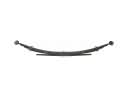 2004 Dodge Ram 1500 Leaf Spring
 2004 Dodge Ram 1500 Sway Bar Bracket
 2004 Dodge Ram 1500 Sway Bar Kit