JeepParts
My Garage
My Account
Cart
OEM 2004 Dodge Ram 2500 Coil Springs
Strut Spring- Select Vehicle by Model
- Select Vehicle by VIN
Select Vehicle by Model
orMake
Model
Year
Select Vehicle by VIN
For the most accurate results, select vehicle by your VIN (Vehicle Identification Number).
35 Coil Springs found

2004 Dodge Ram 2500 Coil Spring, Front Part Number: 52113936AA
$243.26 MSRP: $334.00You Save: $90.74 (28%)Ships in 1-2 Business DaysProduct Specifications- Other Name: Spring - Front Coil; Coil Spring, Front; Coil Springs; Spring; Spring Front Coil
- Position: Front
- Item Weight: 20.10 Pounds
- Item Dimensions: 14.8 x 6.1 x 6.1 inches
- Condition: New
- Fitment Type: Direct Replacement
- SKU: 52113936AA
- Warranty: This genuine part is guaranteed by Mopar's factory warranty.


2004 Dodge Ram 2500 Coil Spring, Front Part Number: 52113977AA
Product Specifications- Other Name: Spring - Front Coil; Coil Spring, Front; Coil Springs; Spring; Spring Front Coil
- Position: Front
- Item Weight: 12.70 Pounds
- Item Dimensions: 19.0 x 7.2 x 7.5 inches
- Condition: New
- Fitment Type: Direct Replacement
- SKU: 52113977AA
- Warranty: This genuine part is guaranteed by Mopar's factory warranty.


2004 Dodge Ram 2500 Coil Spring, Front Part Number: 52113937AA
Product Specifications- Other Name: Spring - Front Coil; Coil Spring, Front; Coil Spring Kit Front; Coil Spring Set; Coil Springs; Spring; Spring Front Coil
- Position: Front
- Item Weight: 21.10 Pounds
- Item Dimensions: 14.7 x 6.1 x 6.3 inches
- Condition: New
- Fitment Type: Direct Replacement
- SKU: 52113937AA
- Warranty: This genuine part is guaranteed by Mopar's factory warranty.


2004 Dodge Ram 2500 Spring, Front Part Number: 52113908AA
Product Specifications- Other Name: Spring - Front Coil; Coil Spring, Front; Coil Springs; Spring Front Coil
- Position: Front
- Item Weight: 21.20 Pounds
- Item Dimensions: 14.8 x 6.0 x 6.0 inches
- Condition: New
- Fitment Type: Direct Replacement
- SKU: 52113908AA
- Warranty: This genuine part is guaranteed by Mopar's factory warranty.


2004 Dodge Ram 2500 Spring, Front Part Number: 52113982AA
Product Specifications- Other Name: Spring - Front Coil; Coil Spring, Front; Coil Springs; Spring Front Coil
- Position: Front
- Item Weight: 18.80 Pounds
- Item Dimensions: 18.6 x 8.0 x 7.7 inches
- Condition: New
- Fitment Type: Direct Replacement
- SKU: 52113982AA
- Warranty: This genuine part is guaranteed by Mopar's factory warranty.


2004 Dodge Ram 2500 Spring, Front Part Number: 52113988AA
Product Specifications- Other Name: Spring - Front Coil; Coil Spring, Front; Coil Springs; Spring Front Coil
- Position: Front
- Item Weight: 30.20 Pounds
- Item Dimensions: 19.4 x 19.4 x 8.0 inches
- Condition: New
- Fitment Type: Direct Replacement
- SKU: 52113988AA
- Warranty: This genuine part is guaranteed by Mopar's factory warranty.
2004 Dodge Ram 2500 Coil Spring, Front Part Number: 52113935AA
Product Specifications- Other Name: Spring - Front Coil; Coil Spring, Front; Coil Springs; Spring; Spring Front Coil
- Position: Front
- Item Weight: 18.40 Pounds
- Condition: New
- Fitment Type: Direct Replacement
- SKU: 52113935AA
- Warranty: This genuine part is guaranteed by Mopar's factory warranty.
2004 Dodge Ram 2500 Coil Spring, Front Part Number: 52113932AA
Product Specifications- Other Name: Spring - Front Coil; Coil Spring, Front; Coil Springs; Spring; Spring Front Coil
- Position: Front
- Item Weight: 13.70 Pounds
- Condition: New
- Fitment Type: Direct Replacement
- SKU: 52113932AA
- Warranty: This genuine part is guaranteed by Mopar's factory warranty.
2004 Dodge Ram 2500 Coil Spring, Front Part Number: 52113933AA
Product Specifications- Other Name: Spring - Front Coil; Coil Spring, Front; Coil Springs; Spring; Spring Front Coil
- Position: Front
- Item Weight: 14.90 Pounds
- Condition: New
- Fitment Type: Direct Replacement
- SKU: 52113933AA
- Warranty: This genuine part is guaranteed by Mopar's factory warranty.
2004 Dodge Ram 2500 Spring, Front Part Number: 52113902AA
Product Specifications- Other Name: Spring - Front Coil; Coil Spring, Front; Coil Springs; Spring Front Coil
- Position: Front
- Item Weight: 2.10 Pounds
- Item Dimensions: 15.2 x 5.7 x 5.8 inches
- Condition: New
- Fitment Type: Direct Replacement
- SKU: 52113902AA
- Warranty: This genuine part is guaranteed by Mopar's factory warranty.
2004 Dodge Ram 2500 Coil Spring, Front Part Number: 52113931AA
Product Specifications- Other Name: Front Coil; Coil Spring, Front; Coil Springs; Spring; Spring Front Coil
- Position: Front
- Item Weight: 13.60 Pounds
- Condition: New
- Fitment Type: Direct Replacement
- SKU: 52113931AA
- Warranty: This genuine part is guaranteed by Mopar's factory warranty.
2004 Dodge Ram 2500 Spring, Front Part Number: 52113905AA
Product Specifications- Other Name: Spring - Front Coil; Coil Spring, Front; Coil Springs; Spring Front Coil
- Position: Front
- Item Weight: 15.50 Pounds
- Item Dimensions: 15.5 x 5.8 x 5.7 inches
- Condition: New
- Fitment Type: Direct Replacement
- SKU: 52113905AA
- Warranty: This genuine part is guaranteed by Mopar's factory warranty.
2004 Dodge Ram 2500 Coil Spring, Front Part Number: 52113934AA
Product Specifications- Other Name: Spring - Front Coil; Coil Spring, Front; Coil Springs; Spring; Spring Front Coil
- Position: Front
- Item Weight: 16.40 Pounds
- Condition: New
- Fitment Type: Direct Replacement
- SKU: 52113934AA
- Warranty: This genuine part is guaranteed by Mopar's factory warranty.
2004 Dodge Ram 2500 Spring, Front Part Number: 52113911AA
Product Specifications- Other Name: Spring - Front Coil; Coil Spring, Front; Coil Springs; Spring Front Coil
- Position: Front
- Item Weight: 25.90 Pounds
- Condition: New
- Fitment Type: Direct Replacement
- SKU: 52113911AA
- Warranty: This genuine part is guaranteed by Mopar's factory warranty.
2004 Dodge Ram 2500 Spring, Front Part Number: 52113912AA
Product Specifications- Other Name: Spring - Front Coil; Coil Spring, Front; Coil Springs; Spring Front Coil
- Position: Front
- Item Weight: 25.80 Pounds
- Condition: New
- Fitment Type: Direct Replacement
- SKU: 52113912AA
- Warranty: This genuine part is guaranteed by Mopar's factory warranty.
2004 Dodge Ram 2500 Coil Spring, Front Part Number: 52113938AA
Product Specifications- Other Name: Spring - Front Coil; Coil Spring, Front; Coil Springs; Spring; Spring Front Coil
- Position: Front
- Item Weight: 23.80 Pounds
- Condition: New
- Fitment Type: Direct Replacement
- SKU: 52113938AA
- Warranty: This genuine part is guaranteed by Mopar's factory warranty.
2004 Dodge Ram 2500 Spring, Front Part Number: 52113903AA
Product Specifications- Other Name: Front Coil; Coil Spring, Front; Coil Springs; Spring Front Coil
- Position: Front
- Item Weight: 16.90 Pounds
- Item Dimensions: 15.6 x 6.0 x 5.9 inches
- Condition: New
- Fitment Type: Direct Replacement
- SKU: 52113903AA
- Warranty: This genuine part is guaranteed by Mopar's factory warranty.
2004 Dodge Ram 2500 Spring, Front Part Number: 52113913AA
Product Specifications- Other Name: Spring - Front Coil; Coil Spring, Front; Coil Springs; Spring Front Coil
- Position: Front
- Item Weight: 26.30 Pounds
- Condition: New
- Fitment Type: Direct Replacement
- SKU: 52113913AA
- Warranty: This genuine part is guaranteed by Mopar's factory warranty.
2004 Dodge Ram 2500 Spring, Front Part Number: 52113914AA
Product Specifications- Other Name: Spring - Front Coil; Coil Spring, Front; Coil Springs; Spring Front Coil
- Position: Front
- Condition: New
- Fitment Type: Direct Replacement
- SKU: 52113914AA
- Warranty: This genuine part is guaranteed by Mopar's factory warranty.
2004 Dodge Ram 2500 Spring, Front Part Number: 52113909AA
Product Specifications- Other Name: Spring - Front Coil; Coil Spring, Front; Coil Springs; Spring Front Coil
- Position: Front
- Item Weight: 23.60 Pounds
- Item Dimensions: 15.6 x 6.0 x 5.9 inches
- Condition: New
- Fitment Type: Direct Replacement
- SKU: 52113909AA
- Warranty: This genuine part is guaranteed by Mopar's factory warranty.
| Page 1 of 2 |Next >
1-20 of 35 Results
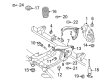
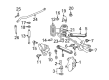
2004 Dodge Ram 2500 Coil Springs Parts and Q&A
- Q: How Are Coil Springs Removed and Installed on 2004 Dodge Ram 2500?A: First, raise and support the vehicle, then take out the front wheel and tire. Put support under the lower control arm on the outer side so the car doesn't sag and remove the shock absorber. Attach the Spring Compressor into the lower suspension arm, through the coil spring and into the shock hole on the frame, with the bell-shaped end of the adapter touching the lower suspension arm and fasten the nut at the shock hole finger tight before loosening it by 1/2 turn so the spring is still held in place. Then remove the lower stabilizer link and the nut on the lower ball joint at the knuckle and detach the ball joint from the knuckle with Ball Joint Remover 8677, supporting the upper arm and knuckle to stop downward rebound. Get rid of the lower arm support rod, then tighten the compressor to give room for the ball joint's removal and unbolt the control arm's pivot bolt for easier swing down. Gradually relax how tight the spring compressor is, to let the lower suspension arm lower and then unhook everything and extract both the coil spring and its isolator pad. To install the isolator pad, tape it to the coil spring at the top and set it in the lower suspension arm just right. Replace the Spring Compressor DD-1278 into the car by feeding it through the lower arm, spring and shock hole in the frame and tighten the device nut to lower the spring. Remove the upper control arm's holder and lower the ball joint into the steering knuckle, then use a 20 mm wrench to tighten the retaining nut to the required torque, followed by an additional 90° turn if it is a 1500 series or 135 Nm and another turn for the HD 4X2. Remember to uninstall the spring compressor, hold the lower control arm on the outer side and reinstall the shock absorber and the stabilizer link. Take off the lower control arm support, fit the wheel and tire assembly and put the car on the ground. Next, let the vehicle rest on the floor loaded with weight and secure both the front and rear control arm mounting bolts to 285 Nm (210 ft. lbs.) on HD 4X2 and 204 Nm (150 ft. lbs.) for LD 4X2 once the vehicle is at the shop.
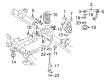
Related 2004 Dodge Ram 2500 Parts
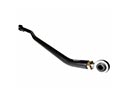 2004 Dodge Ram 2500 Track Bar
 2004 Dodge Ram 2500 Steering Knuckle
 2004 Dodge Ram 2500 Leaf Spring Shackle
 2004 Dodge Ram 2500 Ball Joint
 2004 Dodge Ram 2500 Bump Stop
 2004 Dodge Ram 2500 Leaf Spring Bushing
 2004 Dodge Ram 2500 Shock Absorber
 2004 Dodge Ram 2500 Sway Bar Bracket
 2004 Dodge Ram 2500 Sway Bar Bushing
 2004 Dodge Ram 2500 Sway Bar Kit
 2004 Dodge Ram 2500 Sway Bar Link
 2004 Dodge Ram 2500 Wheel Hub