JeepParts
My Garage
My Account
Cart
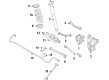
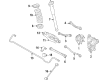
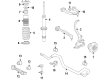
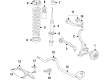
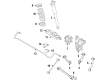
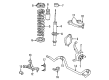
OEM 2005 Chrysler 300 Sway Bar Kit
Stabilizer Sway Bar Set- Select Vehicle by Model
- Select Vehicle by VIN
Select Vehicle by Model
orMake
Model
Year
Select Vehicle by VIN
For the most accurate results, select vehicle by your VIN (Vehicle Identification Number).
7 Sway Bar Kits found


2005 Chrysler 300 Stabilizer Bar, Rear Part Number: 4782873AB
$120.89 MSRP: $154.00You Save: $33.11 (22%)Ships in 1-2 Business DaysProduct Specifications- Other Name: Bar - Rear Suspension; Suspension Stabilizer Bar, Rear; Sway Bar; Stabilizer Bar Rear Suspension; Bar Rear Sway
- Position: Rear
- Item Weight: 6.20 Pounds
- Item Dimensions: 49.0 x 8.6 x 7.2 inches
- Condition: New
- Fitment Type: Direct Replacement
- SKU: 4782873AB
- Warranty: This genuine part is guaranteed by Mopar's factory warranty.

2005 Chrysler 300 Stabilizer Bar, Rear Part Number: 4782871AB
$60.84 MSRP: $89.50You Save: $28.66 (33%)Ships in 1-3 Business DaysProduct Specifications- Other Name: Bar - Rear Sway; Suspension Stabilizer Bar, Rear; Sway Bar; Bar Rear Sway
- Position: Rear
- Item Weight: 7.40 Pounds
- Item Dimensions: 37.8 x 6.1 x 2.1 inches
- Condition: New
- Fitment Type: Direct Replacement
- SKU: 4782871AB
- Warranty: This genuine part is guaranteed by Mopar's factory warranty.


2005 Chrysler 300 Stabilizer Bar, Front Part Number: 4782544AC
Product Specifications- Other Name: Bar - Front; Suspension Stabilizer Bar, Front; Sway Bar; Stabilizer Bar Front
- Position: Front
- Replaces: 4782544AB
- Item Weight: 15.60 Pounds
- Item Dimensions: 39.7 x 10.3 x 2.9 inches
- Condition: New
- Fitment Type: Direct Replacement
- SKU: 4782544AC
- Warranty: This genuine part is guaranteed by Mopar's factory warranty.

2005 Chrysler 300 Stabilizer Bar, Front Part Number: 4782541AC
Product Specifications- Other Name: Bar - Front; Suspension Stabilizer Bar, Front; Sway Bar; Stabilizer Bar Front
- Position: Front
- Replaces: 4782541AB
- Item Weight: 11.30 Pounds
- Item Dimensions: 39.3 x 10.4 x 2.4 inches
- Condition: New
- Fitment Type: Direct Replacement
- SKU: 4782541AC
- Warranty: This genuine part is guaranteed by Mopar's factory warranty.

2005 Chrysler 300 Stabilizer Bar, Rear Part Number: 4782872AB
Product Specifications- Other Name: Bar - Rear Suspension; Suspension Stabilizer Bar, Rear; Sway Bar; Stabilizer Bar Rear Suspension; Bar Rear Sway
- Position: Rear
- Item Weight: 5.80 Pounds
- Item Dimensions: 55.9 x 10.6 x 5.0 inches
- Condition: New
- Fitment Type: Direct Replacement
- SKU: 4782872AB
- Warranty: This genuine part is guaranteed by Mopar's factory warranty.
2005 Chrysler 300 Stabilizer Bar, Front Part Number: 4782543AC
Product Specifications- Other Name: Bar - Front; Suspension Stabilizer Bar, Front; Sway Bar; Stabilizer Bar Front
- Position: Front
- Replaces: 4782543AB
- Item Weight: 13.00 Pounds
- Item Dimensions: 39.5 x 11.0 x 2.0 inches
- Condition: New
- Fitment Type: Direct Replacement
- SKU: 4782543AC
- Warranty: This genuine part is guaranteed by Mopar's factory warranty.

2005 Chrysler 300 Stabilizer Bar, Front Part Number: 4782950AB
Product Specifications- Other Name: Bar - Front; Suspension Stabilizer Bar, Front; Sway Bar; Stabilizer Bar Front; Bar Front Sway
- Position: Front
- Item Weight: 19.30 Pounds
- Item Dimensions: 44.7 x 10.1 x 2.4 inches
- Condition: New
- Fitment Type: Direct Replacement
- SKU: 4782950AB
- Warranty: This genuine part is guaranteed by Mopar's factory warranty.
2005 Chrysler 300 Sway Bar Kit Parts and Q&A
- Q: How to Service and Repair a Sway Bar Kit in the Rear Suspension on 2005 Chrysler 300?A: First remove and block the negative terminal of the battery from the post, then raise and prop up the vehicle for the repair. Remove the nuts and the tire and wheel assembly from the right and left wheel sides of the rear. Then, take out the rear exhaust and put alignment index marks on the rubber coupler of the propeller shaft and the flange of the axle. Withdraw the three bolts and nuts joining the propeller shaft coupler to the axle flange. Then, secure the propeller shaft with the help of a bungee cord tugging on the fuel tank straps. Release the parking brake cable at the connector by the right rear parking brake cable and then remove it from the equalizer. Keep holding the guide pin while removing the 2 bolts that secure the brake caliper to the adapter and pads. You can use a bungee cord or wire to hold the caliper above the rear suspension until you're done. Unclip the left wheel speed sensor cable from its routing mechanism, then remove the sensors' connectors from the body wiring harness connector by the luggage compartment floor pan. Undo the bolt from the top of the shock absorber on each side and then use a marking tool to show the positions of the crossmember on the vehicle body at all four points. Put jack stands under the front part of the engine cradle, then position a jack below the differential at the rear, raising it till it touches the differential. Take out the fuel filler tube and all the bolts on either side that hold the crossmember, then let the crossmember fall to the point where the propeller shaft can easily be lifted from the rear axle differential. Keep moving the crossmember down so you have a convenient level to reach the fasteners of the sway bar kit. With your bolts and nuts nearby, take them off the sway bar kit fixing points and remove the bolts fastening each sway bar isolator to the crossmember. Fit the isolators to the sway bar kit so the slit is in front and after that, put the retainers and bar with isolators and retainers onto the crossmember. Fasten the isolation mounting bolts on, skip the nuts, then fasten the bar ends to the links by skipping the nuts for both. Set the isolator retainer mounting bolts to 61 Nm and after that, take the springs and isolators out of the spring links. Lift the crossmember so it is about 10 inches from the body mounting points, secure the front parking brake cable routing bracket to the rear crossmember with its screw and then raise the crossmember and move the propeller shaft onto the rear axle differential flange. Install the left side crossmember bolts without tightening and then lower the jack a bit so the right side crossmember descends enough for spring installation. Make sure the isolators are in place on either end of the spring before you insert the spring with isolators into the spring pocket and arrange the top of the spring so it fits the body mount. Elevate the jack so that the coil spring and bottom of the shock pass through the hole, then add the lower bolt and nut just to hold the lower mounting in place. Spacers are needed on top of the right crossmember mount bushings when your vehicle comes with AWD. Put the right side of the crossmember in place and begin installing the right side mounting bolts, just tight enough so they do not move. After taking off the bolts at both ends of the crossmember's left side, lower the jack to move that side of the member down enough to fit the springs. Place the coil spring with isolators in the spring pocket, set the top of the spring on the body mount and use the jack to guide the coil spring and the lower end of the shock absorber into position, stopping when the shock absorber lower mount hole lines up with the spring link. Install the bolt and nut for the lower shock mount without tightening and then, if you have AWD, fit spacers onto the left crossmember mount bushings before putting the crossmember into position. Position the left part of the crossmember and put in the left mounting bolts, leaving them snug. Move the crossmember to make the mounts match the body marks and then check that the distance between the tension link and the body's weld flange is at least 12 mm for correct clearance. Screw all four crossmember mounting bolts in until they reach 180 Nm torque, lower the jack away from the rear axle differential and remove the bungee cord securing the propeller shaft. After removing the propeller shaft, realign the index marks and fix the rear flange bolts to the axle with hand tightening and torque them to 81 Nm. Set up the fuel filler tube, relay the left rear wheel speed sensor cable to the routing clip and connect the left sensor to the right one. Connect the speed sensor connectors to the body wiring harness connector, making certain the retaining clip is fully snapped on. With the rear disc brake, push the guide pins of the caliper into the caliper adapters, guide the brake caliper and hose down past the rear suspension and place the caliper over the brake pads onto the adapter. Firmly maintain the guide pins as you insert and fasten the guide pin bolts to 60 Nm and check that the brake hose is well arranged. Pass the parking brake cable over the rear crossmember and push it through the equalizer just above the rear differential. Attach the front parking brake cable at the connector to the rear parking brake cable, put in the rear exhaust system and set the tire and wheel assemblies, tightening the wheel mounting nuts to 150 Nm torque. Move the vehicle so the rear wheels just touch the floor, press the parking brake lever, remove it, press it again and see that the rear wheels do not move. Reduce the vehicle, attach the negative cable of your battery to the battery post, pump the brake several times, position the vehicle on a rack, secure the shock absorber lower mounting bolt nuts to 72 Nm torque, tighten the sway bar link fasteners to 61 Nm and perform a wheel alignment.
Related 2005 Chrysler 300 Parts
 2005 Chrysler 300 Control Arm
 2005 Chrysler 300 Wheel Bearing
 2005 Chrysler 300 Control Arm Bushing
 2005 Chrysler 300 Wheel Hub
 2005 Chrysler 300 Axle Beam Mount
 2005 Chrysler 300 Axle Pivot Bushing
 2005 Chrysler 300 Coil Spring Insulator
 2005 Chrysler 300 Coil Springs
 2005 Chrysler 300 Lateral Link
 2005 Chrysler 300 Leaf Spring Bushing
 2005 Chrysler 300 Shock And Strut Mount
 2005 Chrysler 300 Sway Bar Bracket