JeepParts
My Garage
My Account
Cart
OEM 2005 Chrysler Town & Country Rack And Pinion
Steering Rack And Pinion- Select Vehicle by Model
- Select Vehicle by VIN
Select Vehicle by Model
orMake
Model
Year
Select Vehicle by VIN
For the most accurate results, select vehicle by your VIN (Vehicle Identification Number).
2 Rack And Pinions found


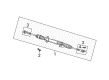
2005 Chrysler Town & Country Steering Gear Part Number: R8072216AC
$746.97 MSRP: $869.00You Save: $122.03 (15%)Product Specifications- Other Name: Gear - Rack And Pinion; Rack and Pinion Assembly; Steering Gearbox; Gear Assembly; Gear Rack And Pinion With Tie Rod Ends; Gear Rack And Pinion
- Replaces: 68072216AC, 68072216AA, 4766250AF, 4766260AK, 4766250AG, 4766250AN, 4766260AL, 4766270AC, 4766250AL, 4766260AJ, 4766250AM, 4766260AG, 4766250AK, 68072216AB, 4766260AF, 4766260AM, R0400272
- Item Weight: 19.90 Pounds
- Item Dimensions: 61.8 x 11.6 x 6.4 inches
- Condition: New
- Fitment Type: Direct Replacement
- SKU: R8072216AC
- Warranty: This genuine part is guaranteed by Mopar's factory warranty.
2005 Chrysler Town & Country Gear Assembly Part Number: 4766270AB
Product Specifications- Other Name: Gear - Power Steering; Steering Gearbox
- Condition: New
- Fitment Type: Direct Replacement
- SKU: 4766270AB
- Warranty: This genuine part is guaranteed by Mopar's factory warranty.
2005 Chrysler Town & Country Rack And Pinion Parts and Q&A
- Q: How to Service and Repair a Rack and Pinion Steering Gear on 2005 Chrysler Town & Country?A: Before starting any repairs or servicing on the LHD rack and pinion, remove the cap from its power steering reservoir and then use a siphon pump to suck out as much liquid as you can without clogging the filter mesh. Hold the steering wheel straight and apply the lock to the steering column to avoid wearing out the Clock Spring. Separate the steering column shaft coupler from the rack and pinion intermediate coupler, raise your vehicle and then take off the front wheels and tires. Unhook the front emissions vapor canister, remove the hose from the power steering cooler and remove both bolts that hold the power steering cooler to the cradle reinforcement. Izzle the nut holding the outer tie rod end to the steering knuckle on all four sides by placing a socket over the tie rod stud and unscrewing the nut. Remove the bolts connecting the leak detection pump to its crossmember reinforcement. Puller C-3894-A should then be used to unbolt both outer tie rods from the steering knuckles. Open the car's rear door and use a brass punch to tap down the locking pin. Next, remove the lower control arm bushing retainer bolts from both sides and become aware of their different thread sizes. Take off the reinforcement from the front suspension cradle as well as the body and do the same with the power transfer unit if AWD is installed. Detach the power steering pressure and return hoses from the rack and pinion, undo the three bolts attaching it to the cradle and pull apart the filter. Lower the rack and pinion down to uncover the intermediate coupler roll pin, then remove the roll pin and separate the coupler from the rack and pinion shaft with Remover/Installer Special Tool 6831A. Place the power steering rack and pinion in the front suspension cradle, push the roll pin into the intermediate coupler and attach the coupler to the rack and pinion shaft. Use the Remover/Installer Special Tool 6831A to push the roll pin into the coupler which will help apply the proper amount of tightness to the rack and pinion to suspension cradle mounting bolts. Connect the rack and pinion to the bracket with three bolts, checking the torque values and fasten the fluid hoses on the rack and pinion, ensuring the plastic parts are secured. If required, assemble the power transfer unit and then bolt the cradle reinforcement to the suspension cradle, tightening them to the correct torque level. Put in the lower control arm rear bushing retainer bolts and the reinforcement to body bolts, with the appropriate tightness. Replace the outer tie rod ends into the steering knuckles and tighten the nuts according to the given torque. Attach and fasten the leak detection pump and the power steering fluid cooler. Attach the detached coolant pipe to the power steering, fit the wheels and front assembly to the vehicle and tighten bolts on the front wheels. Attach the front emissions vapor canister, lower the vehicle to the ground and bring the intermediate shaft up toward the steering column. Then secure the shaft to the column with the pinch bolt. After removing the steering wheel holding tool, add the fluid, bleed the power steering, look for any leaks and make rear toe adjustments.
Related 2005 Chrysler Town & Country Parts
 2005 Chrysler Town & Country Power Steering Hose
 2005 Chrysler Town & Country Power Steering Pump
 2005 Chrysler Town & Country Power Steering Reservoir
 2005 Chrysler Town & Country Steering Column
 2005 Chrysler Town & Country Steering Column Cover
 2005 Chrysler Town & Country Steering Gear Box
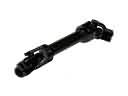 2005 Chrysler Town & Country Steering Shaft
 2005 Chrysler Town & Country Steering Wheel
 2005 Chrysler Town & Country Tie Rod End