JeepParts
My Garage
My Account
Cart
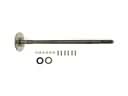
OEM 2006 Chrysler Pacifica Drive Shaft
Axle Shaft- Select Vehicle by Model
- Select Vehicle by VIN
Select Vehicle by Model
orMake
Model
Year
Select Vehicle by VIN
For the most accurate results, select vehicle by your VIN (Vehicle Identification Number).
1 Drive Shaft found


2006 Chrysler Pacifica Drive Shaft Part Number: 4641968AJ
Product Specifications- Other Name: Shaft - Drive; Driveshaft; Shaft Drive
- Replaces: 4641968AG, 4641968AH
- Item Weight: 38.10 Pounds
- Item Dimensions: 94.8 x 8.6 x 8.9 inches
- Condition: New
- Fitment Type: Direct Replacement
- SKU: 4641968AJ
- Warranty: This genuine part is guaranteed by Mopar's factory warranty.
2006 Chrysler Pacifica Drive Shaft Parts and Q&A
- Q: How to Remove and Install the Drive Shaft on 2006 Chrysler Pacifica?A: Make sure another person helps, because removing the propeller shaft is done by two people. First, lift the car on a hoist, take off the rear muffler hanger, then the center hanger brackets and maintain the exhaust system with a screw jack. Make sure the transmission is set to neutral, record the propeller shaft flange positions at the PTU and the rear driveline module for easier installation. Come off the rings but don't remove the bolts from the PTU while you remove the six bolts for the shaft-to-power transfer unit. Get your helper to keep holding the front segment while you remove the center segment's bolts supporting it to the chassis and then support and remove the rear segment bolts together. Bring the propeller shaft assembly down slowly so that the flanges near the front and back avoid damage. For installation, set the transaxle in Neutral (N) and your helper should lift the propeller shaft assembly into the right place, joining it to the driveline module and then to the PTU flange. Fasten the center and rear support bearing/bracket assemblies and secure them with your hands. Set the paint marks on the driveline modules flange to the same positions and install and tighten the three bolts that secure the rubber couplers to the rear driveline module to 54 Nm (40 ft. lbs.). Direct the chalk marks on the shaft at the PTU flange and secure the shaft bolts with 30 Nm (22 ft. lbs. ) force rotated in an alternating pattern. Enter the bearings/supports into their positions, then tighten their support/bearing-to-body bolts to 54 Nm (40 ft. lbs.). Move the exhaust system into its place, attach the rear exhaust bracket, let go of the support stand, fit the center exhaust hanger and put the vehicle back down.