JeepParts
My Garage
My Account
Cart
OEM 2006 Dodge Charger A/C Expansion Valve
Air Conditioning Expansion Valve- Select Vehicle by Model
- Select Vehicle by VIN
Select Vehicle by Model
orMake
Model
Year
Select Vehicle by VIN
For the most accurate results, select vehicle by your VIN (Vehicle Identification Number).
1 A/C Expansion Valve found


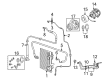
2006 Dodge Charger Expansion Valve Part Number: 5139687AA
$84.68 MSRP: $176.00You Save: $91.32 (52%)Ships in 1-2 Business DaysProduct Specifications- Other Name: Valve - Expansion; A/C Expansion Valve; Valve Expansion O Ring And Screw Is Serviced With The Valve; Valve Expansion
- Item Weight: 0.70 Pounds
- Item Dimensions: 3.1 x 3.1 x 5.1 inches
- Condition: New
- Fitment Type: Direct Replacement
- SKU: 5139687AA
- Warranty: This genuine part is guaranteed by Mopar's factory warranty.
2006 Dodge Charger A/C Expansion Valve Parts and Q&A
- Q: How to Service and Repair an A/C Expansion Valve on 2006 Dodge Charger?A: Before working on the A/C expansion valve, first remove all the refrigerant and take out the negative battery cable. Release the bolt that joins the refrigerant line bracket to the left front shock tower before removing the left side engine mounting nut and second refrigerant line tapping nut. Unplug the wire harness from the A/C pressure transducer, then disconnect both the A/C suction and liquid lines from the expansion valve and put both out of the way. Remove the dual plane seal from the suction and liquid line fittings and seal the holes with either plugs or tape. Unscrew the two bolts attaching the A/C expansion valve to the tapping block, then take out the valve plus the foam seal and throw out the dual plane seal from the fittings on the evaporator tube, also covering the openings. For installation, remove any tape or plugs from the evaporator tube fittings and expansion valve ports, add light clean oil to the dual plane seal, put it onto the fittings and make certain to properly use the seal and refrigerant oil called for in the instructions. Connect the A/C expansion valve to the evaporator tube tapping block using two bolts screwed to 11 N.m and then you can remove any covering on the suction- and liquid-line fittings. Place a new dual plane seal on the fitting covers and install them, finally connecting the suction and liquid lines to the valve. Attach the tapping block to the expansion valve with the nut, tightening them to 23 N.m. After that, set the bolt connecting the refrigerant line bracket to the shock tower to 11 N.m. Link the wire to the A/C pressure transducer, place the negative cable back on the battery, evacuate the refrigerant system and finally charge it.
Related 2006 Dodge Charger Parts
 2006 Dodge Charger Blower Motor
 2006 Dodge Charger A/C Condenser
 2006 Dodge Charger Heater Core
 2006 Dodge Charger Blower Motor Resistor
 2006 Dodge Charger Evaporator
 2006 Dodge Charger A/C Accumulator
 2006 Dodge Charger A/C Clutch
 2006 Dodge Charger A/C Compressor
 2006 Dodge Charger A/C Hose
 2006 Dodge Charger A/C Switch
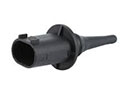 2006 Dodge Charger Ambient Temperature Sensor
 2006 Dodge Charger HVAC Pressure Switch