JeepParts
My Garage
My Account
Cart
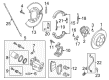
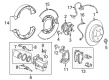
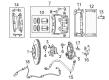
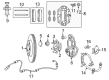
OEM 2006 Dodge Charger Brake Caliper
Caliper- Select Vehicle by Model
- Select Vehicle by VIN
Select Vehicle by Model
orMake
Model
Year
Select Vehicle by VIN
For the most accurate results, select vehicle by your VIN (Vehicle Identification Number).
12 Brake Calipers found


2006 Dodge Charger Caliper Assembly, Red, Front Driver Side Part Number: 5175107AB
$636.90 MSRP: $960.00You Save: $323.10 (34%)Ships in 1-2 Business DaysProduct Specifications- Other Name: Caliper - Disc Brake; Disc Brake Caliper, Front Left; Caliper Assembly Disc Brake Front with Pistons, Seal Boots, and Bleeder Screw.
- Position: Front Driver Side
- Replaces: 5175107AA
- Item Weight: 12.80 Pounds
- Item Dimensions: 6.1 x 10.2 x 10.0 inches
- Condition: New
- Fitment Type: Direct Replacement
- SKU: 5175107AB
- Warranty: This genuine part is guaranteed by Mopar's factory warranty.


2006 Dodge Charger Caliper Assembly, Red, Front Passenger Side Part Number: 5175106AB
$636.90 MSRP: $960.00You Save: $323.10 (34%)Ships in 1-2 Business DaysProduct Specifications- Other Name: Caliper - Disc Brake; Disc Brake Caliper, Front Right; Caliper Assembly Disc Brake Front with Pistons, Seal Boots, and Bleeder Screw.
- Position: Front Passenger Side
- Replaces: 5175106AA
- Item Weight: 15.80 Pounds
- Item Dimensions: 10.4 x 10.5 x 6.5 inches
- Condition: New
- Fitment Type: Direct Replacement
- SKU: 5175106AB
- Warranty: This genuine part is guaranteed by Mopar's factory warranty.

2006 Dodge Charger Caliper Assembly, Black/Red, Rear Passenger Side Part Number: 5175108AA
$651.58 MSRP: $982.00You Save: $330.42 (34%)Ships in 1-2 Business DaysProduct Specifications- Other Name: Caliper - Disc Brake; Disc Brake Caliper, Rear Right; Caliper; Caliper Assembly Disc Brake Rear; Caliper Disc Brake; Brake Caliper
- Position: Rear Passenger Side
- Item Weight: 7.60 Pounds
- Item Dimensions: 9.8 x 9.6 x 8.8 inches
- Condition: New
- Fitment Type: Direct Replacement
- SKU: 5175108AA
- Warranty: This genuine part is guaranteed by Mopar's factory warranty.
2006 Dodge Charger Caliper Assembly, Black/Red, Rear Driver Side Part Number: 5175109AA
$440.72 MSRP: $982.00You Save: $541.28 (56%)Ships in 1-2 Business DaysProduct Specifications- Other Name: Caliper - Disc Brake; Disc Brake Caliper, Rear Left; Caliper; Caliper Assembly Disc Brake Rear; Caliper Disc Brake; Brake Caliper
- Position: Rear Driver Side
- Item Weight: 5.90 Pounds
- Item Dimensions: 9.5 x 7.5 x 7.4 inches
- Condition: New
- Fitment Type: Direct Replacement
- SKU: 5175109AA
- Warranty: This genuine part is guaranteed by Mopar's factory warranty.

2006 Dodge Charger Caliper, Rear Driver Side Part Number: 68548611AA
$82.71 MSRP: $180.00You Save: $97.29 (55%)Ships in 1-2 Business DaysProduct Specifications- Other Name: Caliper - Disc Brake; Disc Brake Caliper, Rear Left
- Position: Rear Driver Side
- Replaces: 5142563AA, 5142563AB
- Condition: New
- Fitment Type: Direct Replacement
- SKU: 68548611AA
- Warranty: This genuine part is guaranteed by Mopar's factory warranty.
2006 Dodge Charger Caliper Assembly, Front Driver Side Part Number: 68548603AA
$139.00 MSRP: $207.00You Save: $68.00 (33%)Ships in 1-2 Business DaysProduct Specifications- Other Name: Caliper - Disc Brake; Disc Brake Caliper, Front Left; Brake Caliper; Caliper
- Position: Front Driver Side
- Replaces: 5140824AA, 5142557AA, 5142557AB
- Condition: New
- Fitment Type: Direct Replacement
- SKU: 68548603AA
- Warranty: This genuine part is guaranteed by Mopar's factory warranty.
2006 Dodge Charger Caliper Assembly, Front Passenger Side Part Number: 68548602AA
$100.95 MSRP: $219.00You Save: $118.05 (54%)Ships in 1-2 Business DaysProduct Specifications- Other Name: Caliper - Disc Brake; Disc Brake Caliper, Front Right; Brake Caliper; Caliper
- Position: Front Passenger Side
- Replaces: 5142556AA, 5140823AA, 5142556AB
- Condition: New
- Fitment Type: Direct Replacement
- SKU: 68548602AA
- Warranty: This genuine part is guaranteed by Mopar's factory warranty.
2006 Dodge Charger Caliper, Rear Passenger Side Part Number: 68548610AA
$137.88 MSRP: $205.00You Save: $67.12 (33%)Ships in 1-3 Business DaysProduct Specifications- Other Name: Caliper - Disc Brake; Disc Brake Caliper, Rear Right; Brake Caliper
- Position: Rear Passenger Side
- Replaces: 5142562AA, 5142562AB
- Condition: New
- Fitment Type: Direct Replacement
- SKU: 68548610AA
- Warranty: This genuine part is guaranteed by Mopar's factory warranty.
2006 Dodge Charger Caliper, Rear Driver Side Part Number: 68548609AA
$133.42 MSRP: $200.00You Save: $66.58 (34%)Product Specifications- Other Name: Caliper - Disc Brake; Disc Brake Caliper, Rear Left; Brake Caliper
- Position: Rear Driver Side
- Replaces: 5142565AB, 5142565AA
- Condition: New
- Fitment Type: Direct Replacement
- SKU: 68548609AA
- Warranty: This genuine part is guaranteed by Mopar's factory warranty.
2006 Dodge Charger Caliper Assembly, Front Passenger Side Part Number: 68548604AA
$168.42 MSRP: $250.00You Save: $81.58 (33%)Ships in 1-3 Business DaysProduct Specifications- Other Name: Caliper - Disc Brake; Disc Brake Caliper, Front Left, Front Right; Brake Caliper; Caliper
- Position: Front Passenger Side
- Replaces: 5137670AB, 5137670AA
- Condition: New
- Fitment Type: Direct Replacement
- SKU: 68548604AA
- Warranty: This genuine part is guaranteed by Mopar's factory warranty.
2006 Dodge Charger Caliper, Rear Passenger Side Part Number: 68548608AA
$132.31 MSRP: $199.00You Save: $66.69 (34%)Ships in 1-2 Business DaysProduct Specifications- Other Name: Caliper - Disc Brake; Disc Brake Caliper, Rear Right; Brake Caliper
- Position: Rear Passenger Side
- Replaces: 5142564AA, 5142564AB
- Condition: New
- Fitment Type: Direct Replacement
- SKU: 68548608AA
- Warranty: This genuine part is guaranteed by Mopar's factory warranty.
2006 Dodge Charger Caliper Assembly, Front Passenger Side Part Number: 68548605AA
$165.76 MSRP: $250.00You Save: $84.24 (34%)Product Specifications- Other Name: Caliper - Disc Brake; Disc Brake Caliper, Front Left, Front Right; Brake Caliper; Caliper
- Position: Front Passenger Side
- Replaces: 5137671AB, 5137671AA
- Condition: New
- Fitment Type: Direct Replacement
- SKU: 68548605AA
- Warranty: This genuine part is guaranteed by Mopar's factory warranty.
2006 Dodge Charger Brake Caliper Parts and Q&A
- Q: How to Service and Repair a Brake Caliper on 2006 Dodge Charger?A: The process starts by detaching the battery negative cable from its post and making sure it is not touching anything. To protect the master cylinder from losing brake fluid, quickly depress the brake pedal 2.5 centimeters past its first inch with a brake pedal holding tool. Lift the vehicle and take off the nuts holding down the wheel mount. Unscrew the banjo bolt, toss the old washers and put on new ones when putting the hose connection together. Having the guide pins pressed in, unscrew the caliper guide pin bolts and withdraw the brake caliper from the adapter and pads. Wash and examine the caliper first and don't let high-pressure air push out the piston, as this may hurt you. Pour the brake fluid out of the caliper, grip the caliper in a vise with dam members and cover the piston with a cushioning wooden block before removal. Apply compressed air to reduce the pressure and follow it by removing the piston. Remove and throw away the dust boot with the proper removal tool and remove the piston seal from its groove using a soft tool. Alcohol or a good solvent should be used to clean the piston bore and drilled passageways and then each area should be checked carefully for any damage. When the caliper inspection fails, you have a choice: recondition it with new seals and dust boots or simply change it with a new one. Make certain the caliper housing is clean and has no water, smear the piston, seals and bore with clean brake fluid and then place a new piston seal inside the groove of the caliper bore. Screw on the dust boot over the piston, secure it and then push the piston into the opening in the caliper. Place Handle C-4171 into the caliper counterbore and align its Special Tool 9314 as you push in the dust boot to seats it. Insert the bleeder screw into the correct threaded hole and tighten it to 15 Nm, afterward put the caliper on the vehicle. Before installing, retract the piston all the way into the bore so it does not get damaged by using a wood block. Set the caliper onto the disc brake adapter, pay attention not to cross-thread the caliper's guide pins and tighten the bolts to 31 Nm torque. Add some new washers to the caliper, screw on the banjo bolt and tighten it to the required tightness of 50 Nm. Fit back the tire and wheel assembly and secure the wheel mounting nuts to 150 Nm torque. Lift up the vehicle, take off the brake holding tool, reattach the negative battery cable, check the brakes for any leaks, bleed the brake hydraulic system when needed and go for a road test.
Related 2006 Dodge Charger Parts
 2006 Dodge Charger ABS Control Module
 2006 Dodge Charger Brake Caliper Bracket
 2006 Dodge Charger Brake Caliper Piston
 2006 Dodge Charger Brake Disc
 2006 Dodge Charger Brake Dust Shield
 2006 Dodge Charger Brake Line
 2006 Dodge Charger Brake Pad
 2006 Dodge Charger Hydraulic Hose
 2006 Dodge Charger Parking Brake Cable
 2006 Dodge Charger Parking Brake Shoe
 2006 Dodge Charger Wheel Bearing Dust Cap
 2006 Dodge Charger Wheel Stud