JeepParts
My Garage
My Account
Cart
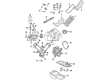
OEM 2006 Dodge Dakota Rod Bearing
Engine Connecting Rod Bearing- Select Vehicle by Model
- Select Vehicle by VIN
Select Vehicle by Model
orMake
Model
Year
Select Vehicle by VIN
For the most accurate results, select vehicle by your VIN (Vehicle Identification Number).
2 Rod Bearings found


2006 Dodge Dakota Bearings Part Number: 68052222AB
$18.13 MSRP: $26.80You Save: $8.67 (33%)Ships in 1-2 Business DaysProduct Specifications- Other Name: Bearing - Connecting Rod; Engine Connecting Rod Bearing Set; Connecting Rod Bearing Set; Rod Bearing; Bearing Kit Connecting Rod Standard See Note
- Replaces: 5019447AA, 68052222AA
- Item Weight: 0.50 Pounds
- Item Dimensions: 3.9 x 2.6 x 2.0 inches
- Condition: New
- Fitment Type: Direct Replacement
- Require Quantity: 6
- SKU: 68052222AB
- Warranty: This genuine part is guaranteed by Mopar's factory warranty.


2006 Dodge Dakota Bearings Part Number: 5012363AE
$16.87 MSRP: $25.00You Save: $8.13 (33%)Ships in 1-2 Business DaysProduct Specifications- Other Name: Bearing - Connecting Rod; Rod Bearing; Bearing Kit Connecting Rod Standard See Note; Bearing Kit Connecting Rod Standard
- Replaces: 5012363AC, 5012363AD, 5018584AB, 5012363AB
- Item Weight: 0.50 Pounds
- Item Dimensions: 4.0 x 2.7 x 2.0 inches
- Condition: New
- Fitment Type: Direct Replacement
- SKU: 5012363AE
- Warranty: This genuine part is guaranteed by Mopar's factory warranty.
2006 Dodge Dakota Rod Bearing Parts and Q&A
- Q: How to Inspect and Replace Rod Bearings on 2006 Dodge Dakota?A: Look for evidence of scoring and normal wear in the connecting rod bearings. If any rim is distorted, damaged, cracked or looks abnormal, replace it. Look for scoring, nicks or burrs on the journals of the connecting rods, as bent rods can result in unusually worn pistons, piston rings, cylinder walls, connecting rod bearings and crankshaft connecting rod journals. If the rod wearing or damages confirm a misalignment, check its position and change any that are crooked, twisted or bent. Lubricate the upper bearing insert after cleaning the connecting rod portion and then fit and centralize it in the rod. Check the depth at two points and ensure it's less than 0.50mm (.0196 inch). Take care to have the oil slinger on the rod point towards the front and the F near the piston pointed towards the front as you install the assembly with the piston ring compressor and the special tool. While centering the lower bearing insert in the bearing cap, put a ribbon of Plastigage across the full width of the lower insert at the center of the cap and make certain it does not break. Fix the bearing cap and the connecting rod onto the journal and set all bolts at 27 Nm (20 ft. lbs.) plus 90° without moving the crankshaft. Pull off the bearing cap and check the width of the compressed Plastigage to find out the bearing-to-journal clearance. This should be the same along the entire insert, because inconsistencies might be because of a tapered journal, bent rod or another cause. When the clearance is within limits, unwrap the Plastigage and continue with installation; for surplus clearance, find the suitable set of bearings and always forget to use reusable bolts on the connecting rods, because they are Torque to Yield and cannot be used twice. Repeat the Plastigage measurement before final assembly to confirm the bearing is adequate and when the proper insert is chosen, fix it and affix the cap, tightening the connecting rod bolts to 27 Nm (20 ft. lbs.) plus 90° of torque. After that, tidily insert a feeler gauge into the space between the connecting rod and the flange on the crankshaft. If the side clearance is not correct, remove the connecting rod.
Related 2006 Dodge Dakota Parts
 2006 Dodge Dakota Oil Pump
 2006 Dodge Dakota Cam Gear
 2006 Dodge Dakota Cylinder Head Gasket
 2006 Dodge Dakota Dipstick
 2006 Dodge Dakota Dipstick Tube
 2006 Dodge Dakota Engine Mount Bracket
 2006 Dodge Dakota Intake Valve
 2006 Dodge Dakota Lash Adjuster
 2006 Dodge Dakota Oil Pan Gasket
 2006 Dodge Dakota Piston Ring Set
 2006 Dodge Dakota Rocker Arm
 2006 Dodge Dakota Timing Chain Tensioner